User Guide: EdbuildSoft app
Welcome to the official EdbuildSoft app documentation. Here you will learn step-by-step how to make the most of all the tools we offer to optimize your workflow.
1. Getting started
To start using the application, you must log in with your credentials. If you are a new user, you will be sent an invitation to set up your password.
Note: We recommend using the latest version of Google Chrome.
2. Navigating the interface
The main interface is designed to be intuitive and facilitate seamless management. The system is clearly divided into two main regions: a side control panel (navigation menu) and the central workspace where information is displayed.
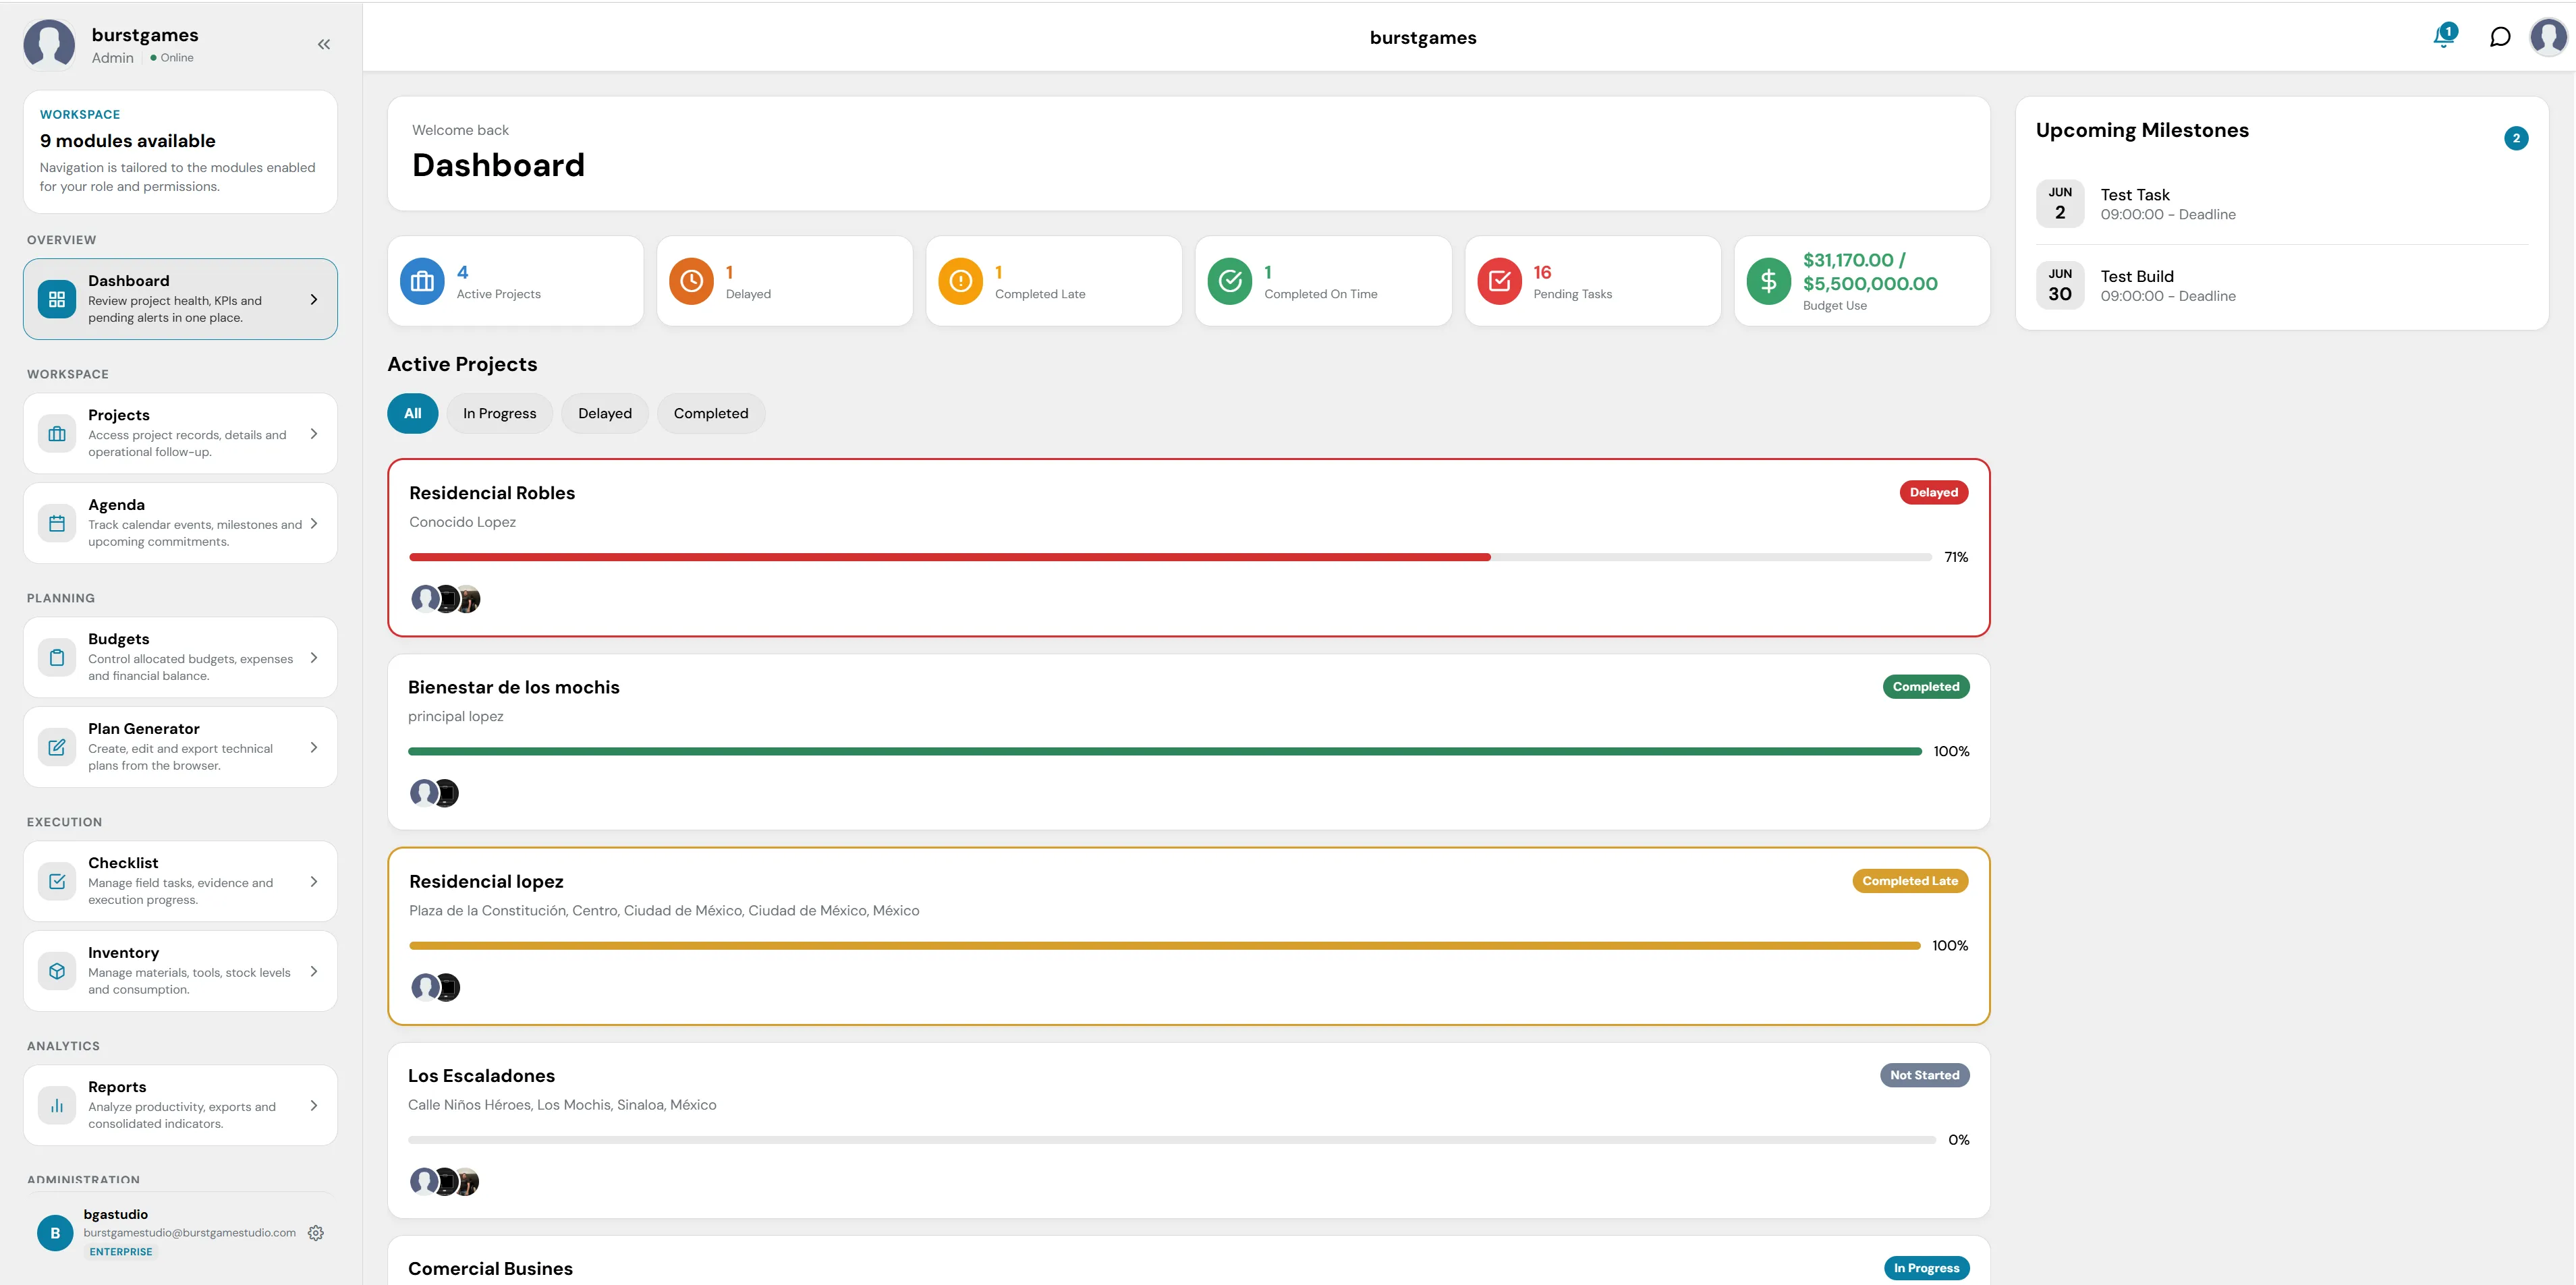
Figure 1: Main interface of the EdBuildSoft web platform.
A. Side Control Panel (Navigation Menu)
This panel is located on the left side of the screen and organizes system tools into hierarchical modules tailored to your role.
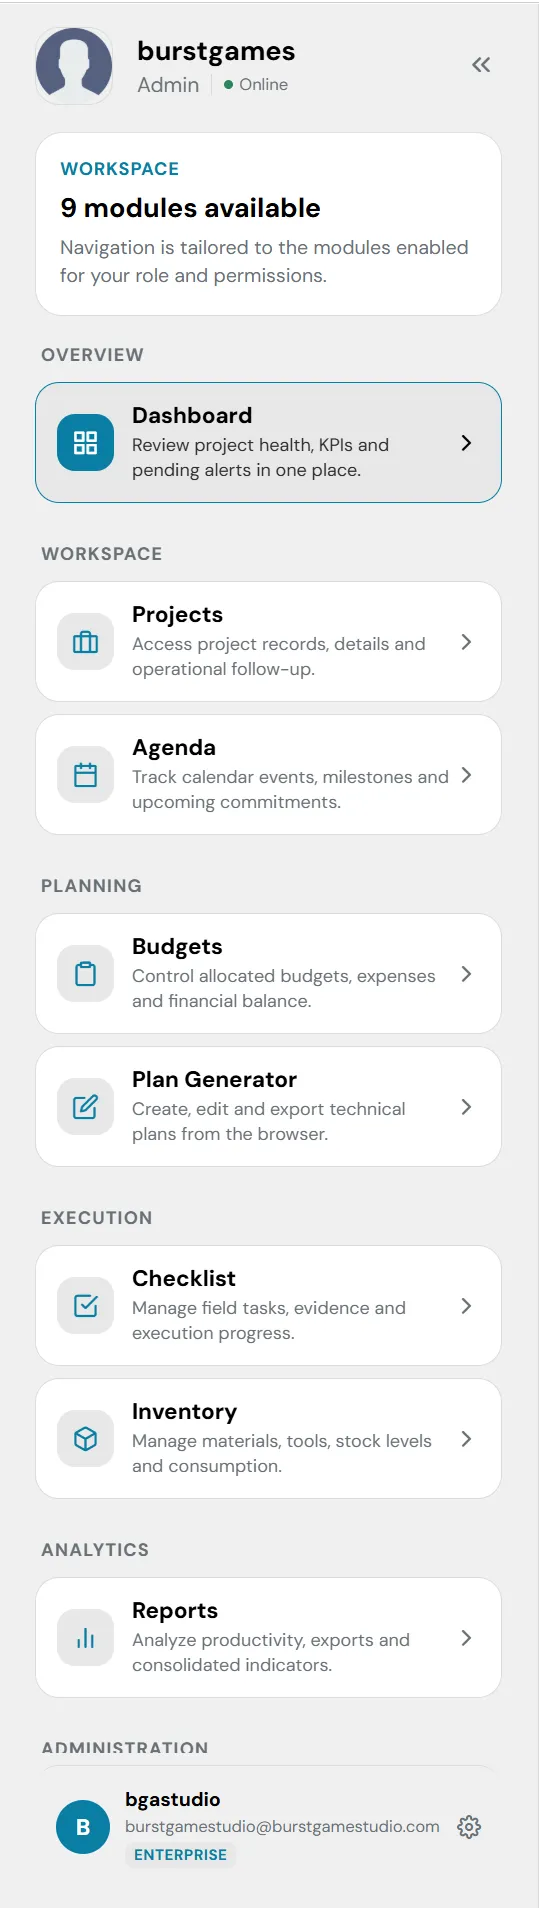
Detail of the side navigation menu.
- Organization Profile & Role: At the top, the workspace (burstgames), the user's role (Admin), and status (Online) are identified.
- Modules Indicator: An info box reminds you how many sections you have enabled based on your permissions (e.g. 9 modules available).
- OVERVIEW Section:
- Dashboard: Your general view with key metrics, performance charts, and global statuses of active projects.
- WORKSPACE Section:
- Projects: Direct access to the detailed list, historical logs, and operational tracking of each site.
- Agenda: Integrated calendar to view deadlines, upcoming commitments, and team milestones.
- PLANNING Section:
- Budgets: Financial control, allocated budgets, real-time expenses, and general balances.
- Plan Generator: Interactive tool to create, edit, and export technical plans directly from the browser.
- EXECUTION Section:
- Checklist: Field task management, photographic or documentary evidence collection, and daily progress control.
- Inventory: Monitoring and control of materials, tools, stock levels, and consumption on sites.
- ANALYTICS Section:
- Reports: Generation of advanced reports to analyze productivity, consolidated indicators, and data export.
- ADMINISTRATION & Settings Section:
- Profile Settings: Located in the bottom left corner, it shows your corporate account identifier. Clicking here gives you direct access to Settings to manage your user profile, preferences, and security credentials.
B. Central Workspace
It is the dynamic area of the system that changes according to the module selected in the side panel. By default, when logging in, you view the Dashboard, which primarily displays:
- Summary cards with critical metrics (active projects, delayed, pending tasks, and budget execution).
- Interactive and visual list of developing projects with their respective progress bars and status alerts.
- A secondary panel on the right focused exclusively on chronological Upcoming Milestones.
3. Module: Administrator
The Administrator module is the central panel for global system configuration. It is designed exclusively for high-level roles (such as Admin) and allows you to manage base catalogs, subscription plans, access levels, and organization users.

General view of the Administration module.
1. Module Header and Quick Access
Located at the top of the central workspace, it serves to identify the active section:
- Title and Subtitle: Shows the main label 'Administrator' accompanied by the operational description 'Manage catalogs and users'.
- Tag Buttons: Just below, two quick access buttons or organizational tags with descriptive icons are included: 6 modules and Quick access.
- Global Search Bar: A text field with the Search placeholder that allows you to quickly filter between the different configuration options and catalogs on this screen.
2. Section: Subscription
Block dedicated to commercial control, billing, and contracted license levels for the workspace:
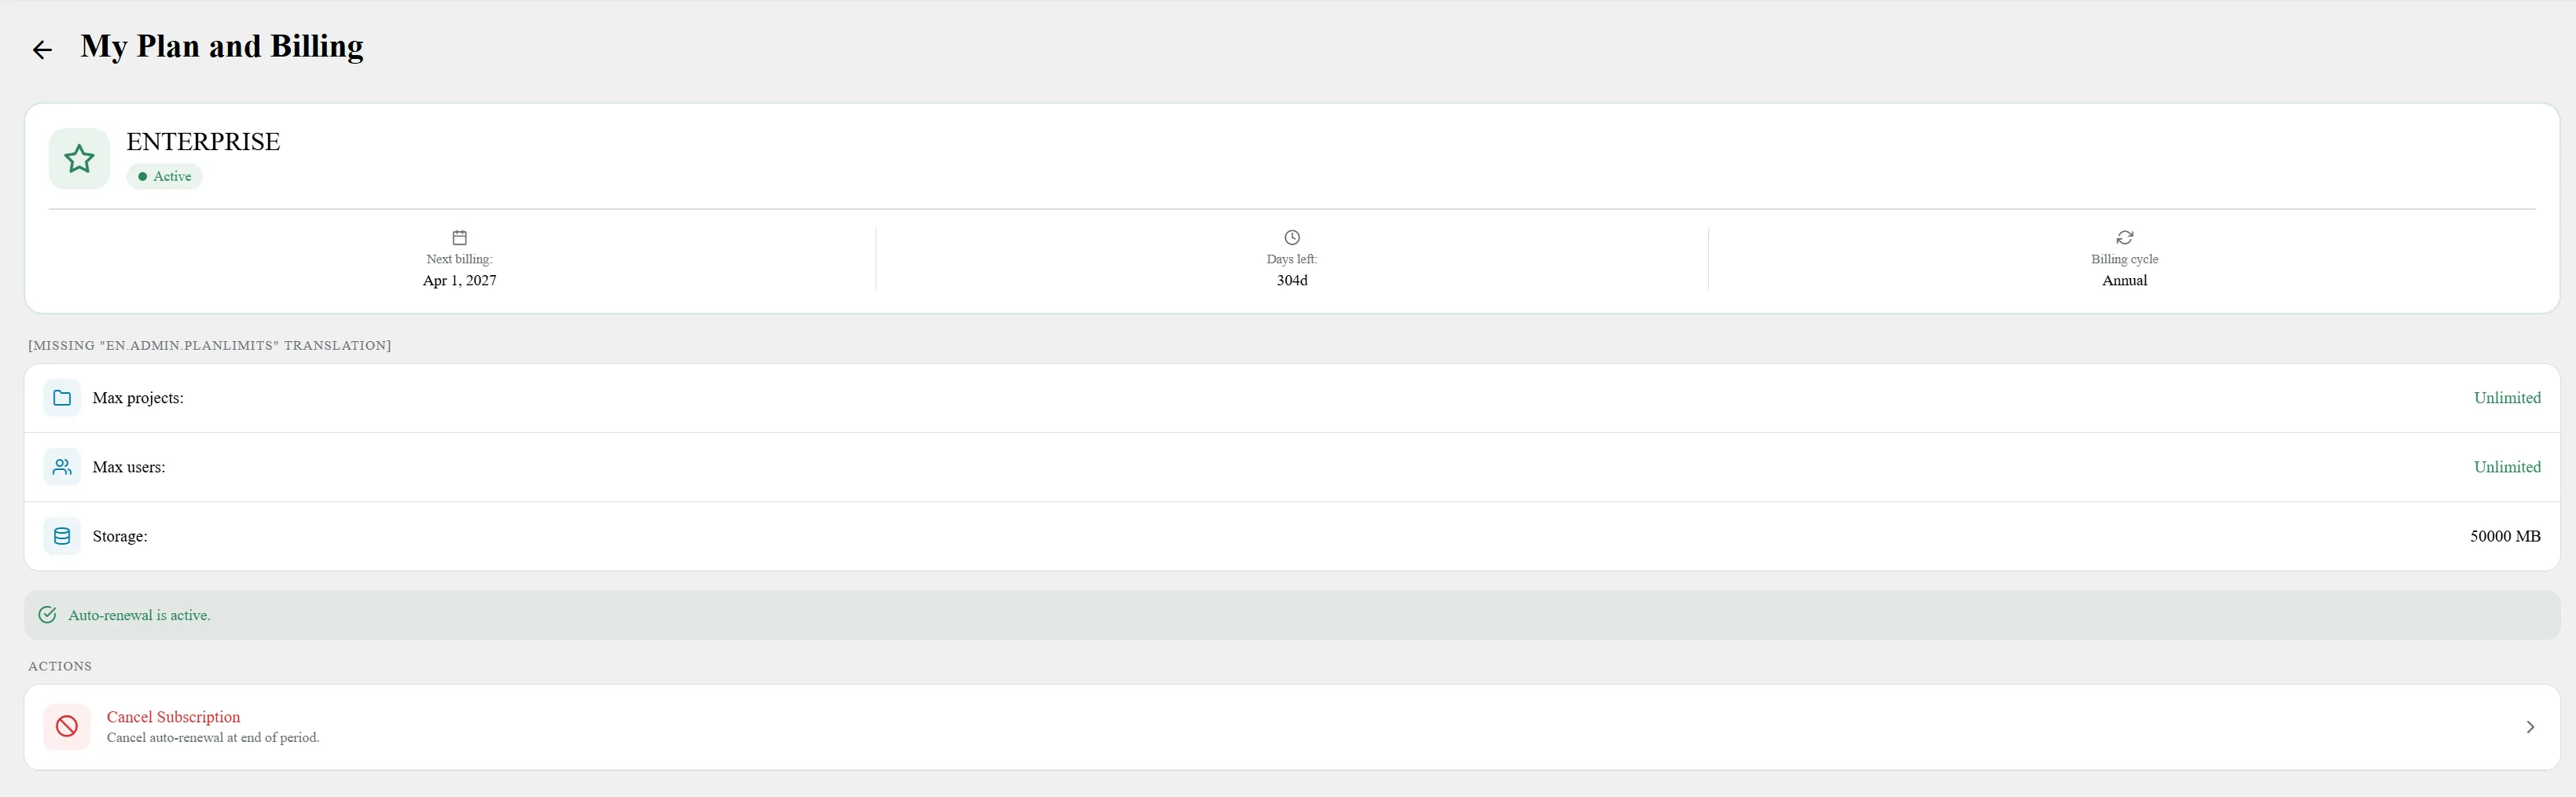
Details of your current plan and billing.
- My Plan and Billing: Allows you to view details of the current plan and manage the organization's payment methods or billing.
- View Plans: Interactive space to explore and compare the different subscription plans available on the platform to scale or modify the service.
3. Section: Catalogs
This section contains the templates and master databases that feed the behavior of the other work modules of the platform (such as Checklist, Agenda, and Budgets):
- Checklist Template: Allows you to define and structure standardized tasks that can be automatically preloaded in the checklists of new construction projects.
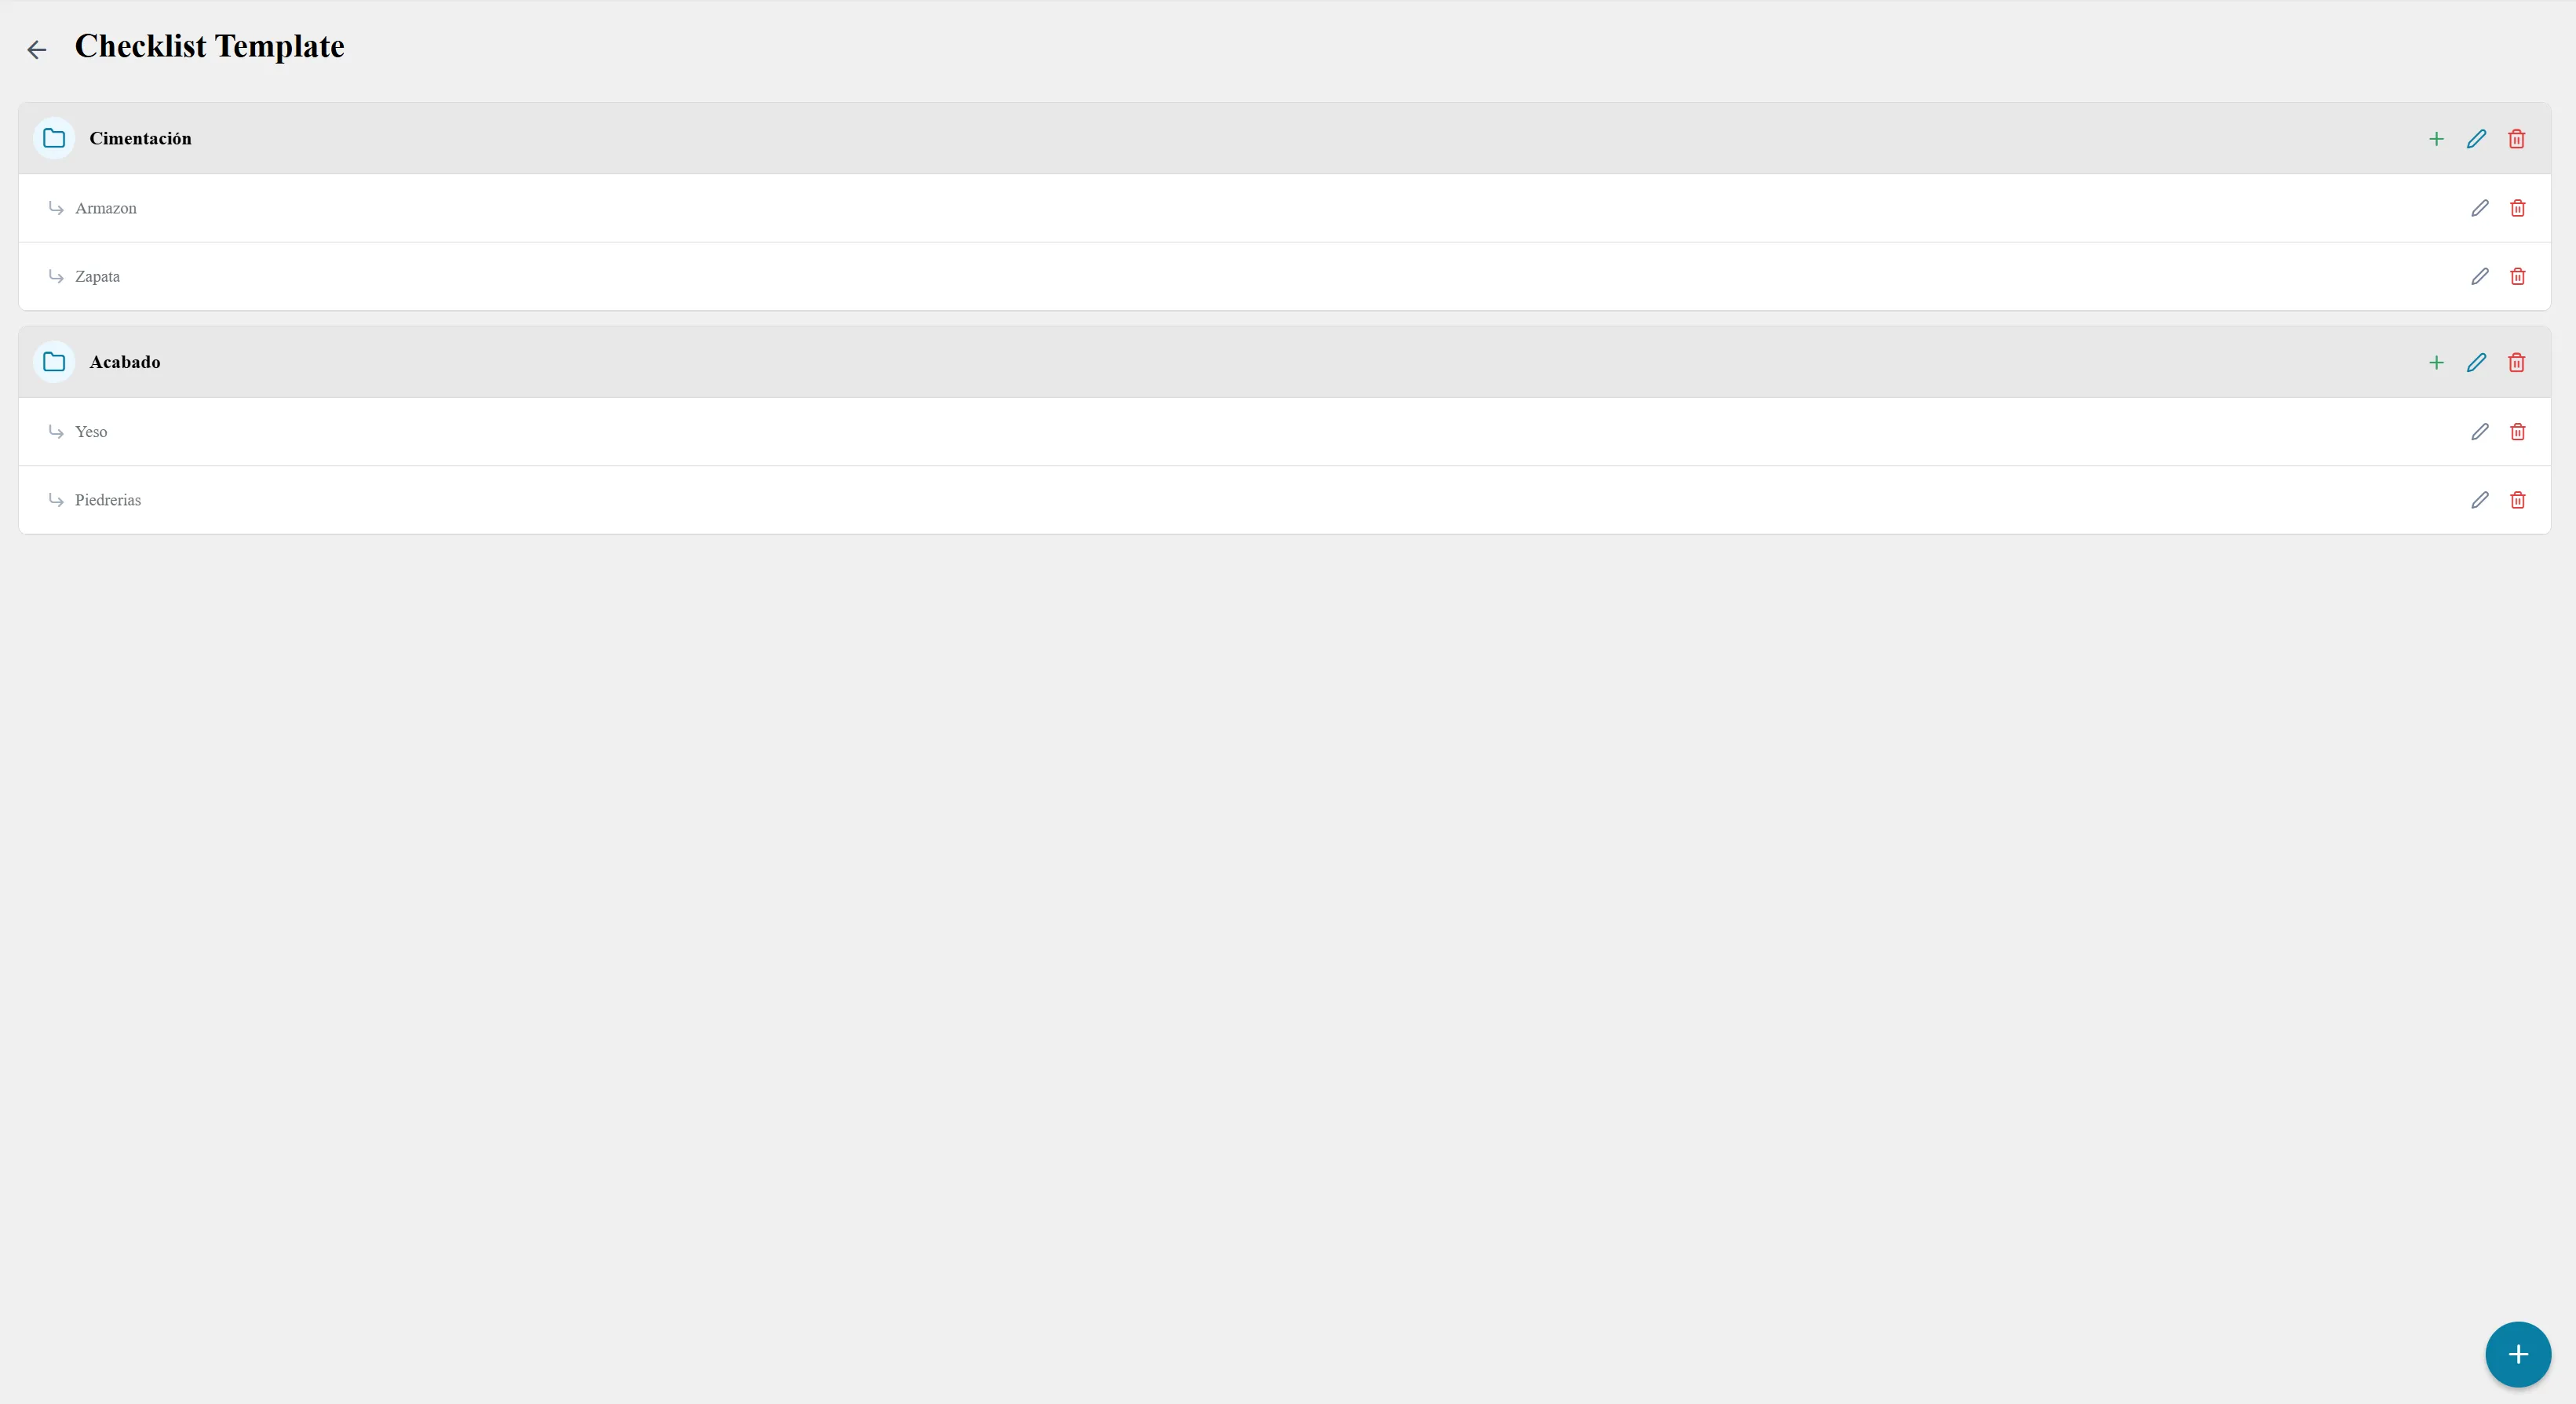
Configuration of the Checklist base template.
- Agenda Types: Configuration and administration of the different types of events, meetings, and milestones allowed in the system calendar.

Configuration of the system's agenda types.
- Document Categories: Classification and ordering of categories for documents uploaded to the system (e.g., contracts, blueprints, invoices).

System document and expense categories.
- Budget Categories: Master catalog to organize, name, and classify expense concepts and budget items.
4. Section: Roles & Permissions
Area focused on system security and access control based on team structure:
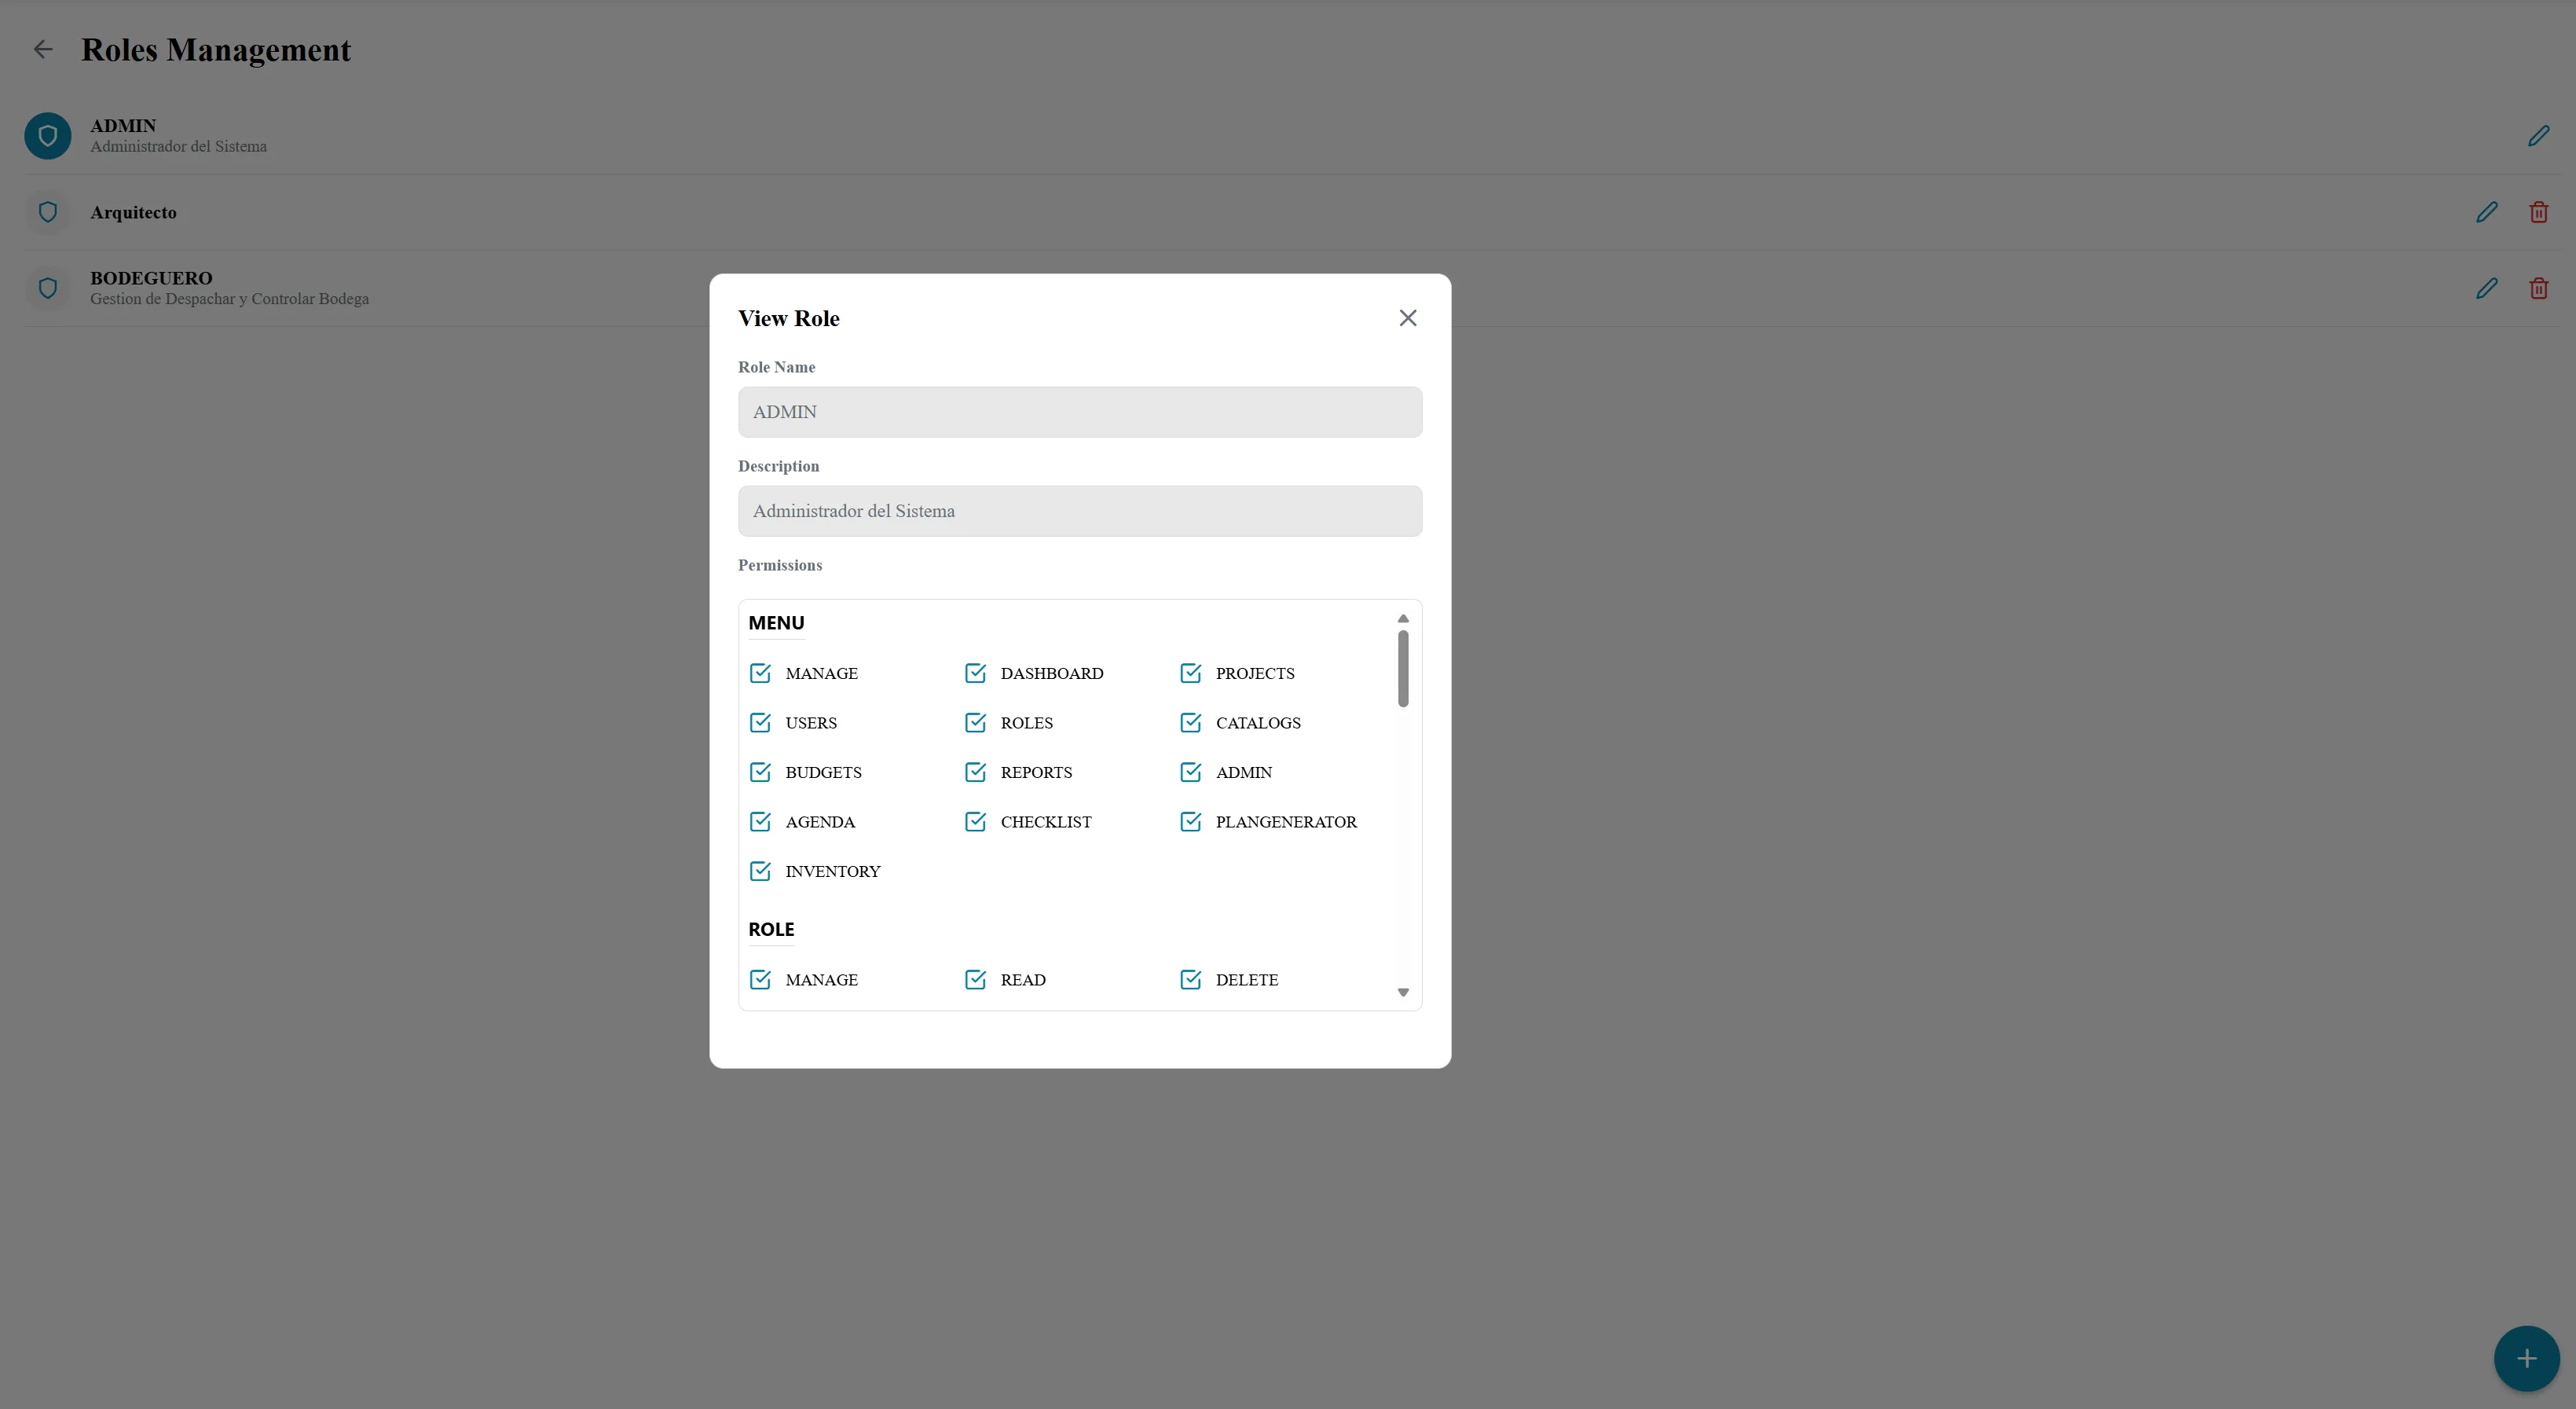
System roles and permissions management.
- Roles Management: Tool to create, edit, or delete system roles (e.g., Administrator, Site Supervisor, Client) and meticulously assign which modules and actions each is allowed to view or modify.
5. Section: Users
Located at the bottom of the administration panel:
- User Management: Control panel to register new collaborators, suspend access, edit staff information, and assign them a specific role within the organization.
4. Dashboard: Your Command Center
The Dashboard is the first screen you see when you log into the application. Here you will find a general overview of the status of your construction sites through Key Performance Indicators (KPIs) and your upcoming milestones.
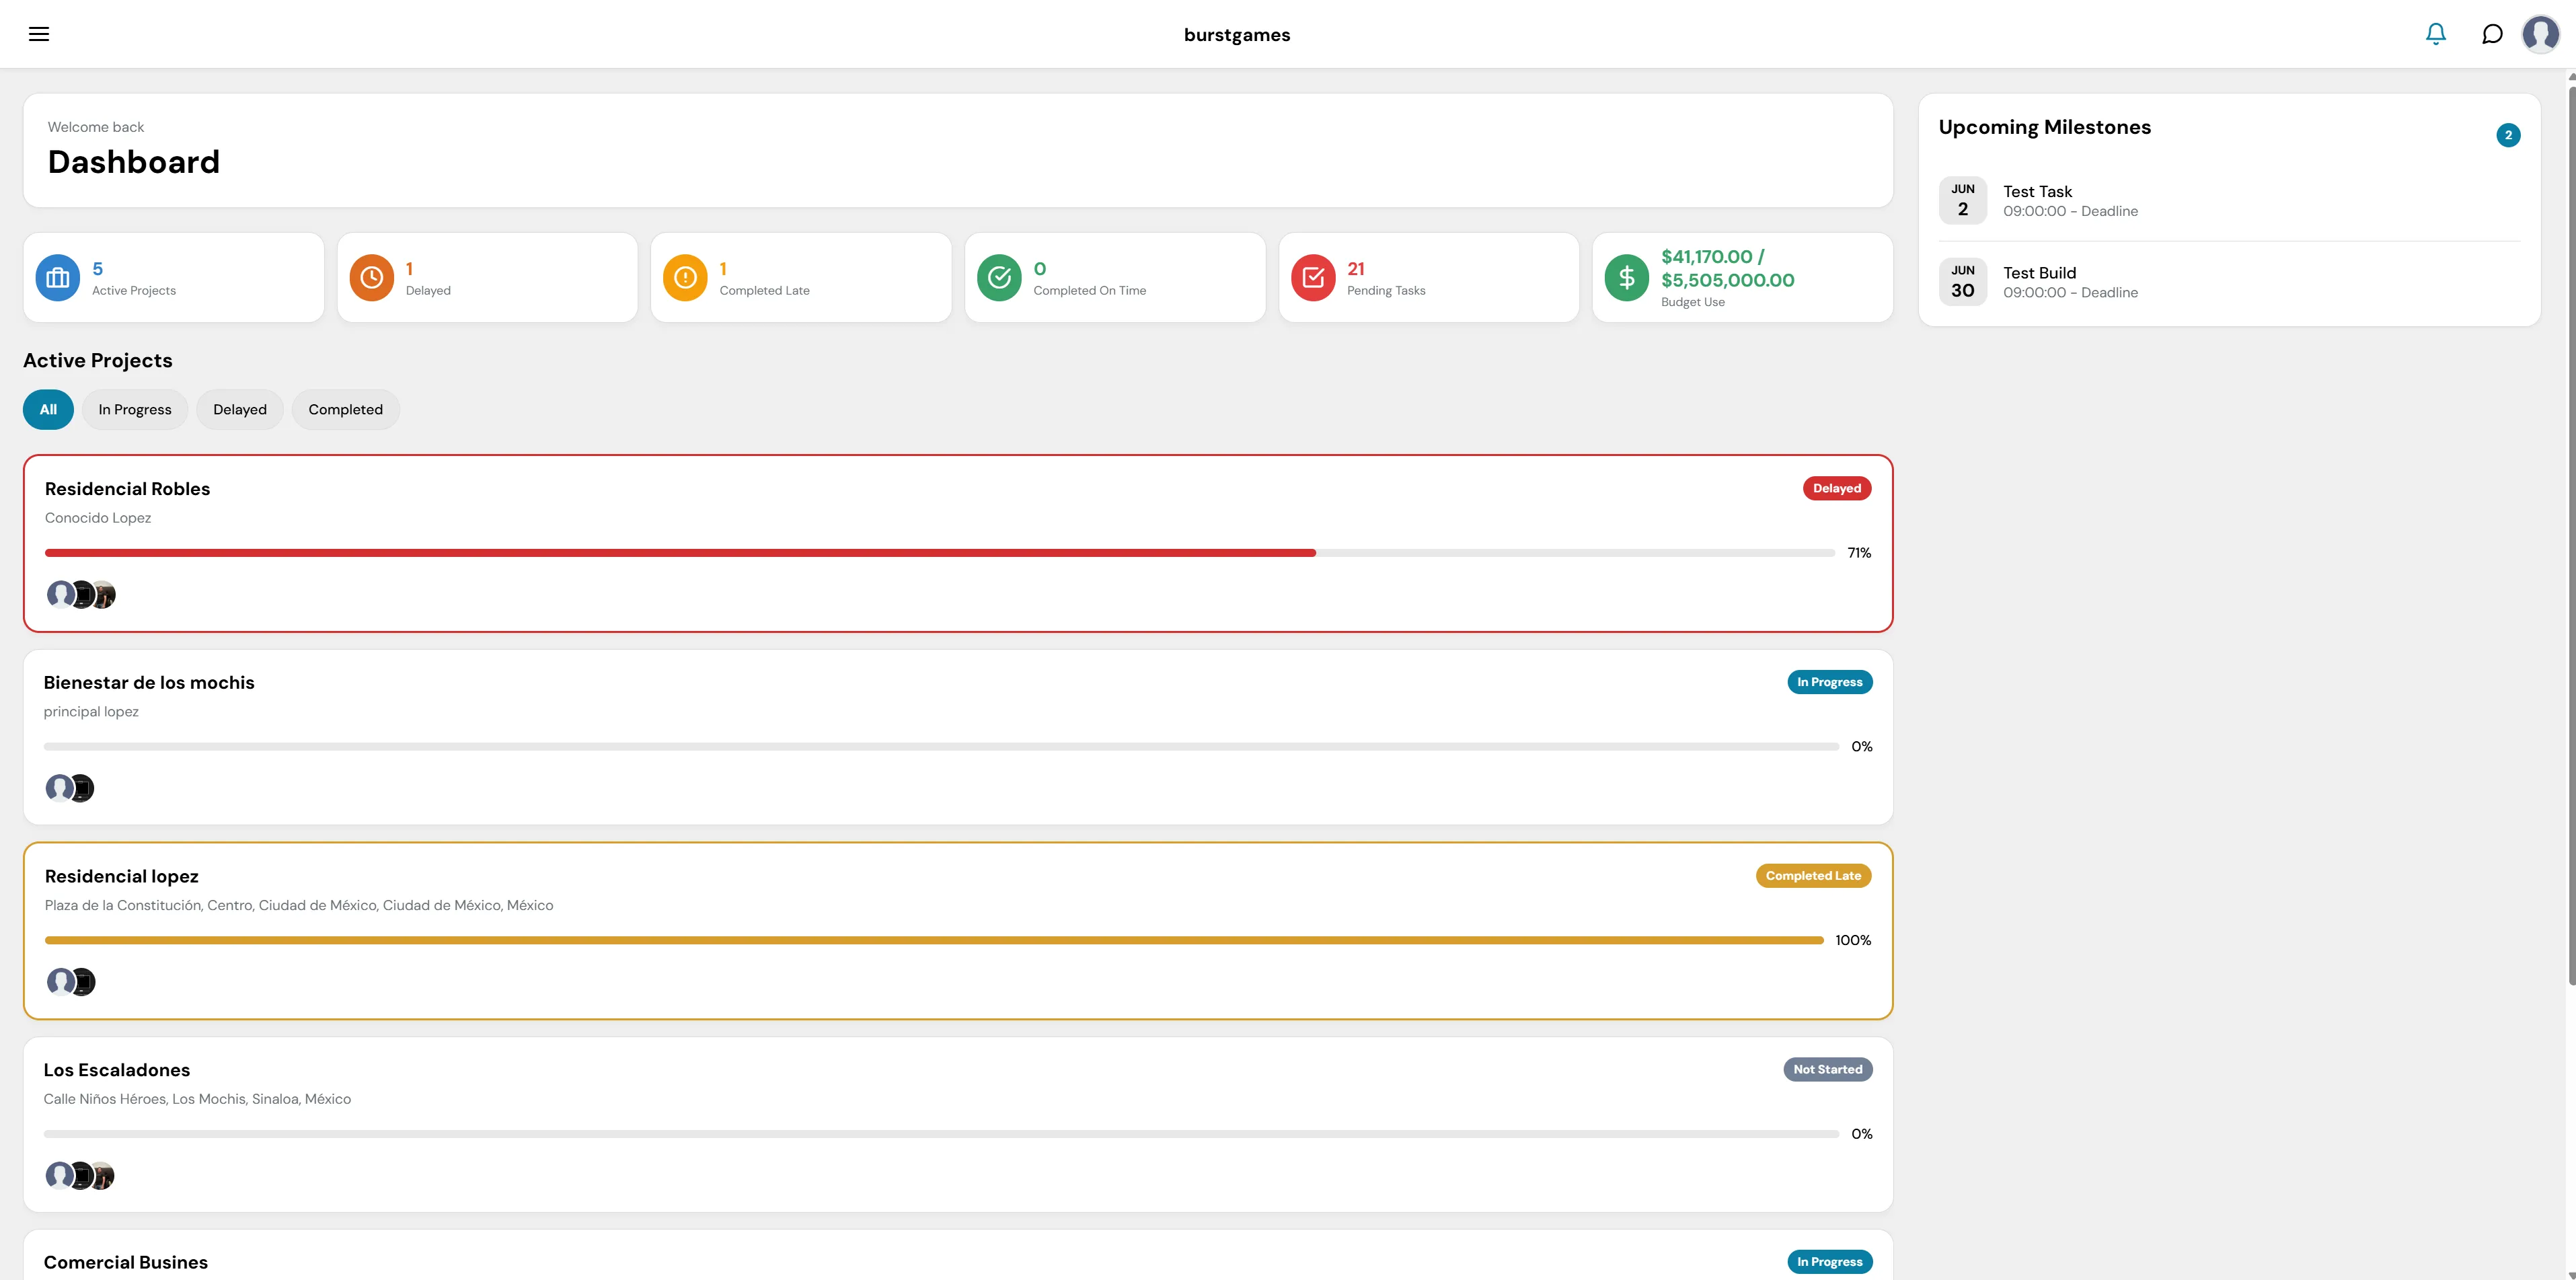
Figure 1: General view of the Dashboard with KPI cards.
Summary Section (Key Metrics)
Just below the welcome greeting and the 'Dashboard' title, a row of dynamic informative cards is presented:

Figure 2: Detail of the KPI cards.
- Active Projects (Blue): The total number of sites currently being executed.
- Delayed (Dark Orange): Sites that have passed their scheduled completion date.
- Completed Late (Yellow): Projects that have finished, but past the deadline.
- Completed On Time (Green): Sites successfully delivered within the established timeframe.
- Pending Tasks (Red): The total volume of tasks that still require action across all your blueprints.
- Budget Use (Financial Green): Displays a quick ratio of the executed budget versus the total allocated budget.
Active Projects View
This is the central section of the board, where developing sites are listed vertically.

Figure 3: View of active projects and their statuses.
- Status Filters: In the top left, quick buttons (All, In Progress, Delayed, Completed) are included to visually segment the list.
- Project Cards: Each project is represented by a container that includes:
- Name and Location: Main title of the site and associated physical address.
- Status Badge: A visual indicator with a specific color code for its current status (e.g. Delayed in red, In Progress in blue).
- Dynamic Borders: The left border of the card illuminates with the corresponding status color.
- Progress Bar: A horizontal line showing the project's actual progress percentage.
- Assigned Team: Circular icons in the bottom left corner showing linked team members.
- Access to Details: Clicking on any card will take you directly to the project's detailed view (we will cover this in depth later in the Projects module).
Side Panel: Upcoming Milestones
Located in the right column of the screen, this module chronologically organizes the closest critical events and deliverables:
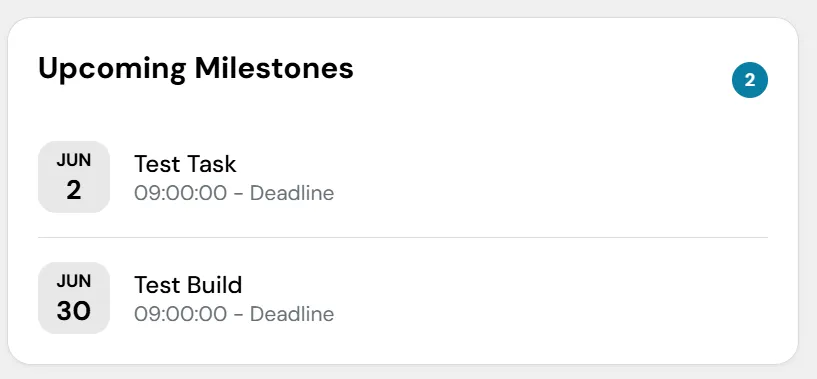
Figure 4: Upcoming milestones shown in the side panel.
- Milestone Counter: A blue numerical indicator shows the total upcoming events.
- Date Cards: Each milestone includes a calendar block on the left with the specific month and day, followed by the activity name and its deadline.
- Access to Agenda: Clicking on any milestone will redirect you directly to the Agenda module (explained later in this guide).
5. Module: Projects
The Projects module is the dedicated space for the management, supervision, and detailed tracking of all individual construction sites on the platform. Unlike the Dashboard, this section breaks down specific operational metrics, key dates, and organizational tools for each project.
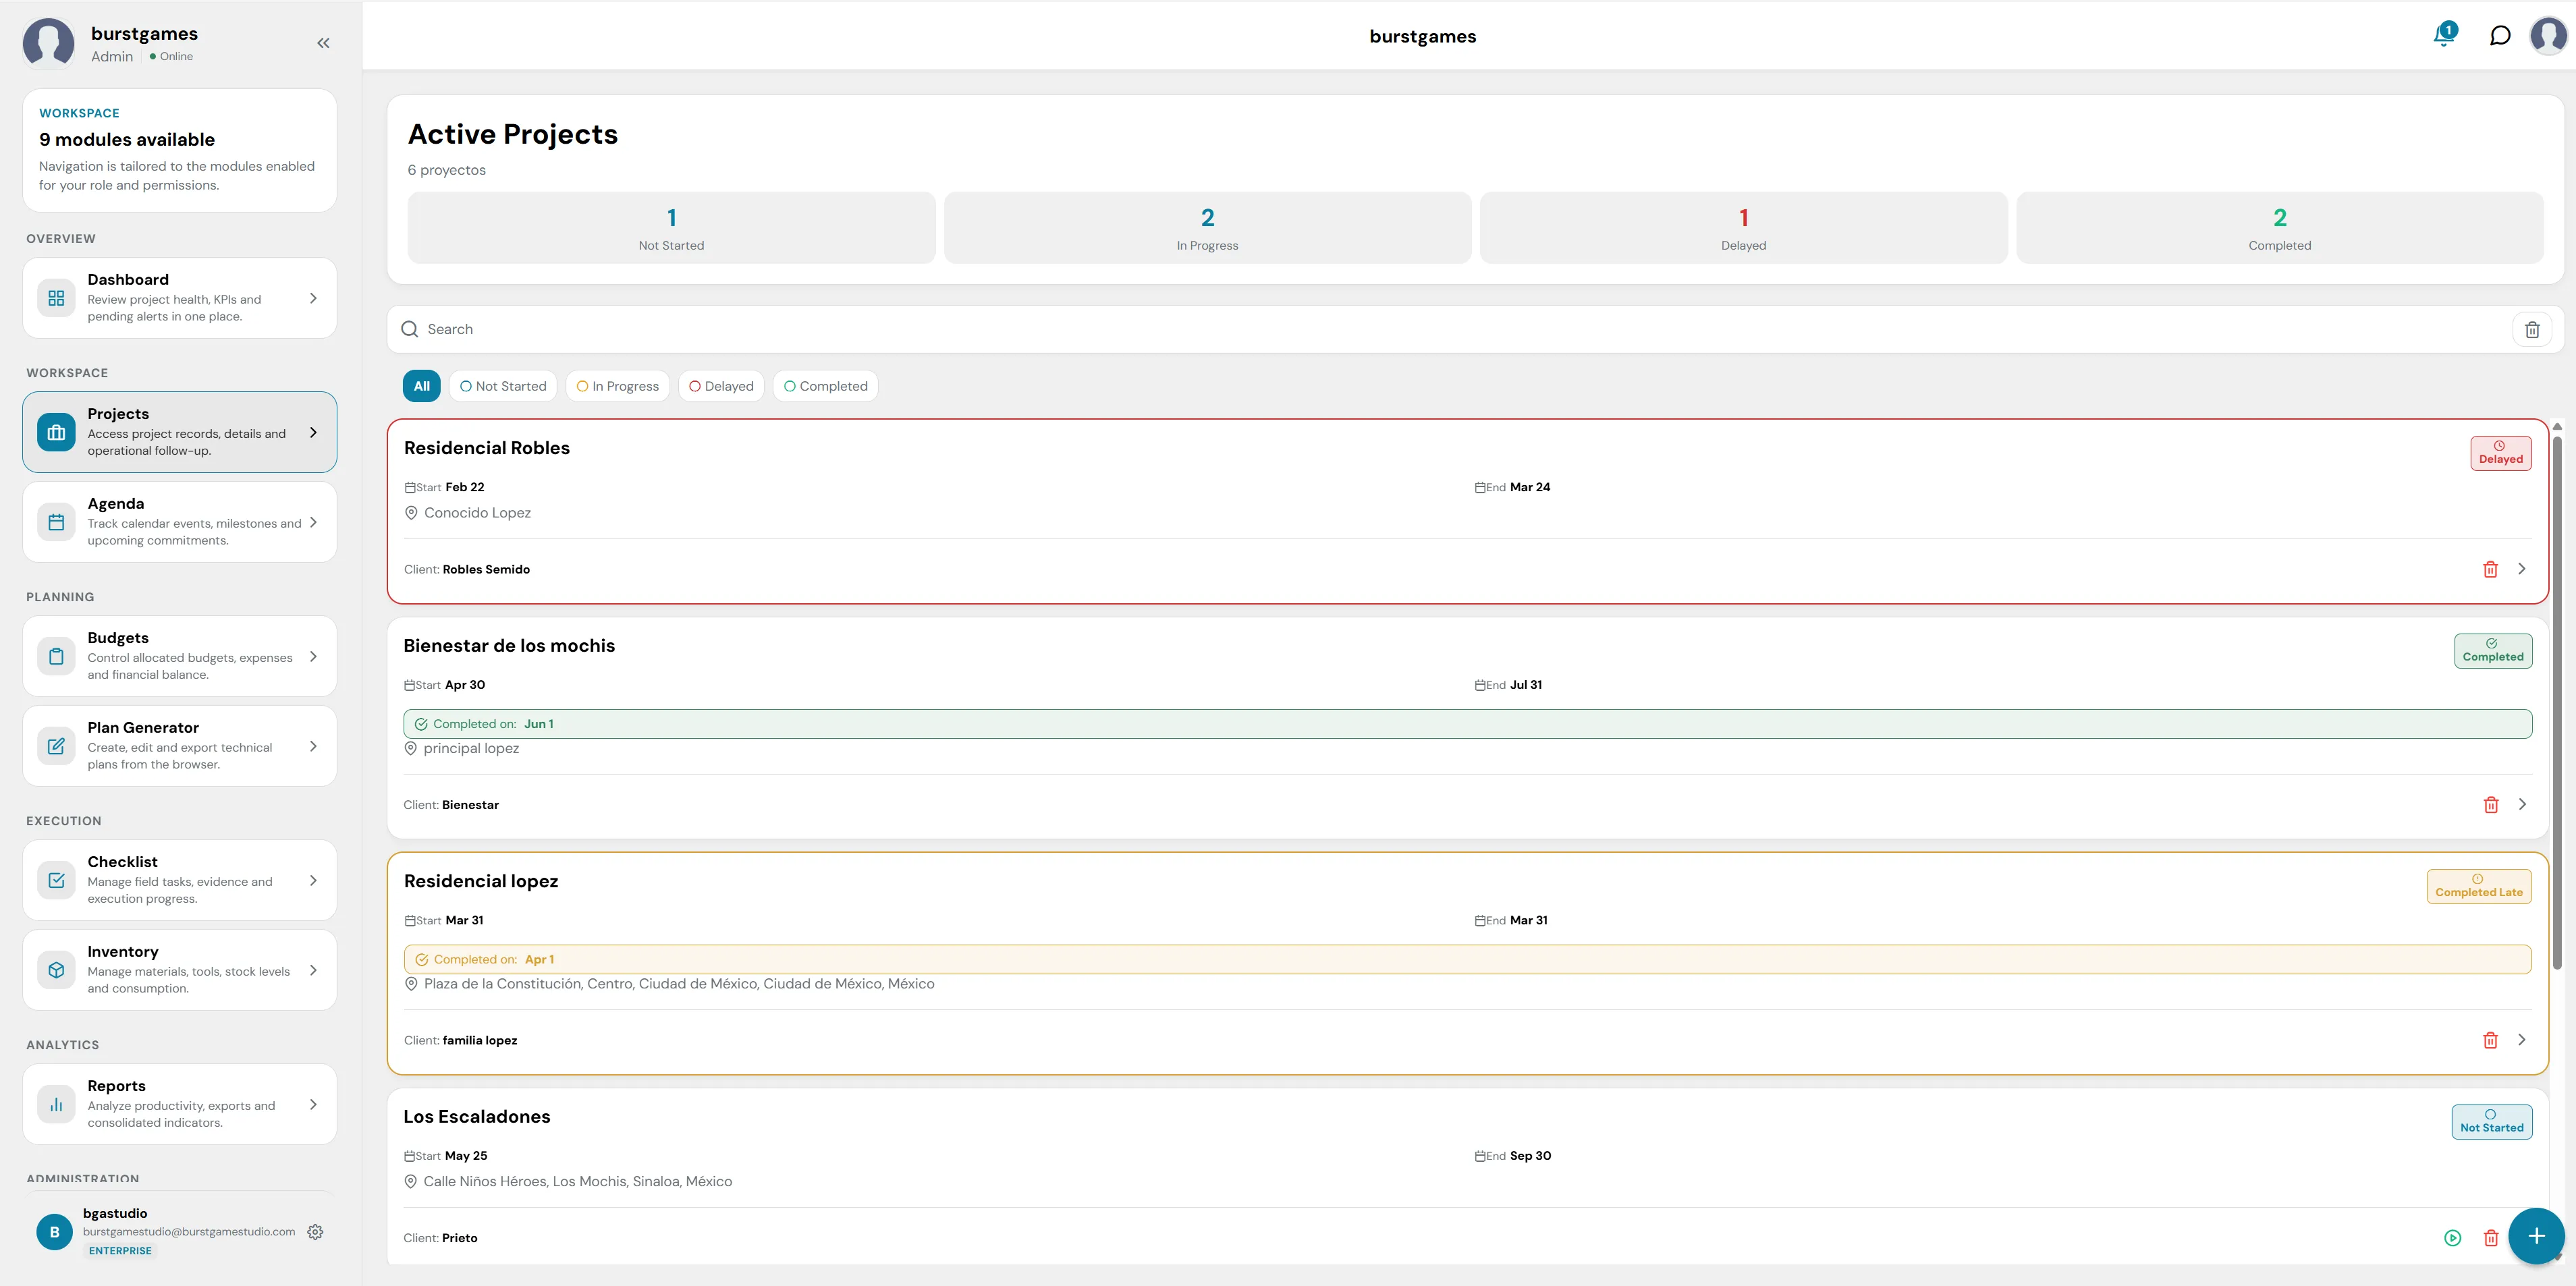
Figure 5: Main view of the Projects module.
1. Projects Statistical Summary (Top KPIs)
At the top of the workspace, a general counter is displayed accompanied by four horizontal cards that classify the current status of the sites:
- Not Started: Number of projects that have been created but whose start date has not yet been executed.
- In Progress: Projects currently in the development or active construction phase.
- Delayed: Alerts for projects that are delayed compared to their original planning.
- Completed: Sites that have been successfully finished.
2. Toolbar, Search, and Filters
Located immediately below the statistical summary, it allows you to quickly locate and segment the list of sites:
- Search Bar: A text field with a magnifying glass icon that allows you to filter projects by typing their name, client, or location. On its far right, it has a trash can button to quickly clear the entered text.
- Quick Status Filters: Interactive buttons with color codes to segment the visible list with a single click: All (Blue), Not Started (Gray), In Progress (Light Blue), Delayed (Red), Completed (Green).
- Deleted Projects (Trash): Clicking the trash icon located above the search bar will open a view with all deleted projects. You have a 30-day window to recover them before they are permanently deleted.

Figure 6: Deleted projects view and recovery option.
3. Detailed Project Cards
Each item in the list represents a project and transparently exposes its essential logistical data:
- Header and Status: The commercial name of the site is shown in bold, and in the upper right corner, a badge with the real-time status.
- Timeline: Indicates precisely the scheduled start day and estimated completion date (Start / End). For finished projects, it adds a highlighted line recording the exact closing date (Completed on).
- Location and Address: Identifies the assigned address or coordinates for the construction with a map icon.
- Client Information: In the lower left part of each card, the name or corporate name of the contracting party is specified.
- Quick Actions: In the lower right corner, shortcuts are integrated: a trash icon to delete/archive, and a navigation arrow (>) to access the internal detailed view.
4. Global Creation Button (Main Action)
In the bottom right corner of the screen is a floating blue button with a plus symbol (+). This control remains accessible at all times and serves as the primary trigger to create and register a new project in the system.
5. Project Details View
By clicking on any project card or its navigation arrow (>), the platform will display the Project Details View. This section offers an in-depth breakdown of the operational status, progress metrics, and general data of the selected site in a centralized manner.
The details header is composed of the following key elements:

View of the project details header and KPIs.
1. General Information Panel (Header)
In the upper left corner, the site's identification data is consolidated:
- Status Badge: A prominent visual indicator (e.g. Delayed in red) that immediately warns of the site's condition.
- Project Name: The main title assigned to the construction (e.g. Residencial Robles).
- Client and Location: Descriptive icons showing the contractor's name (Robles Semido) and registered physical address (Conocido Lopez).
- Lifecycle Dates: The official timeline with the start day (Start 2026-02-22) and the estimated closing date (End 2026-03-24).
2. Progress Bar and Quick Controls
- Dynamic Progress Bar: A horizontal line that lights up with the current status color to graphically indicate the completed execution percentage of the project (e.g. 71%).
- Global Action Buttons: In the upper right corner are two interactive tools:
- Clock Icon: History of changes or project timeline.
- Pencil Icon: Allows editing general data, modifying dates, or readjusting the initial parameters of the site.
3. Operational Metrics Row (KPIs)
Just below the progress, three informative cards are located with direct metrics on the advancement of field activities:
- Tasks (20/28): Indicates the ratio of completed tasks versus the total tasks assigned to the project. A lower progress bar helps visualize this indicator at a glance.
- Days Overdue (69): A critical counter in red that precisely calculates the number of accumulated days of lag or delay with respect to the original calendar.
- Blueprints (11): The total blueprints, architectural designs, or technical schemes linked and uploaded within this site's repository.
4. Team Management
In the lower strip of the container is the personnel control:
- Assigned Members: Shows the initials in colored circles (e.g. BG, AR, ER) corresponding to the engineers, supervisors, or collaborators who have permissions and responsibilities within this specific project.
6. Sub-module: Project Documents
Continuing within the project details, you will find the section dedicated to the management of files, blueprints, and receipts linked to the site. This sub-module acts as a centralized digital repository to store and organize all the technical and financial documentation of the selected project.
The interface is designed with the following components:
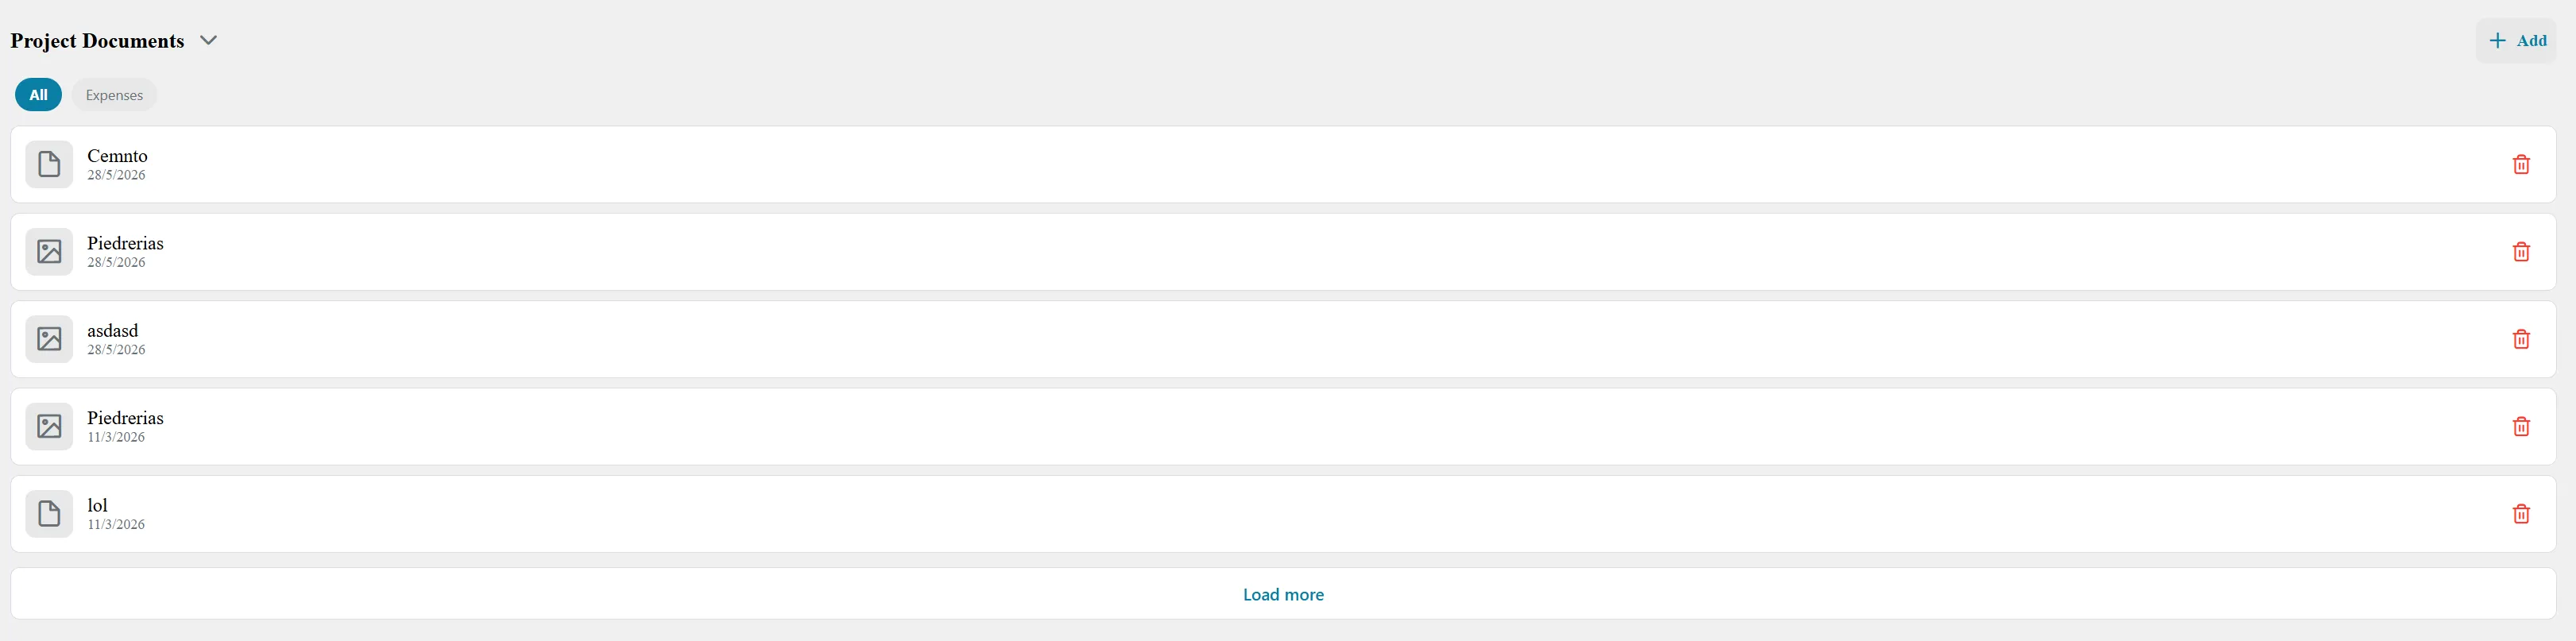
View of the Project Documents sub-module.
1. Header and Upload Control
- Section Dropdown (Project Documents ∨): Located in the upper left corner, this selector allows you to quickly switch between the different tabs or categories of the project's internal view.
- Add Button (+ Add): Located in the upper right corner, it is the main action that deploys a pop-up window or file explorer to upload new documents, images, or blueprints to the site's repository.
2. Category Filters
Just below the section title, interactive buttons are presented that allow you to visually segment the type of files shown in the list:
- All (Blue): Default filter that displays all uploaded files, regardless of their origin or classification.
- Expenses (Gray): Quick filter to isolate and view exclusively receipts, invoices, or files associated with the project's expenses and financial transactions.
3. Repository and File List
The central body of the section organizes documents in a clean, vertically stacked list format. Each row represents an individual file and includes:
- File Type Icon: Located at the beginning of each card, it helps visually identify the document format immediately:
- Document Icon: Represents text files, PDFs, or contracts (e.g. Cemnto, lol).
- Image/Gallery Icon: Indicates photographic files, field evidence captures, or conceptual images (e.g. Piedrerias, asdasd).
- File Metadata: Below the name of each file, the exact date it was uploaded to the system is transparently displayed (e.g. 28/5/2026 or 11/3/2026).
- Delete Action (Trash Icon): At the far right of each row, a red button with a trash icon is integrated that allows you to remove the document from the server (subject to user role permissions).
4. Pagination Control
- Load more Button: Located at the central base of the list, this control allows dynamically loading additional blocks of older documents in case the project has an extensive volume of files, avoiding saturation and optimizing page load times.
7. Sub-module: Interactive Plan
Continuing with the integrated tools in the project details, the platform offers the Interactive Plan module. This powerful web tool allows engineering, supervision, and administration teams to view architectural or engineering blueprints of the site and make annotations, geolocate tasks, and delimit areas in real time directly on the technical drawing.
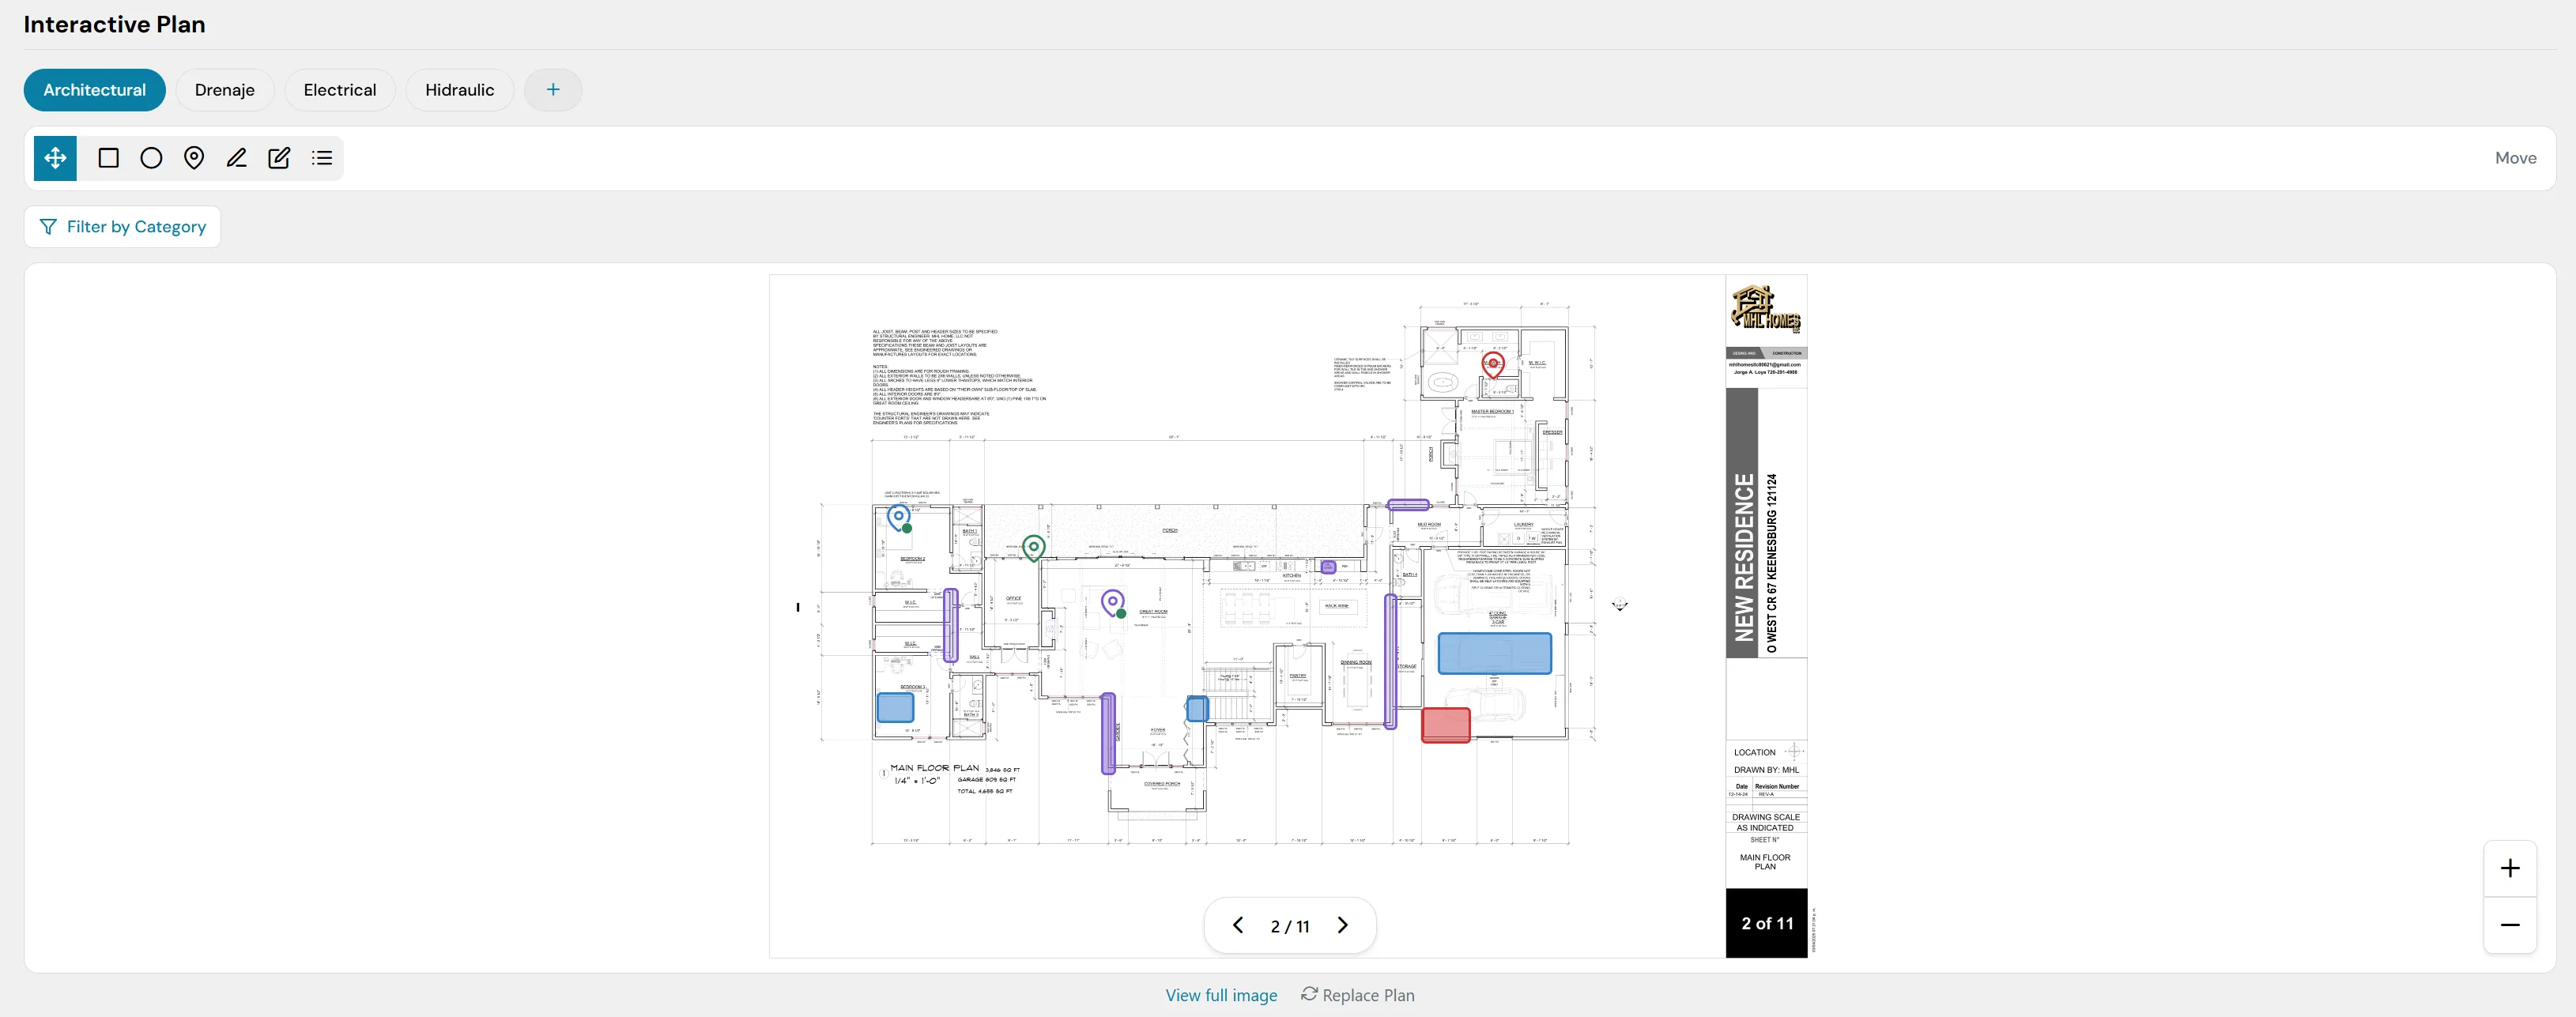
View of the Interactive Plan interface.
1. Specialty Selector (Blueprint Tabs)
In the upper left, there are dynamic tabs that allow you to instantly switch between the different technical plans uploaded for the site:
- Default Specialties: Quick filters like Architectural (selected by default), Drainage, Electrical, and Hydraulic.
- Add Button (+): Allows you to register and upload new categories or specialties of blueprints according to the specific requirements of the construction.
2. Annotation and Markup Toolbar
Just below the specialty tabs, there is a floating toolbar with interactive icons to make modifications and visual overlays on the blueprint:
- Select / Move: Directional cross icon to scroll through the document or drag elements.
- Geometric Shapes: Rectangle and circle tools to delimit specific areas in the workspace (visible on the plan in colors like blue and red).
- Location Markers (Pins): Pin/thumbtack icons to geolocate exact points of interest, incidents, or pending tasks (visible on the plan in green, dark blue, and red colors).
- Drawing and Editing Tools: Pen and pencil icons to trace freehand lines or custom polygons.
- Annotations List: Bullet point icon to display a summary of embedded elements.
- State Control (Move): Located at the far right of the bar to toggle the interaction mode with the canvas.
3. Thematic Filter
- "Filter by Category" Button: Located below the toolbar, this dropdown menu allows the user to hide or show specific layers of marks (for example, see only pending tasks or only area delimitations), avoiding visual saturation of the technical drawing.
4. Central Blueprint Viewer and Navigation Controls
The central area renders the selected technical plan (in this case, a floor plan labeled "New Residence"). Key navigation controls are integrated over this plan:
- Blueprint Pagination: In the lower central part, there is a numeric selector with side arrows (< 2 / 11 >) that allows you to quickly leaf through the different pages, sheets, or levels of the current blueprint set. Additionally, a black label in the lower right corner of the plan confirms the active sheet (2 of 11).
- Zoom Controls (+ / −): Floating buttons to zoom in or out of the blueprint view are located in the lower right corner of the screen, allowing you to inspect large-scale details or review millimeter-level technical specifications.
5. Bottom File Actions
At the footer of the viewer, two quick maintenance links are located:
- View full image: Opens the blueprint in its native and full resolution in a new tab for an unobstructed view of the interface.
- Replace Plan: Allows you to update the base loaded file with a more recent or corrected version, keeping previous annotations or allowing a clean reconfiguration.
8. Sub-module: Checklist / Log
Also located within the project details, the Checklist / Log sub-module is the central operational tool for the control, assignment, and tracking of the daily progress of site activities. It allows supervisors to manage pending tasks, filter assignments, and audit which activities were delivered late or are currently in execution.
The interface is structured as follows:
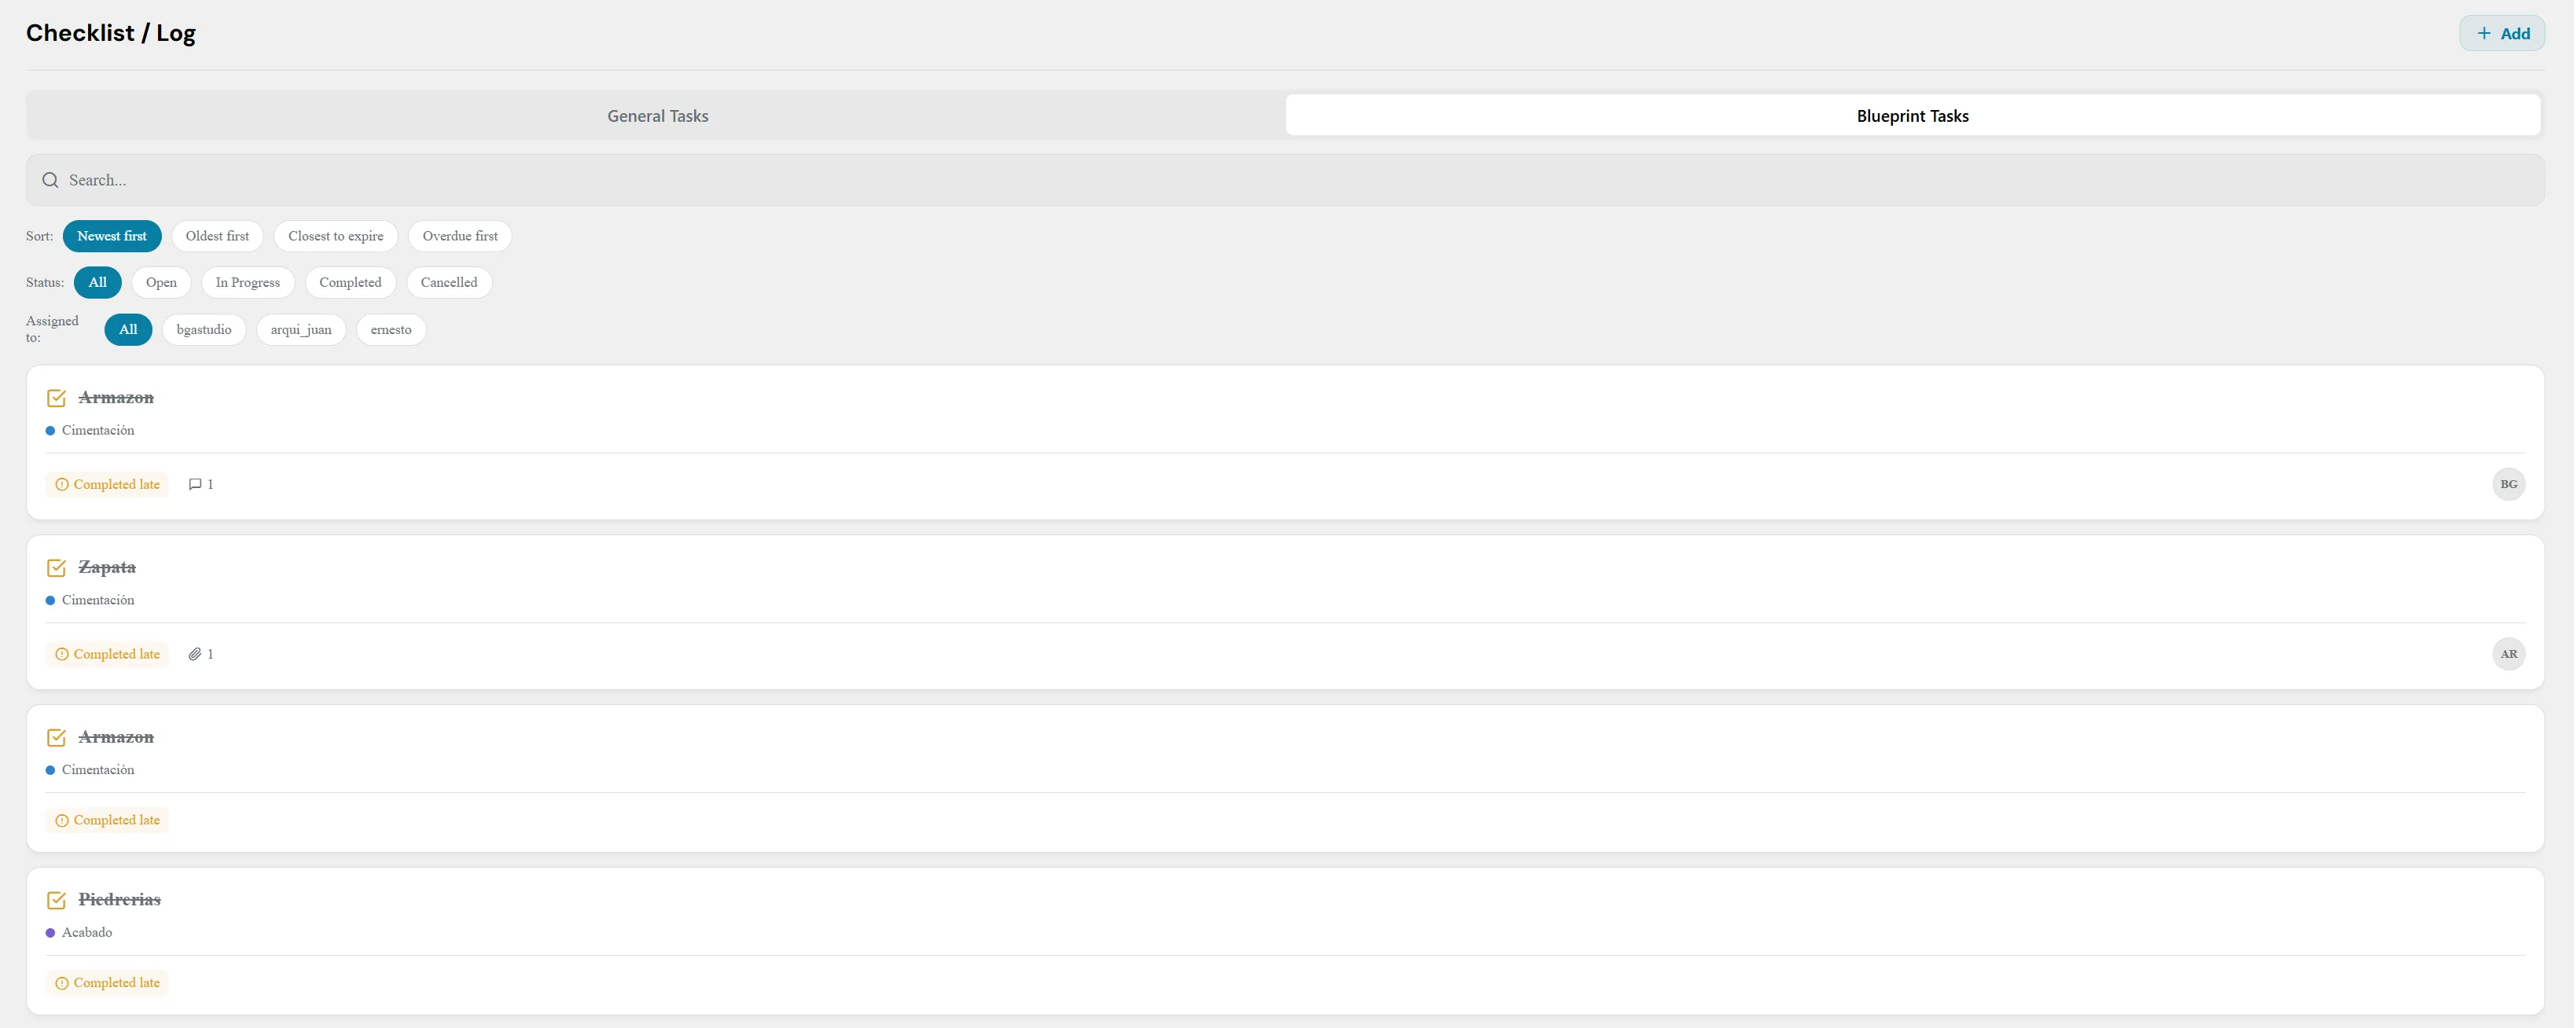
View of the Task List (Checklist / Log) interface.
1. Control Header and Main Classification
- Section Title: Identified on the left as "Checklist / Log".
- Add Button (+ Add): Located in the top right corner, it allows you to manually register new activities or operational tasks within the project.
- Environment Selector: A wide tab switch that divides the nature of the tasks:
- General Tasks: Focused on global or administrative activities of the site.
- Blueprint Tasks (Selected): Strictly focused on those tasks that are directly anchored or geolocated on the technical blueprints of the Interactive Plan sub-module.
2. Search, Sorting, and Advanced Filtering Panel
Just below the main selector is a robust filter system to segment extensive lists of activities:
- Search Bar: Field with a Search... placeholder to locate tasks by typing keywords from their title or category.
- Sorting Criteria (Sort): Quick buttons to change the visual hierarchy of the list: Newest first (active by default), Oldest first, Closest to expire, and Overdue first.
- Status Filters (Status): Allows isolating activities according to their current stage using the options: All, Open, In Progress, Completed, and Cancelled.
- Assignment Filters (Assigned to): Allows viewing activities assigned to specific team members. It includes quick options like All or specific organization users such as bgstudio, arqui_juan, and ernesto.
3. Integrated Task List
The central body displays the activities in clean, independent rows. Each task card transparently provides the following indicators:
- Checkbox and Icon: A confirmation box on the left (☑) that shows the validation status of the activity along with its main title (e.g. Armazon, Zapata, Piedrerias). When a task has been completed, the title text is automatically displayed crossed out.
- Category or Item: A colored bullet identifies the technical category to which the concept belongs within the catalog (e.g. a blue dot for Foundation or a purple dot for Finish).
- Issue or Time Tag: If the activity suffered a lag from the schedule, the system attaches a visual yellow warning indicator with the legend Completed late.
- Interaction Counters: Complementary icons that record the internal activity of the task:
- Message Icon: Indicates the number of comments or log notes added by field supervisors (e.g. 💬 1).
- Clip Icon: Indicates the existence of files, evidence photos, or documents attached to that specific task (e.g. 📎 1).
- Assigned Responsible: At the far right of each row, a gray circular avatar with the initials of the collaborator in charge of supervising or executing the activity is shown (e.g. BG or AR).
9. Task and Supply Creation Process (Step-by-Step Modal)
When a supervisor or administrator initiates the creation of a new activity in the project, the platform displays a wizard configured in 3 sequential steps to ensure that all technical, logistical, and warehouse information is recorded correctly.
Step 1: Task Details
In this first stage, the general and geolocation properties of the activity are defined:
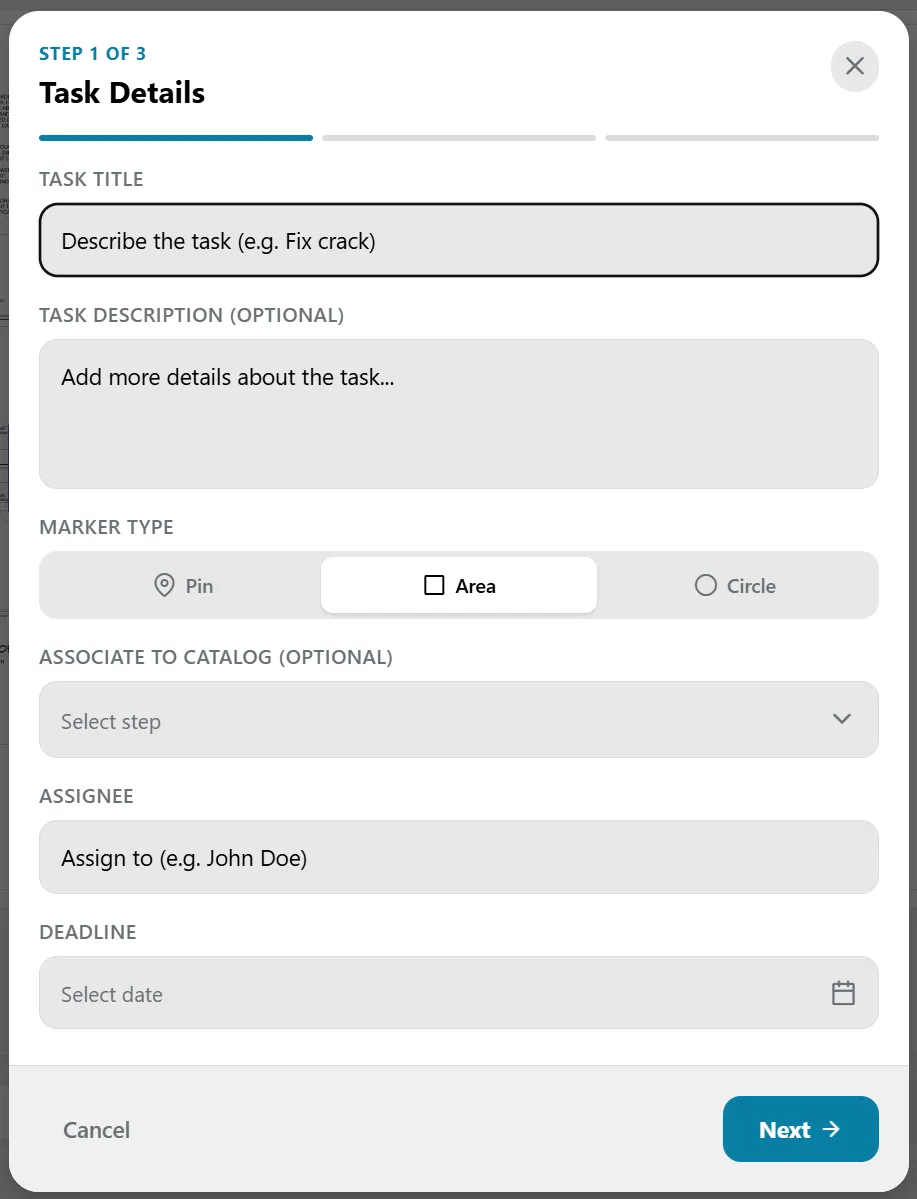
Step 1: General details of the task.
- Task Title (Mandatory): Text field to enter the name of the activity (e.g. "Framework" or "Crack repair").
- Task Description (Optional): Free text block to add technical specifications or detailed instructions on how to execute the work.
- Marker Type: Defines the visual representation the task will have on the technical blueprint. Available options are:
- Pin: Exact point marker.
- Area: Rectangular container to delimit zones.
- Circle: Circular radius of affectation.
- Associate to Catalog (Optional): Dropdown menu to link the task to a preconfigured item or category in the master catalog (e.g. Foundation, Finishes).
- Assignee: Field to select and indicate which collaborator or team supervisor will be directly responsible for executing and validating the task.
- Deadline: Calendar format selector to set the deadline for delivering the activity.
Step 2: Materials Allocation
⚠️ Security Permissions Note: This supplies and materials screen is only visible to users who have specific permissions to generate and request materials within the organization's role configuration.
If the user has the corresponding privileges, the system allows linking physical resources to the task:
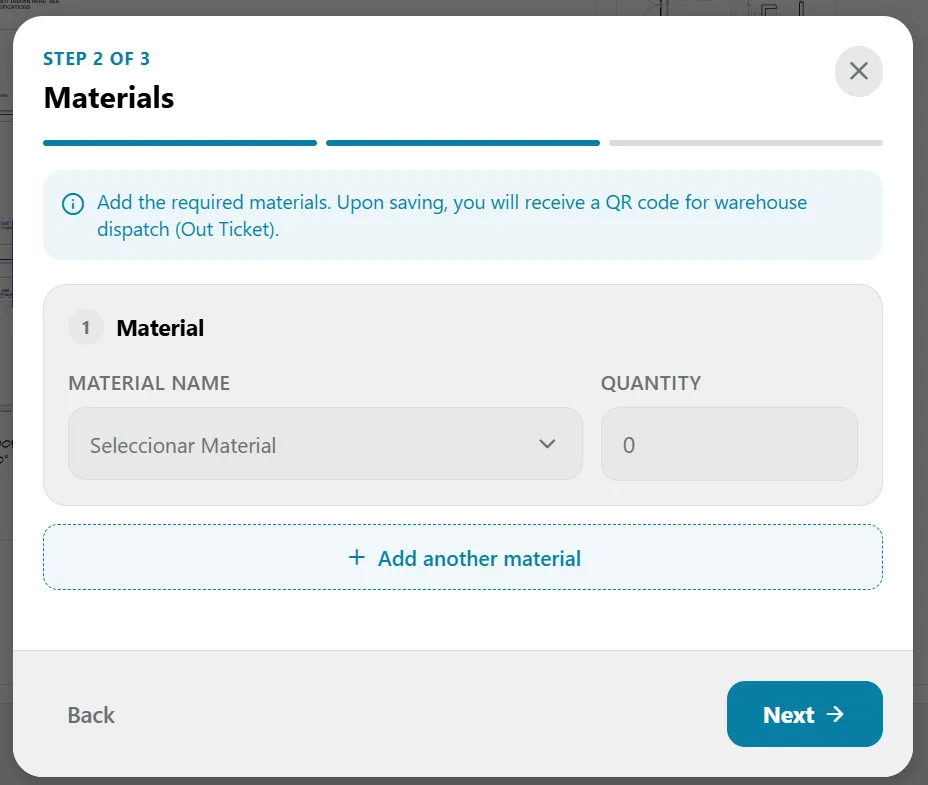
Step 2: Requesting materials from inventory.
- Select Material: A dropdown menu connected in real-time with the site's inventory to choose the required supply.
- Quantity: Numeric field to specify the exact amount of units needed (e.g. pieces, bags, meters).
- "+ Add another material" Button: Allows adding multiple rows of supplies within the same task request.
Step 3: Agenda Synchronization
The final stage of the wizard automates the communication of the schedule:
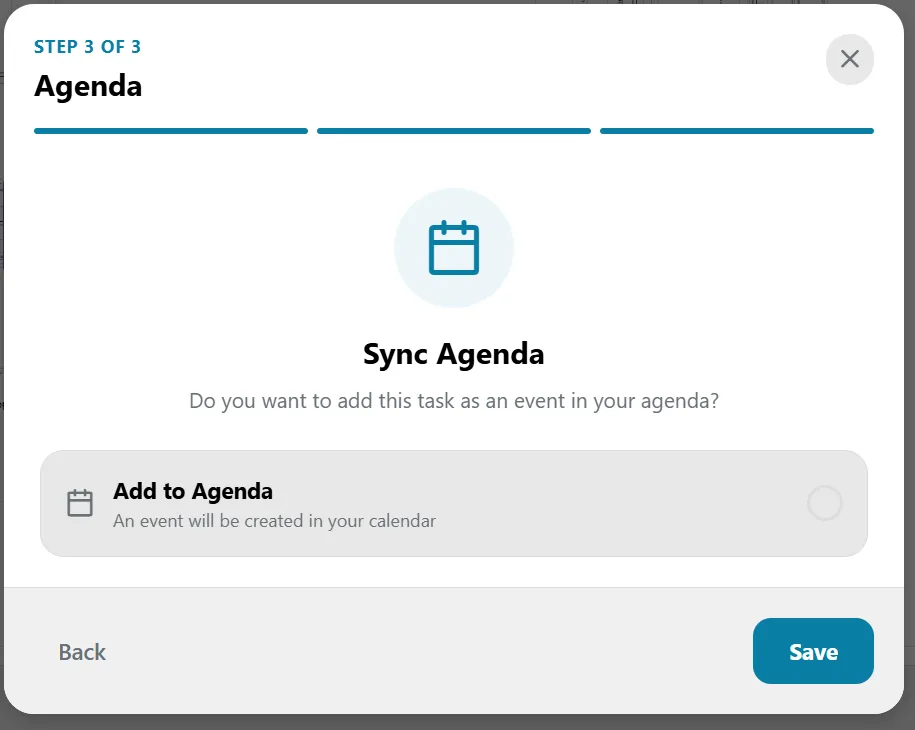
Step 3: Agenda synchronization options.
- Sync Agenda: The system asks if you want to index this activity in the global calendar.
- "Add to Agenda" Button: By activating this interactive checkbox, the platform will automatically create an event in the Agenda module referencing the task title and its deadline, notifying the involved team before proceeding to click the "Save" button.
Final Warehouse Checkout Flow (Business Rules)
Once the user clicks "Save", the system evaluates the registered information and applied permissions to determine how the process closes:
- Scenario A: With Material Request (Generates Out Ticket) If the user had enabled permissions and added supplies in Step 2, the system processes a supply order and displays the Out Ticket screen. This window automatically generates a unique dynamic QR Code. The field supervisor must present this scannable QR code at the site's warehouse so the storekeeper can validate the transaction, deduct the supplies from the Inventory module stock, and physically hand over the materials.
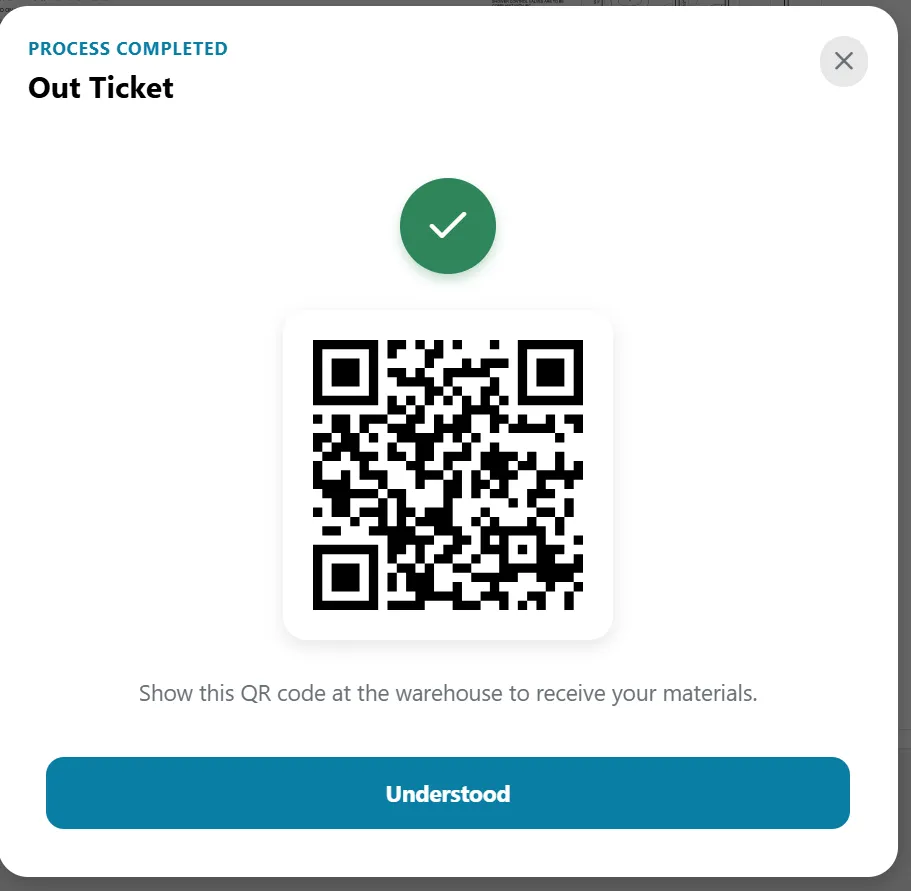
Automatic generation of the QR code for the out ticket.
- Scenario B: Without Material Request (Checklist Only) If the user did not add materials to the task (or if their platform role lacks the necessary permissions for supply management), the system will simply create and save the activity within the project's Checklist. In this case, the process ends immediately, the task is added to the operational list, and no out ticket or warehouse QR code will be generated, returning the user directly to the workspace screen.
6. Module: Agenda (Calendar)
The Agenda module is the platform's time planning component. It functions as an interactive and centralized calendar that chronologically consolidates all milestones, key events, and deadlines of active projects in a standard monthly grid format.
The interface is composed of the following control and visualization elements:

Main view of the Agenda and calendar module.
1. Time Navigation Controls Bar
Located at the top of the screen, it allows the user to manage the visible time range on the grid:
- Month and Year Indicator: In the upper left corner, the current month and year are displayed (e.g. June 2026). A circular blue indicator next to the text denotes that we are viewing the month corresponding to the system's current date.
- Scroll Arrows (< / >): Located at the top edges, they allow you to page through the calendar backward or forward to review past or future planning months.
- "Today" Button: Located in the top right corner, it works as a quick shortcut to instantly return the calendar view to the current month and day with a single click.
2. Legend Bar and Event Filters
- Classification Tag (Deadline): Located just below the month indicator, this tag with a clock icon serves as a visual identifier or quick filter. It indicates that the red blocks displayed on the grid correspond to mandatory compliance deadlines for site tasks.
3. Central Calendar Matrix (Monthly View)
The main body of the interface organizes the days in vertically and horizontally ordered blocks:
- Days of the Week Header: A top gray strip that divides the calendar into seven standard columns, starting on Sunday (Sun) and ending on Saturday (Sat).
- Current Day Indicator: The number corresponding to the current day is automatically highlighted with a bright blue circular container (e.g., June 1 in the image) so the operator can locate their temporal position immediately.
- Dynamic Task Blocks: Activities registered in the system are embedded directly within the assigned day's box. They are represented as horizontal red bars that expose the deliverable's title:
- June 2 Milestone: Shows the block corresponding to the scheduled Test Task.
- June 30 Milestones: Displays two parallel critical deliverables scheduled for the end of the month: Test Build and Task 5.
4. Floating Creation Button
- Main Action (+): In the bottom right corner of the screen remains a floating blue button with a plus symbol. This interactive control allows administrators or site coordinators to add a new milestone, reminder, or deadline directly to the agenda, opening a quick configuration wizard without needing to leave the current tab.
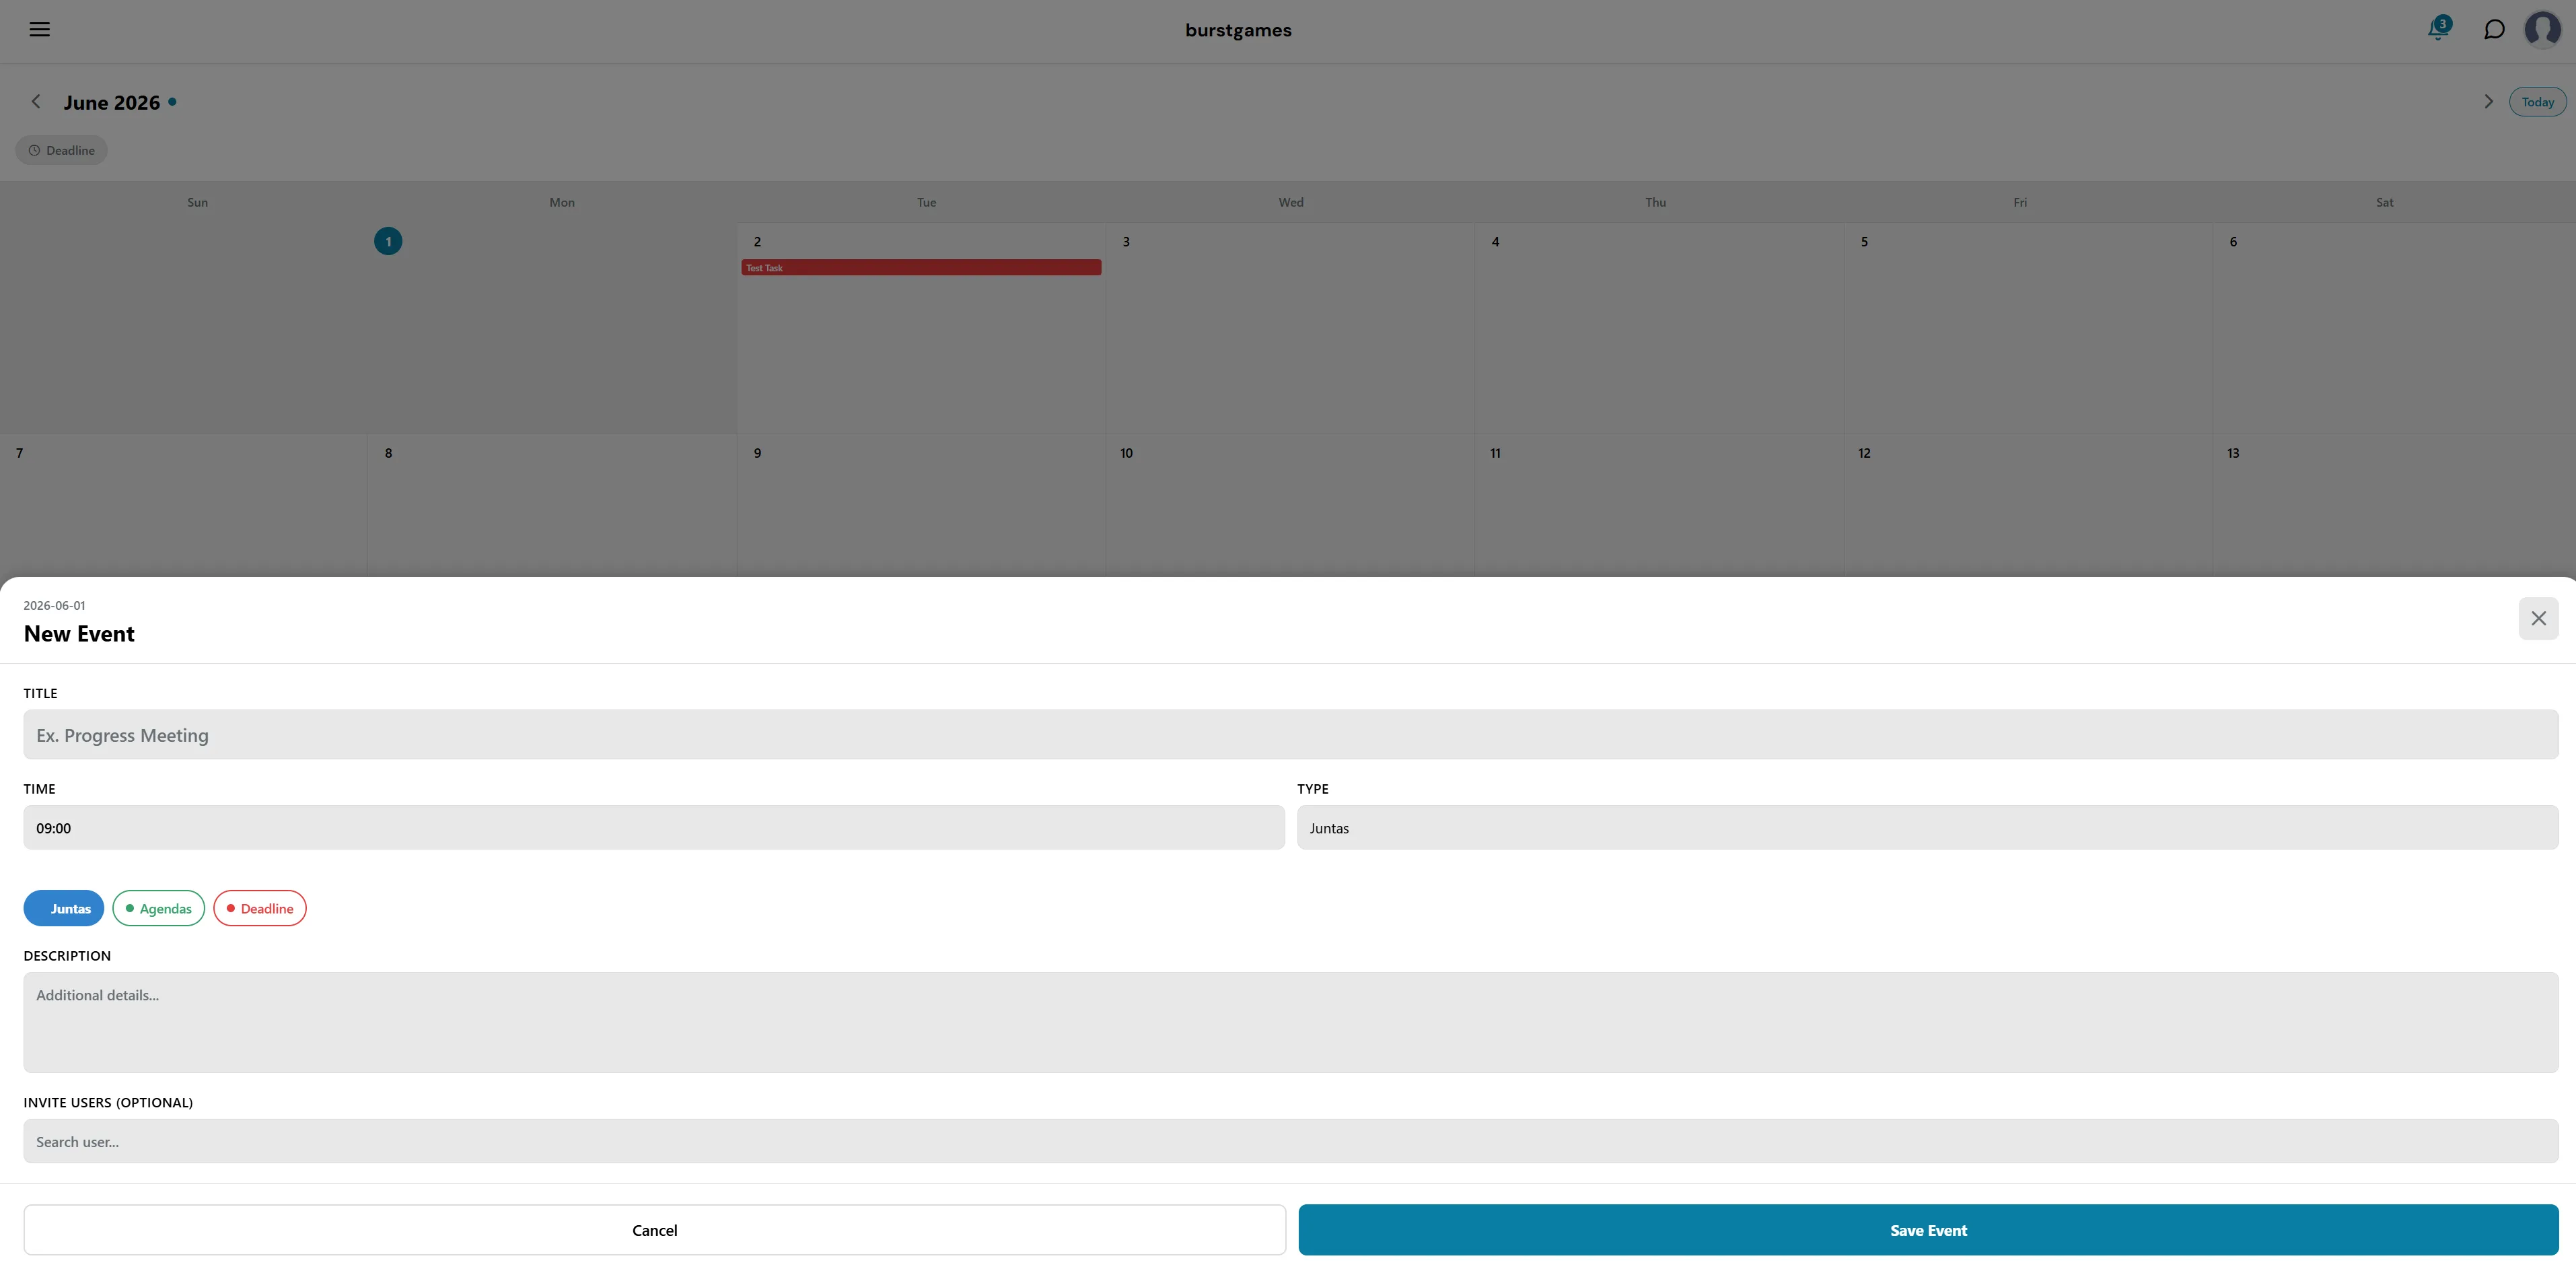
View of the event creation modal in the Agenda.
7. Module: Budgets
The Budgets module is the centralized financial control tool of the platform. Its main objective is to offer absolute transparency over the organization's economic resources, allowing the auditing of the total allocated budget, monitoring accumulated expenses in real-time, and analyzing the global and individual financial balance for each developing site.
The interface is visually structured into three analysis levels:
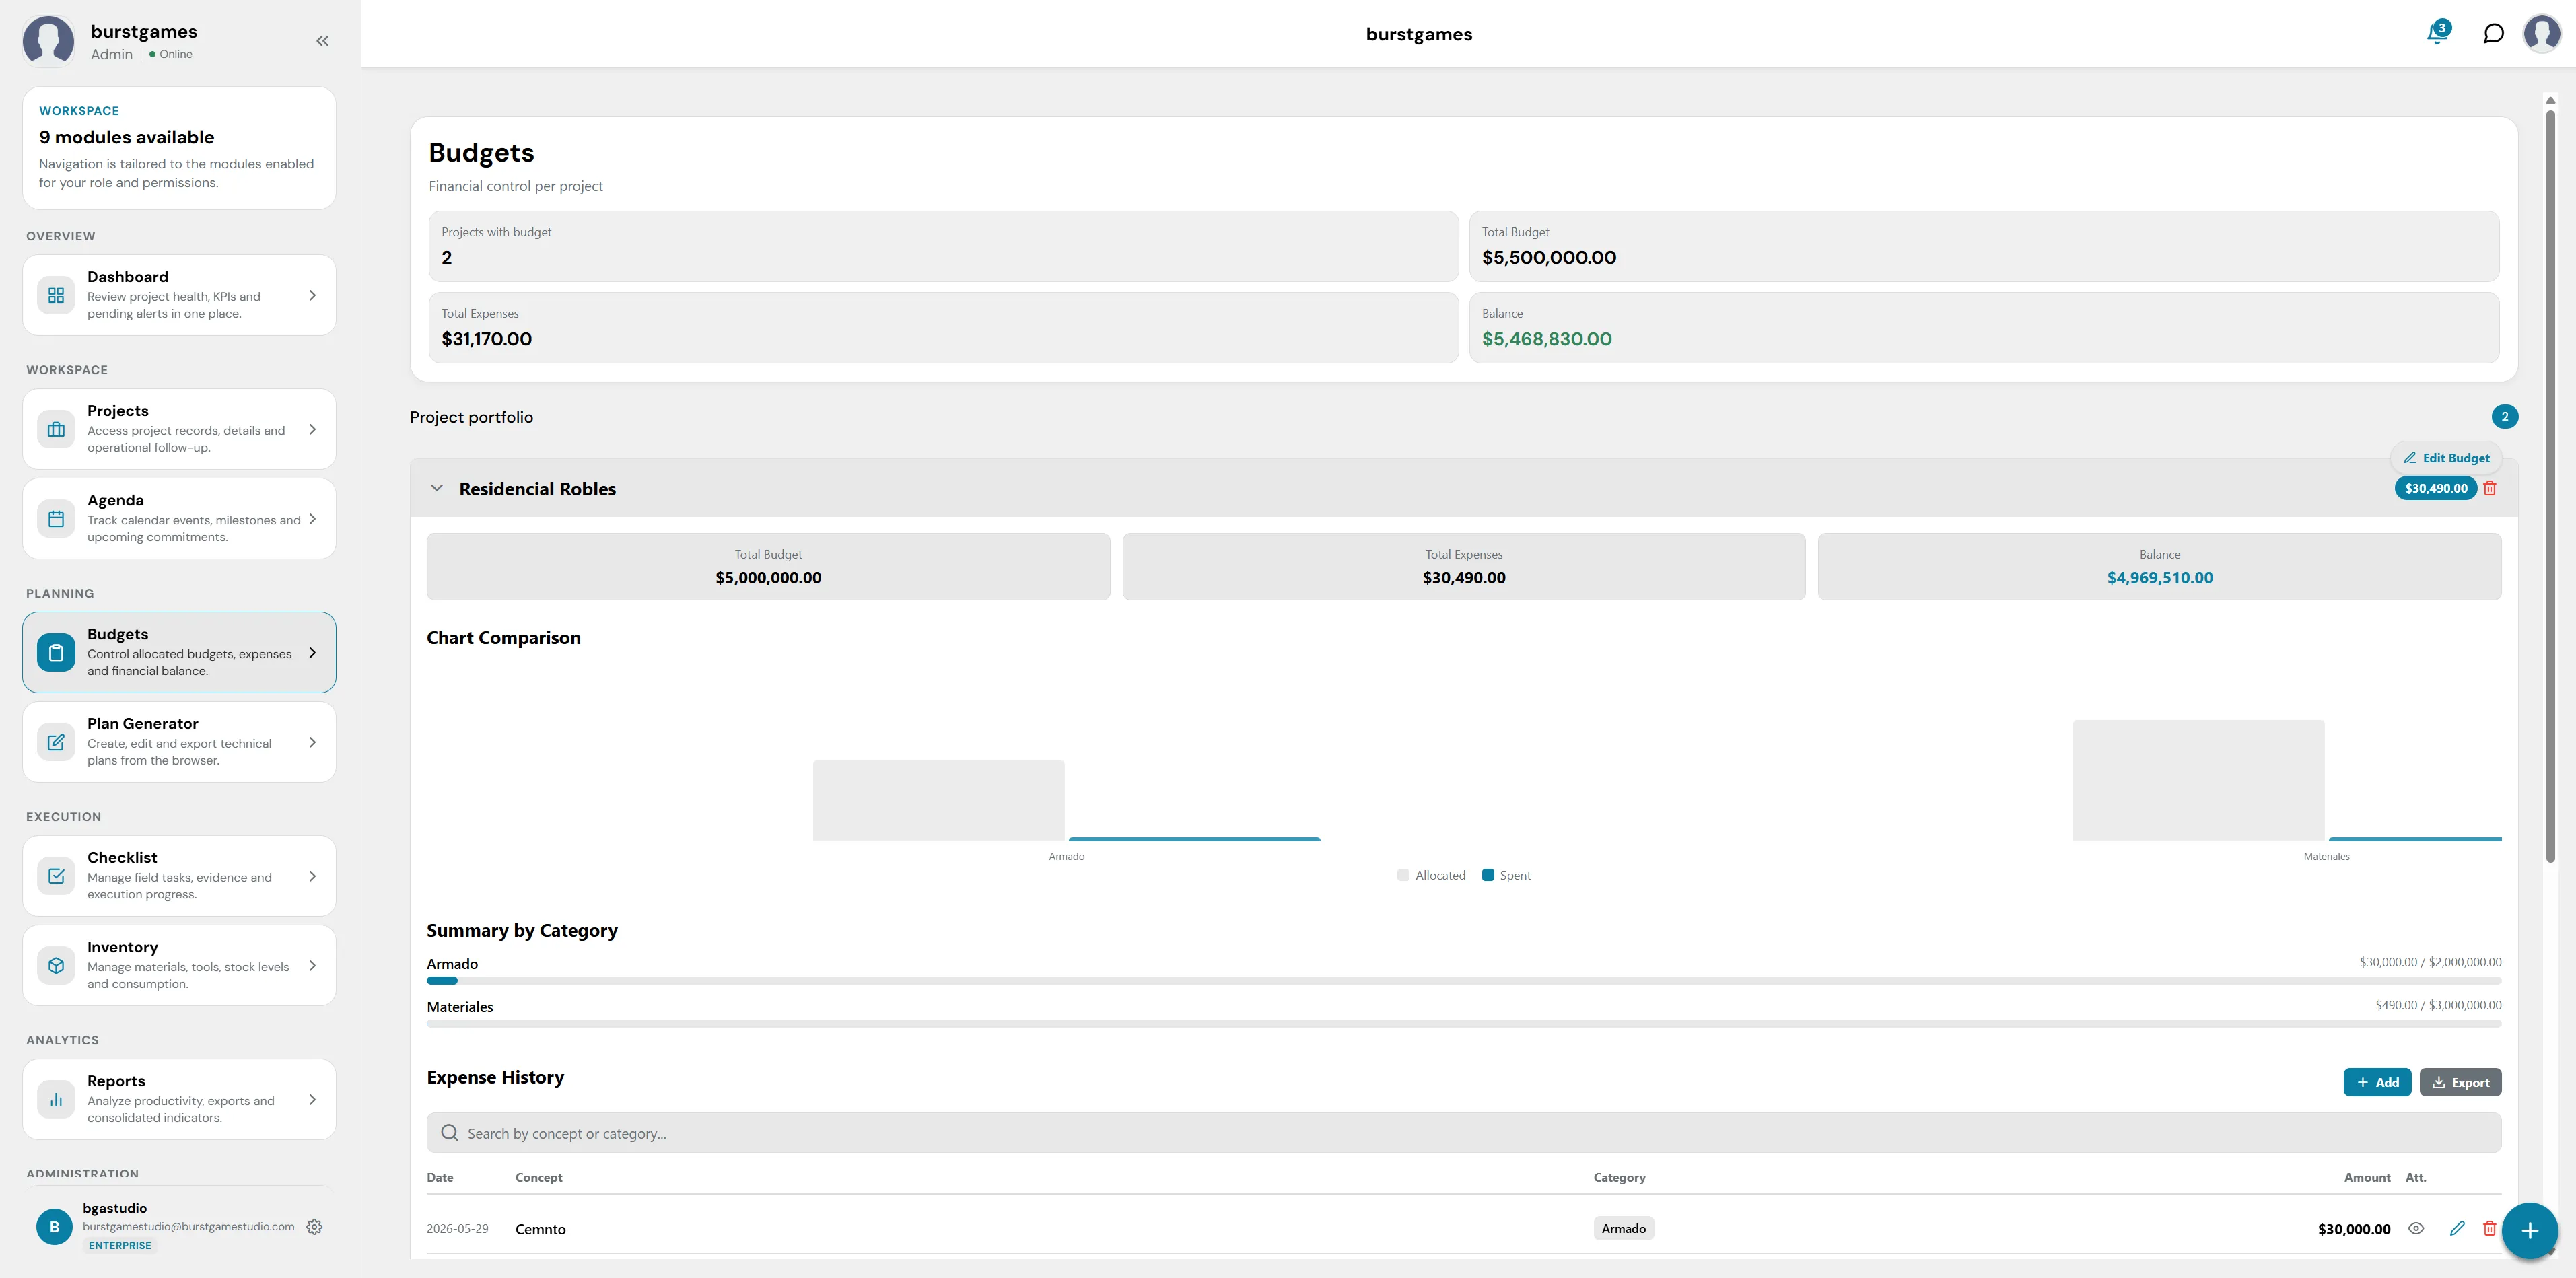
General view of the Budgets module and financial control.
1. Global Financial Metrics Panel (Consolidated KPIs)
Located at the top of the workspace, this container groups the consolidated financial status of all active work fronts:
- Projects with budget: Quantifies the total number of individual sites that have economic resources allocated in the system (e.g. 2).
- Total Budget: Total sum of the approved financial funds injected into the platform (e.g. $5,500,000.00).
- Total Expenses: Cumulatively records the total money accrued, billed, and spent across all fronts (e.g. $31,170.00).
- Balance: The remaining available balance of the organization (calculated using the formula: Total Budget - Total Expenses). It is highlighted in green to indicate positive financial health (e.g. $5,468,830.00).
2. Project Portfolio
Just below the global summary, the individualized breakdown by site is located. Each project is organized within an expandable container (accordion):
- Project Header: Clicking on the tab (e.g. Residencial Robles) expands it to show its internal financial data. To its far right is a quick counter with the current site expense ($30,490.00), a red warning icon, and the "Edit Budget" shortcut to adjust the items.
- Site Metrics: When expanded, it shows three horizontal cards with the specific amounts allocated to that project:
- Total Budget: Money exclusively allocated to this site (e.g. $5,000,000.00).
- Total Expenses: Accumulated expenses in this project (e.g. $30,490.00).
- Balance: Exclusive available fund for the development of this construction (e.g. $4,969,510.00).
3. Charts, Summaries, and Expense History
Once the site is expanded in the portfolio, three advanced internal auditing tools are enabled:
- Chart Comparison: Visual module that renders statistical bar charts to immediately contrast planned budgets against actual consumed expenses (Allocated vs. Spent).
- Summary by Category: Segments and distributes the money flow based on master catalogs. Each row shows a progress bar indicating how much budget has been consumed per technical item (e.g. items like Framework or Materials), contrasting the expense against the allocated limit on the far right.
- Expense History: A linear and detailed accounting record where all transactions made are logged:
- Internal Search: Text bar with the Search by concept or category... placeholder to filter specific purchases quickly.
- Upload Controls (+ Add / Export): Dedicated buttons to manually register a new cash expense or export the project's account statement in downloadable formats.
- Transaction Table: Structured columns that classify each movement with its registration Date, the name of the supply or service (Concept), the associated catalog tag (Category), the total billed Amount, the attached evidence files or invoices (Att.), and tools to edit or delete the record.
4. Global Registration Button
- Main Action (+): In the bottom right corner of the screen, the floating blue button with the plus symbol (+) remains accessible, designed as the platform's quick shortcut to register new budget structures from any section of the module.
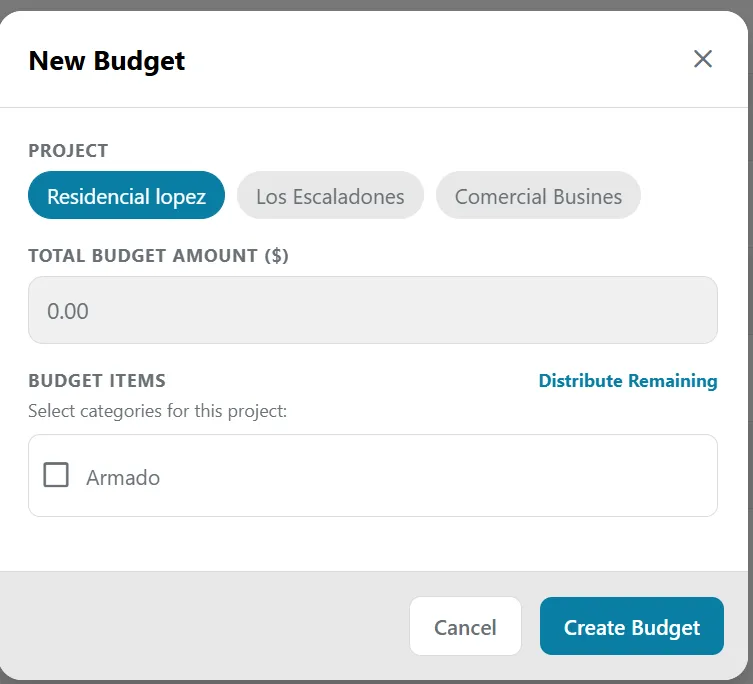
View of the new budget creation modal.
8. Module: Plan Generator
💡 Developer Note: This module is currently in Beta phase. We are actively working on upcoming performance improvements, rendering, and object library integration to offer an even more robust design experience.
The Plan Generator is an interactive technical drawing tool integrated directly into the browser. Its purpose is to allow engineers, architects, and designers to quickly sketch, structure, and export floor plans without needing heavy external CAD software, optimizing the site planning stage.
Below is a detailed breakdown of the workflow and interface components through its main screens:
1. Plan Management Panel (My Plans)
Upon entering the module, the first thing the user sees is their local design repository:
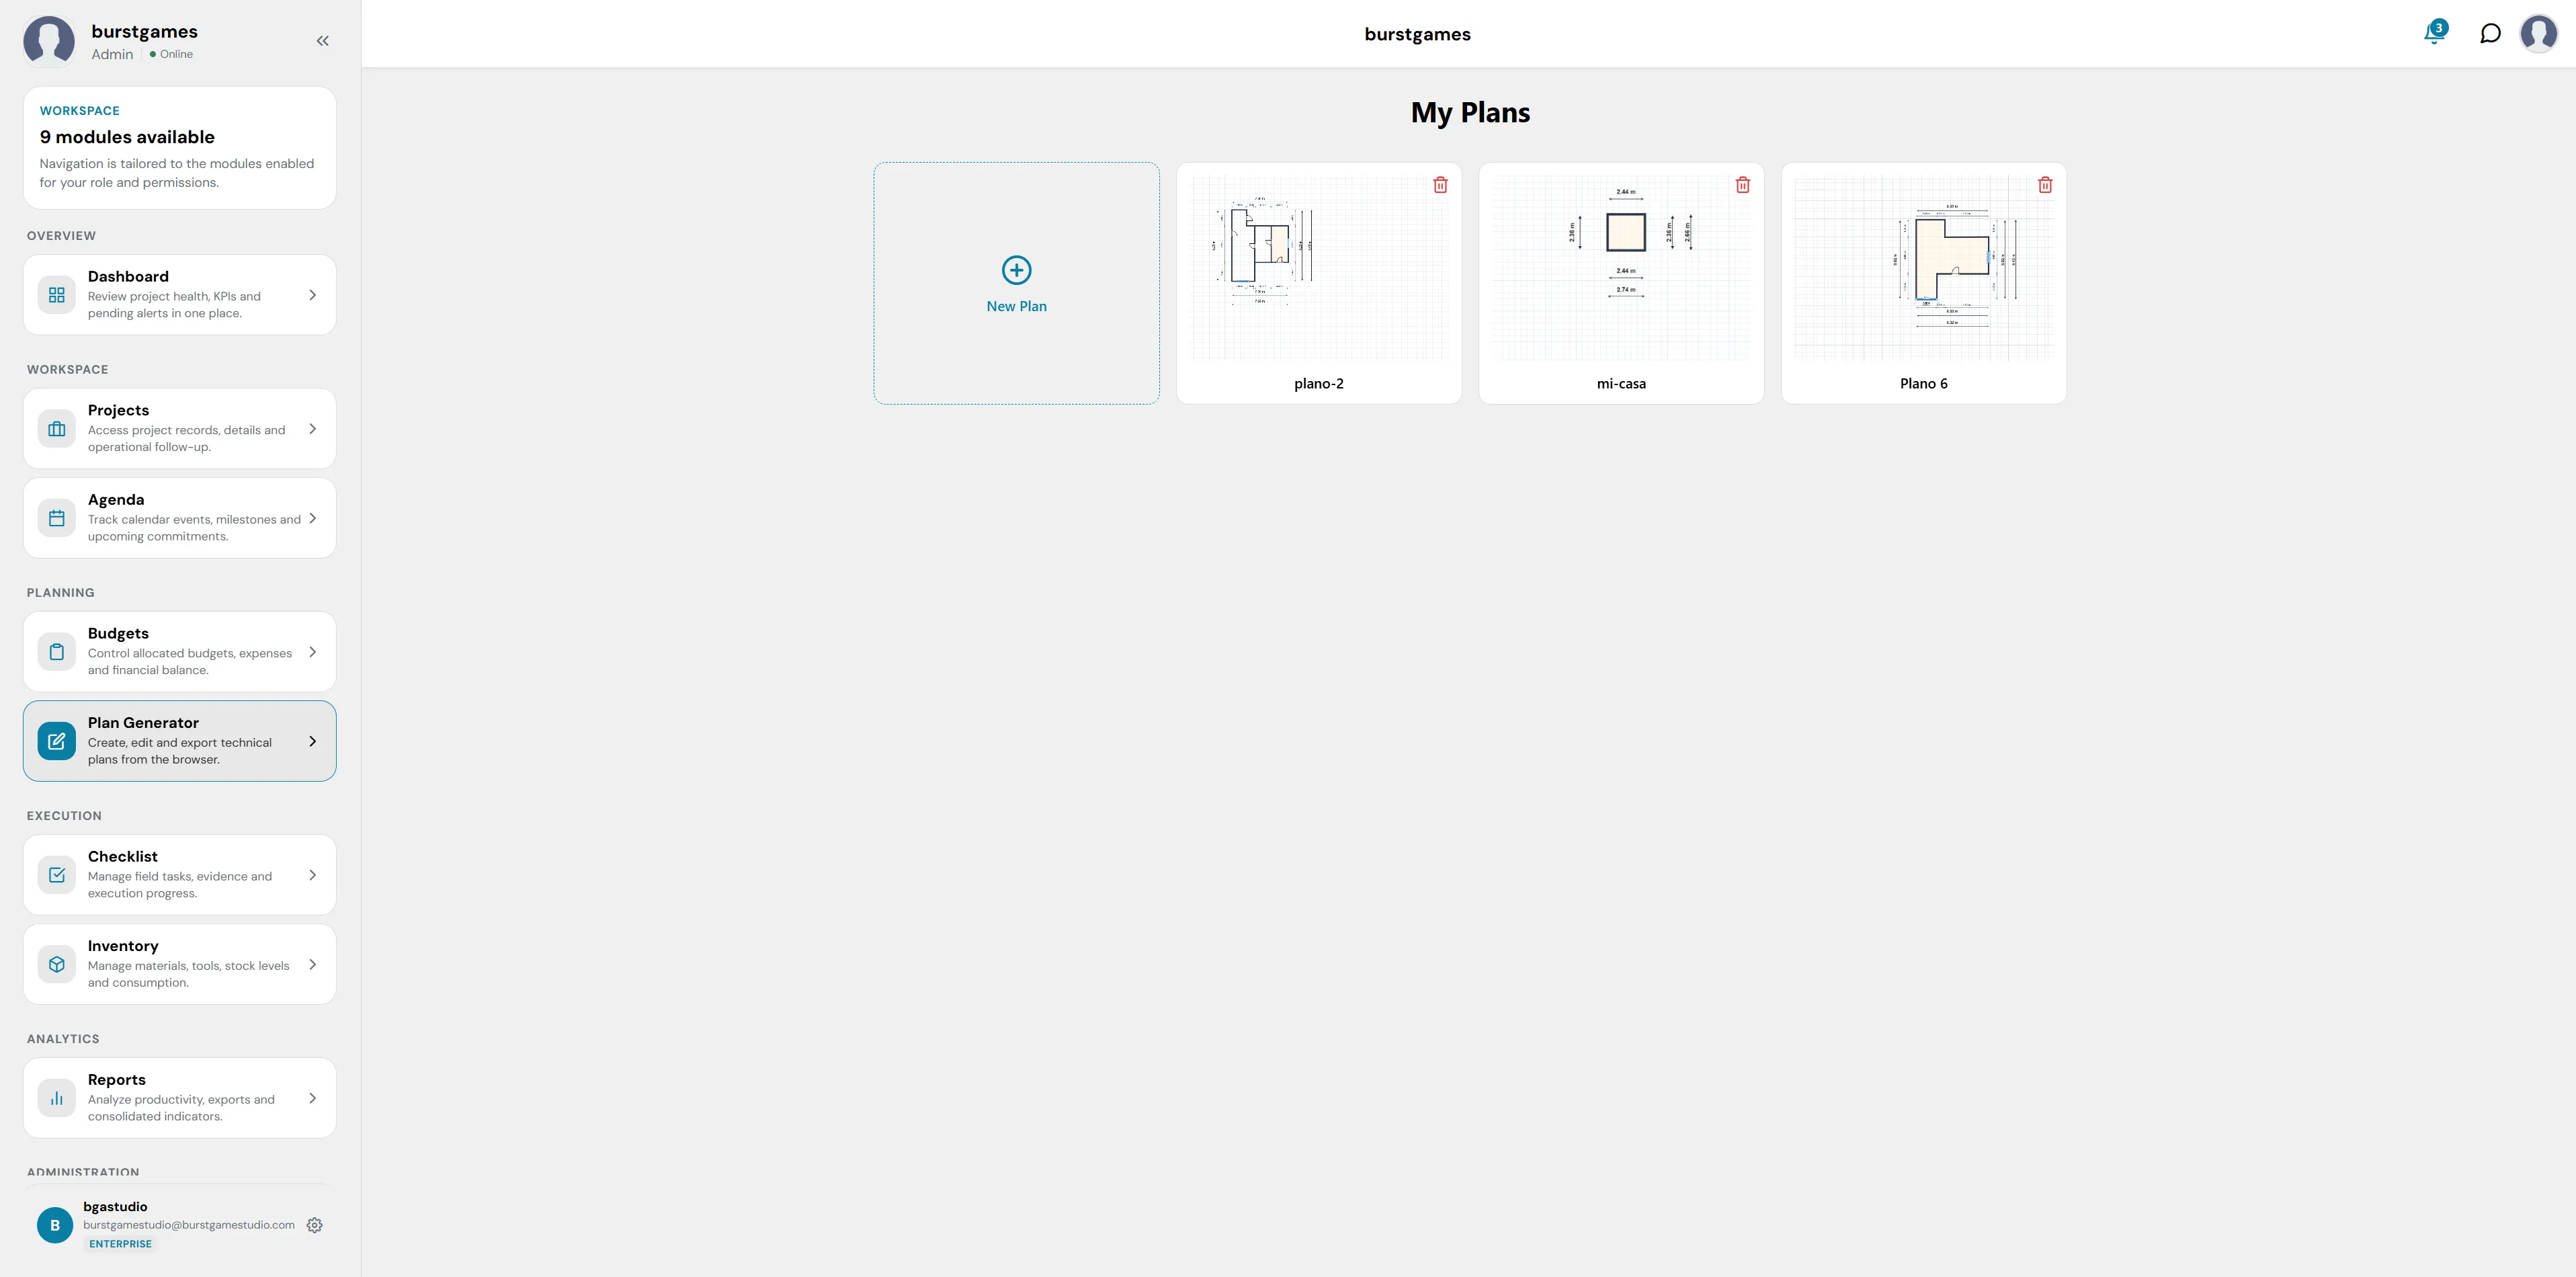
View of the saved plans management panel.
- New Creation (+ New Plan): A dotted-line container that acts as a trigger to open a blank canvas and start a design from scratch.
- Project Showcase (My Plans): A grid list that stores thumbnails of user-saved plans (e.g. plano-2, mi-casa, Plano 4). Each card includes a quick delete button (red trash can icon) in the upper right corner to clean up the catalog.
2. Drawing Canvas and Main Interface
When opening or creating a plan, the system loads an assisted technical design environment over a gridded background:
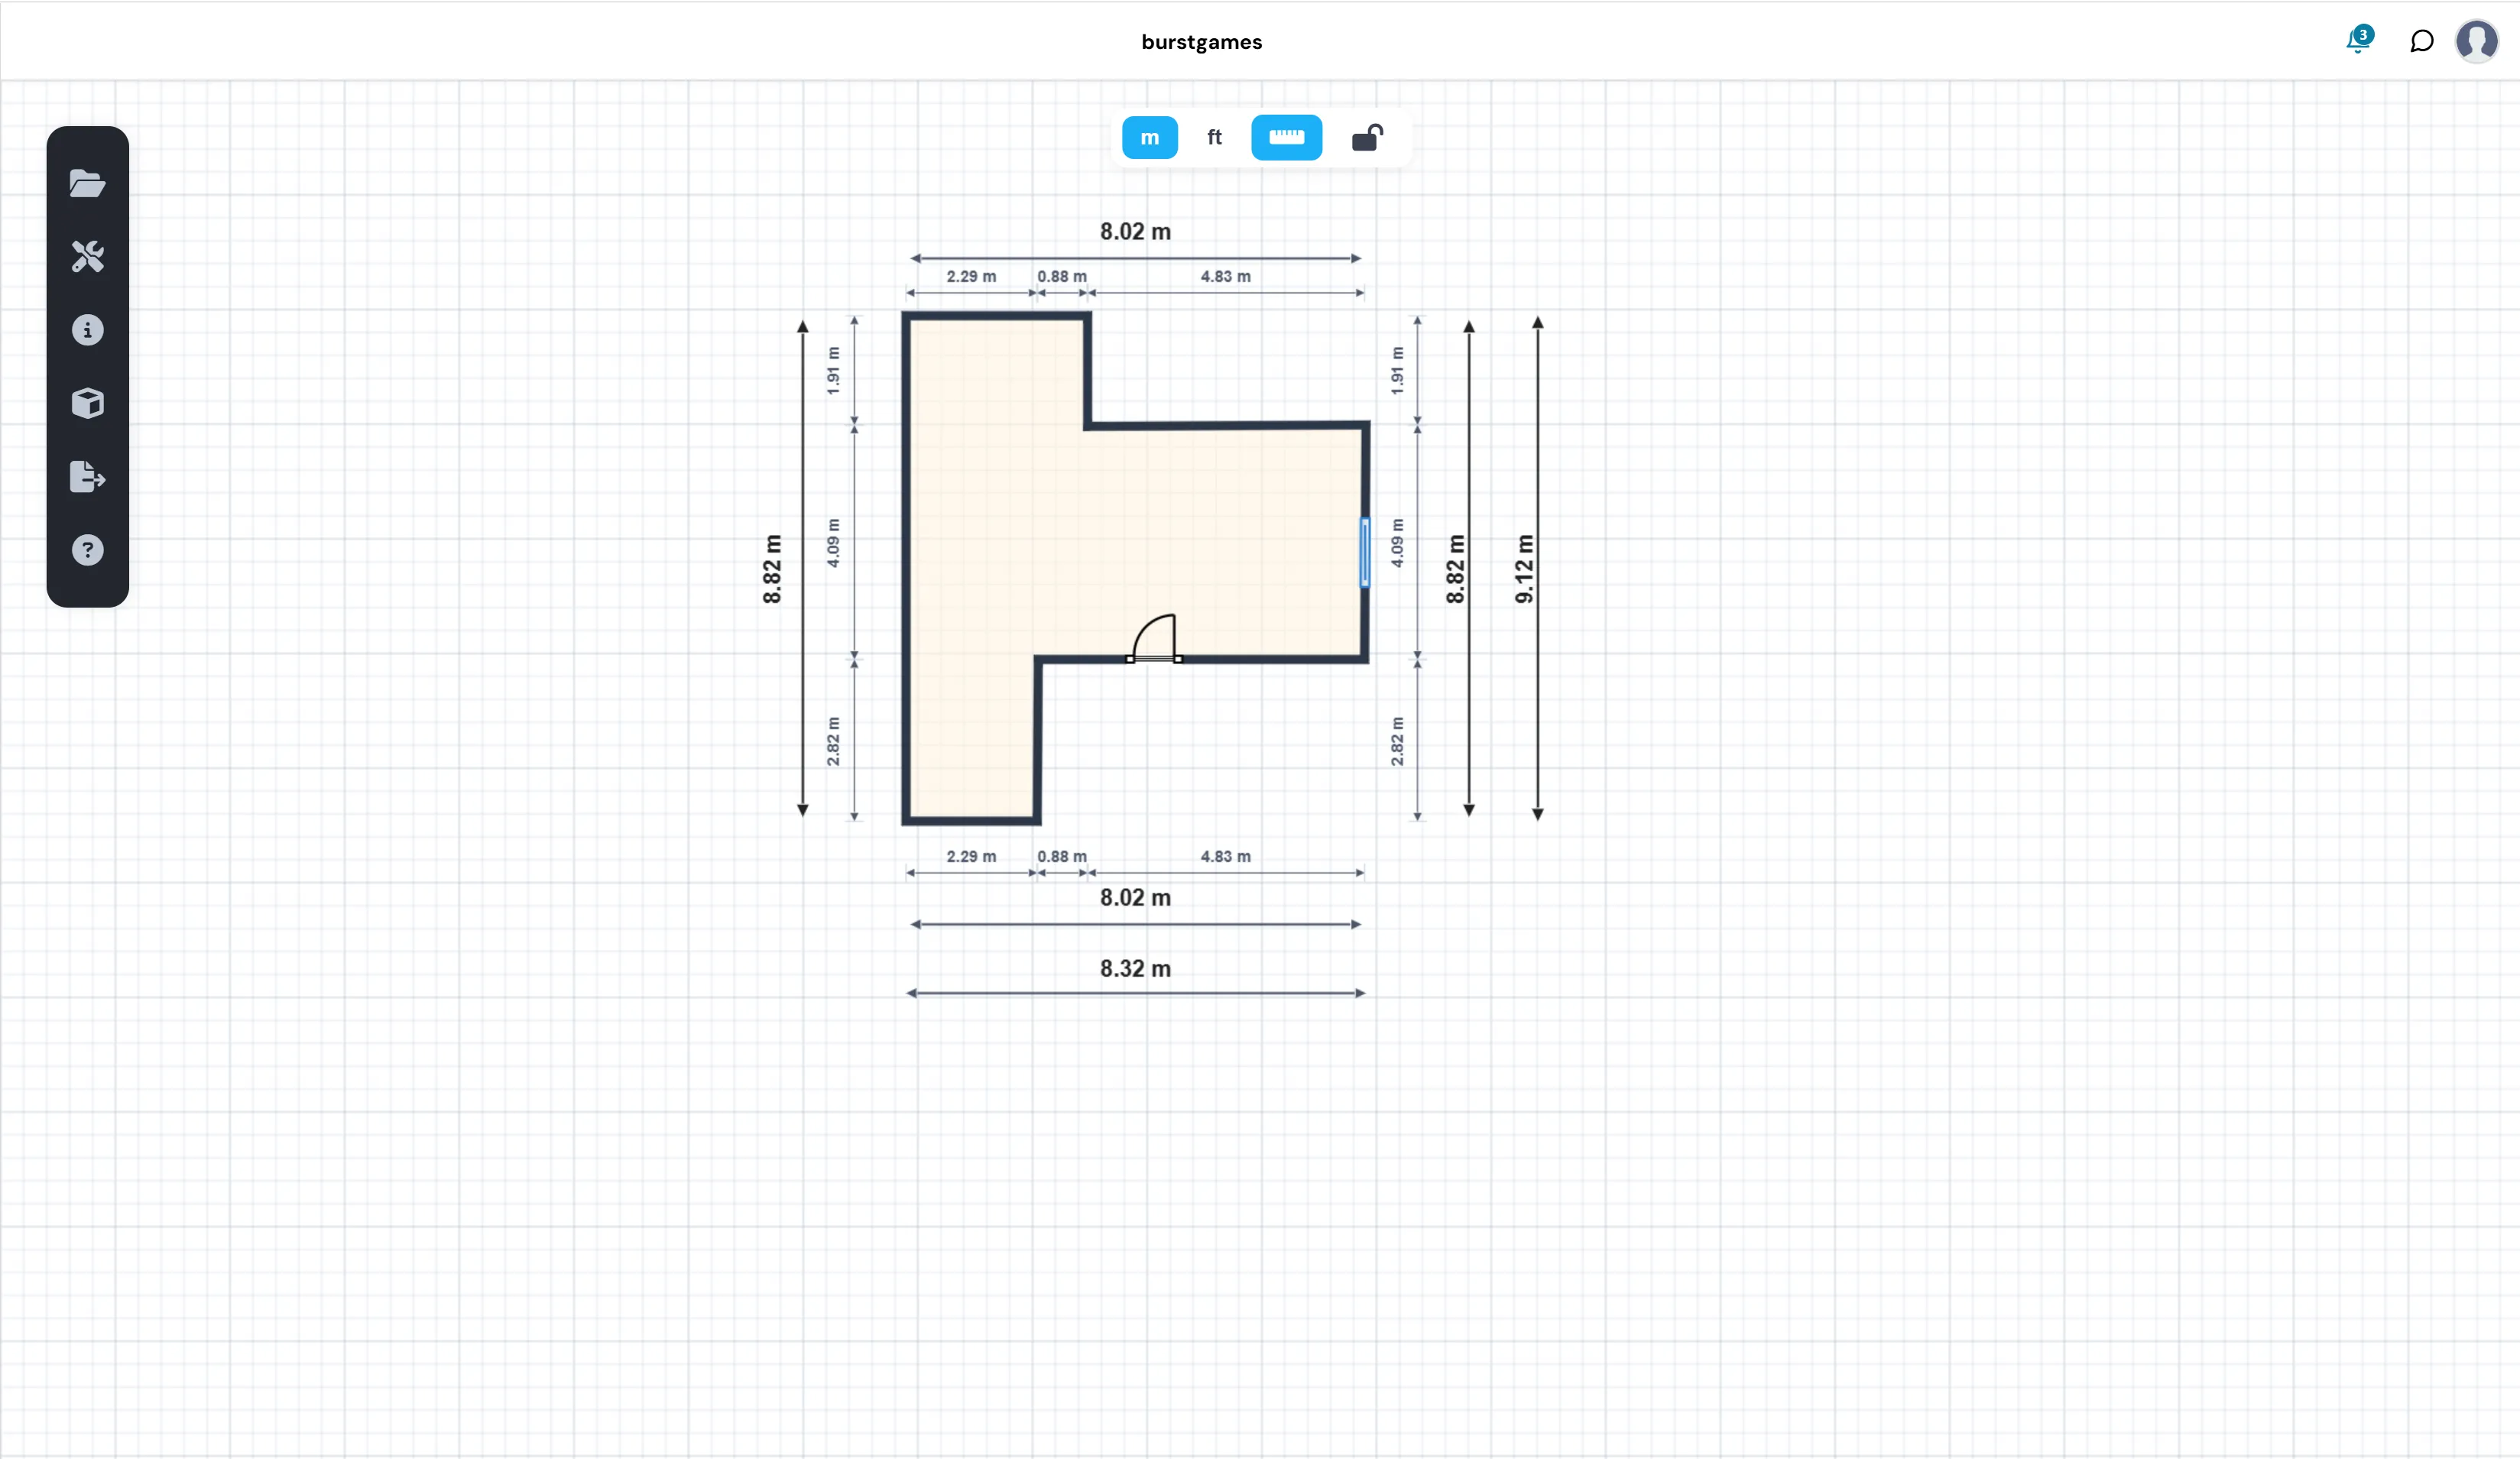
View of the technical drawing canvas and dimension calculation.
- Automatic Dimension Calculation: As walls are drawn, the generator's engine calculates the exact dimensions of interior and exterior walls and construction thicknesses in real-time (showing automatic dimensions in meters, e.g. 8.02 m, 4.83 m).
- Unit Selectors: In the top central bar, the user can quickly toggle the measurement scale between meters (m) and feet (ft).
- Precision Tools: Top icons to enable or disable guide lines/rulers (blue ruler) and lock or unlock the editing of canvas elements (padlock icon).
3. Construction Toolbar (Build Menu)
Located on the far left of the screen, a dark vertical bar houses the operational menus. Selecting the tools icon (wrench and screwdriver) deploys the floating "Build" panel, which contains essential building blocks:
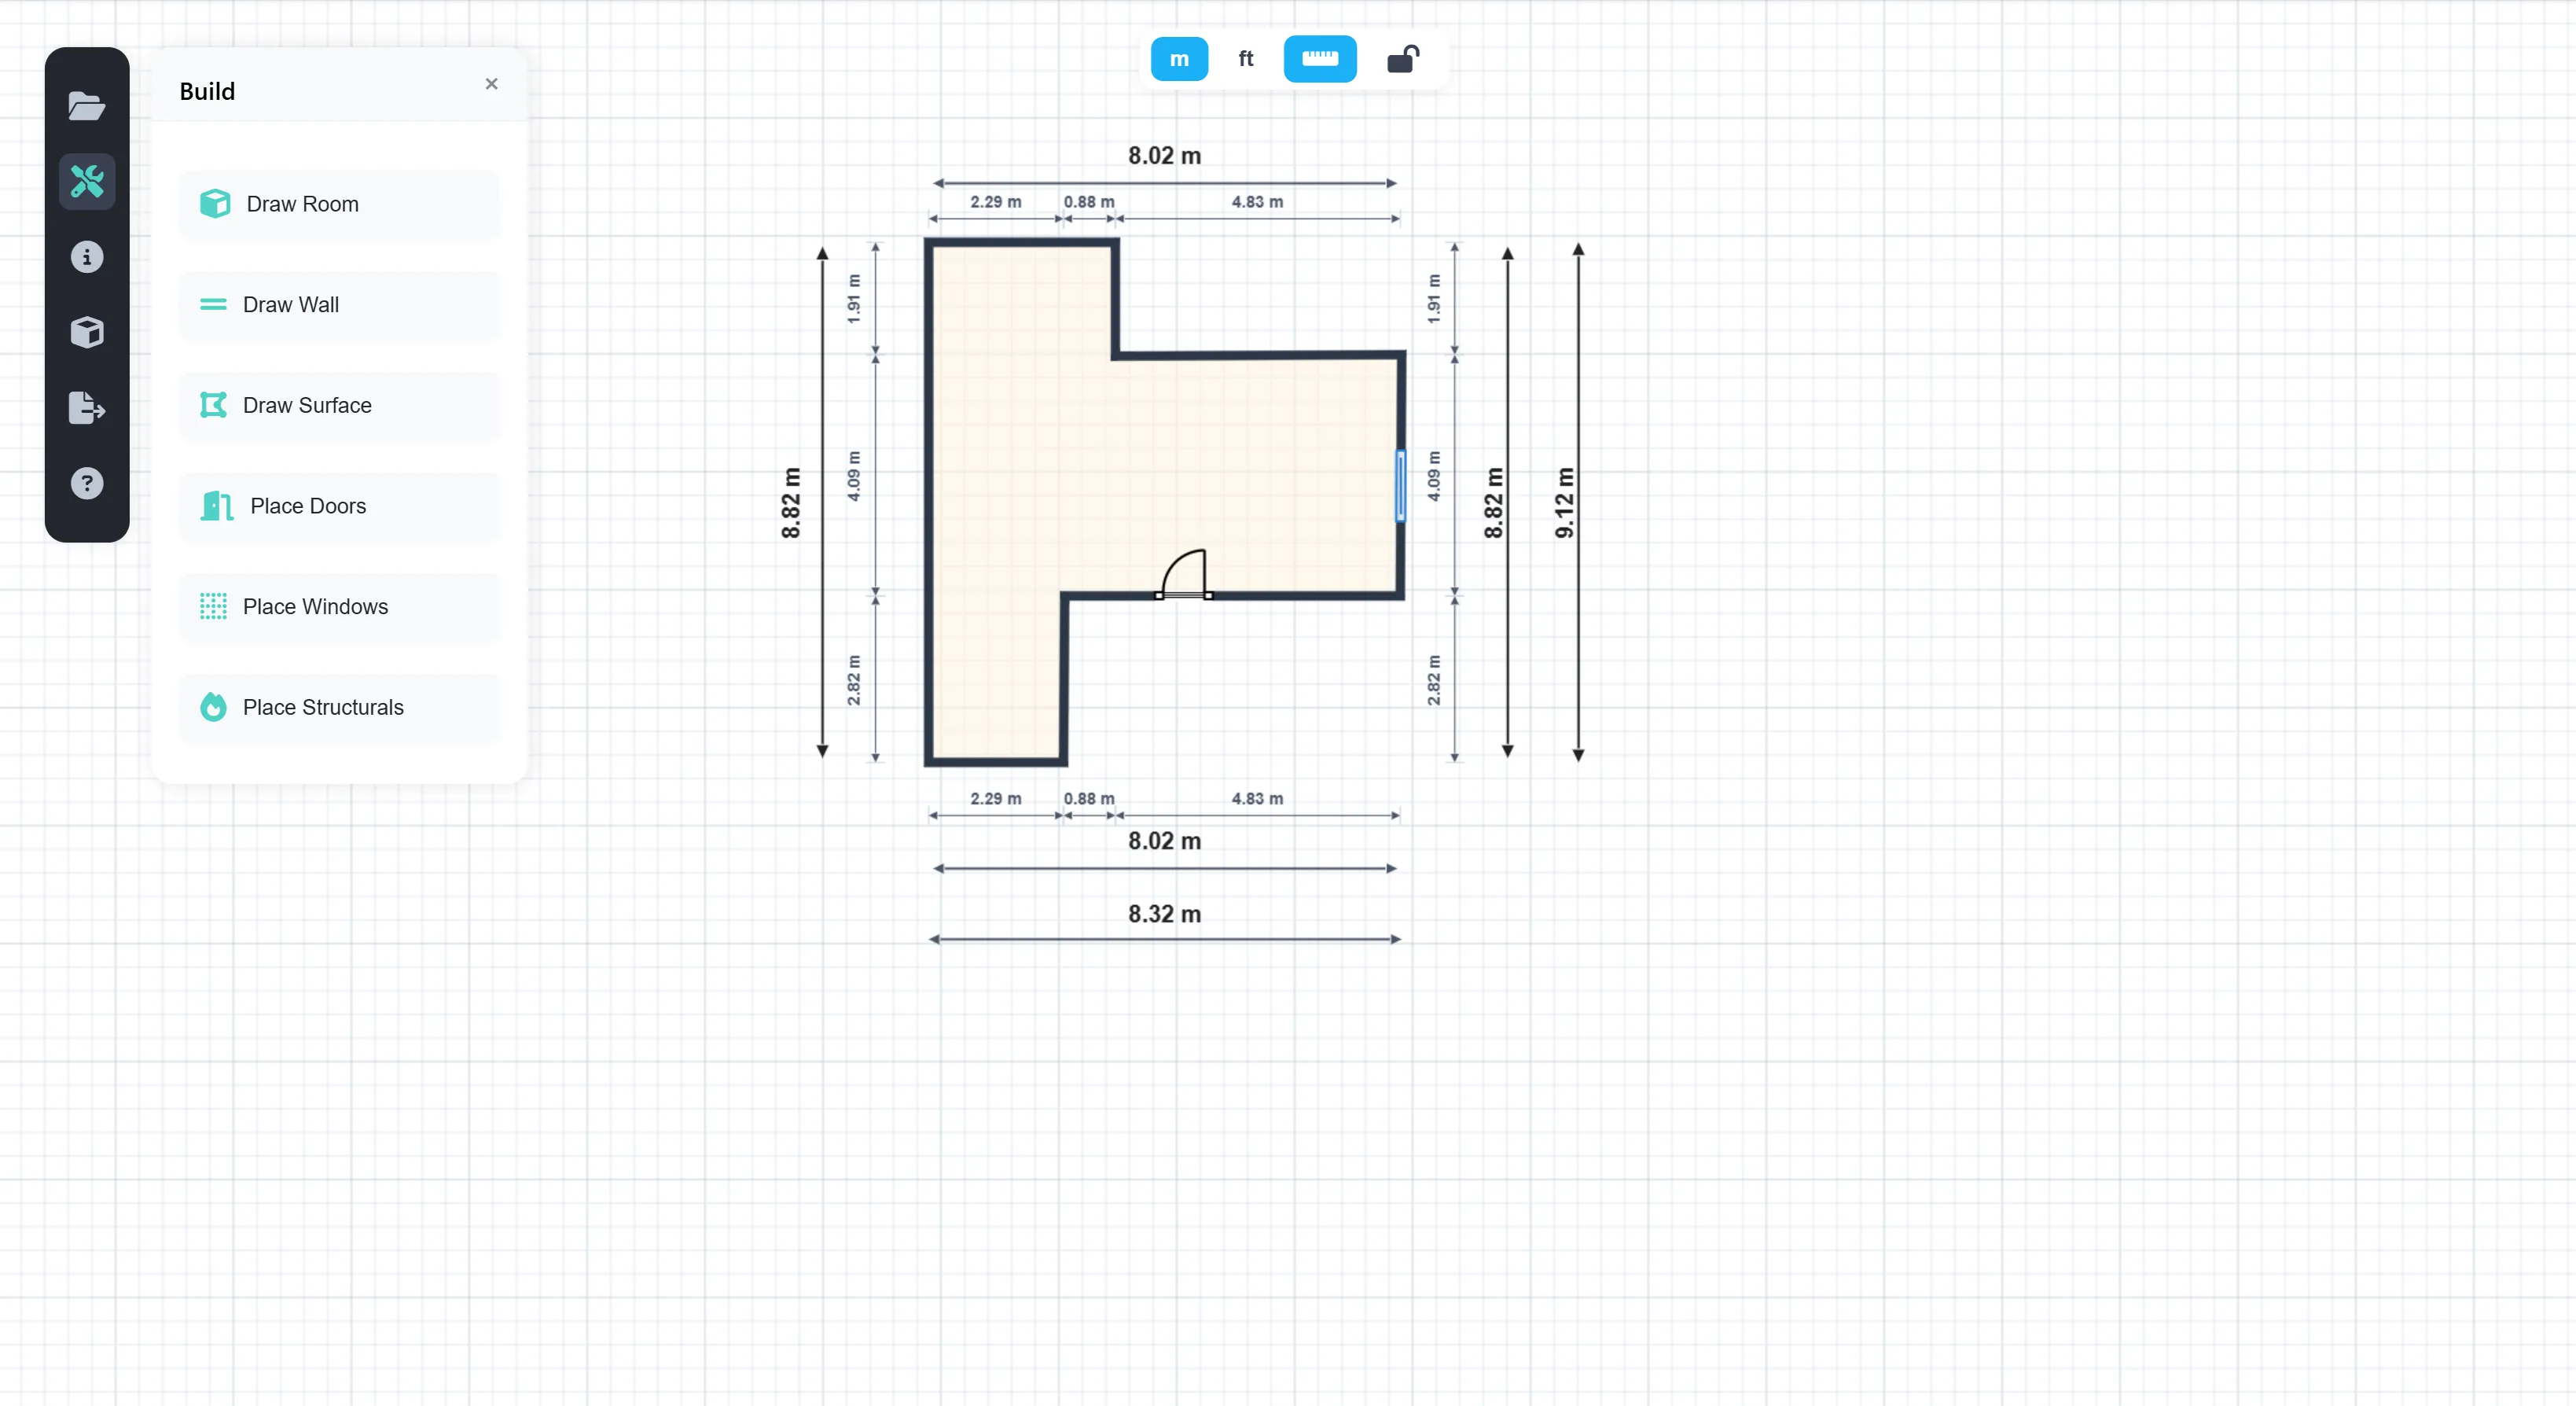
Construction toolbar (Build).
- Draw Room: Allows tracing predefined quadrangular rooms or spaces swiftly.
- Draw Wall: Freehand linear drawing tool to erect custom walls at any angle.
- Draw Surface: Defines specific floor areas, slabs, or surface textures on the map.
- Place Doors: Inserts swing or sliding doors, or access points with configurable opening directions (as seen already placed in the center of the plan).
- Place Windows: Adds window openings in walls to define the lighting of the plan (identified as a blue block on the right wall).
- Place Structurals: Allows positioning essential load-bearing elements such as columns, pillars, or support beams.
4. Export and Compatibility Module
Once the structural design is finished, the export icon (folder with an outgoing arrow) opens an interactive modal window to download the file in multiple formats depending on the required technical destination:
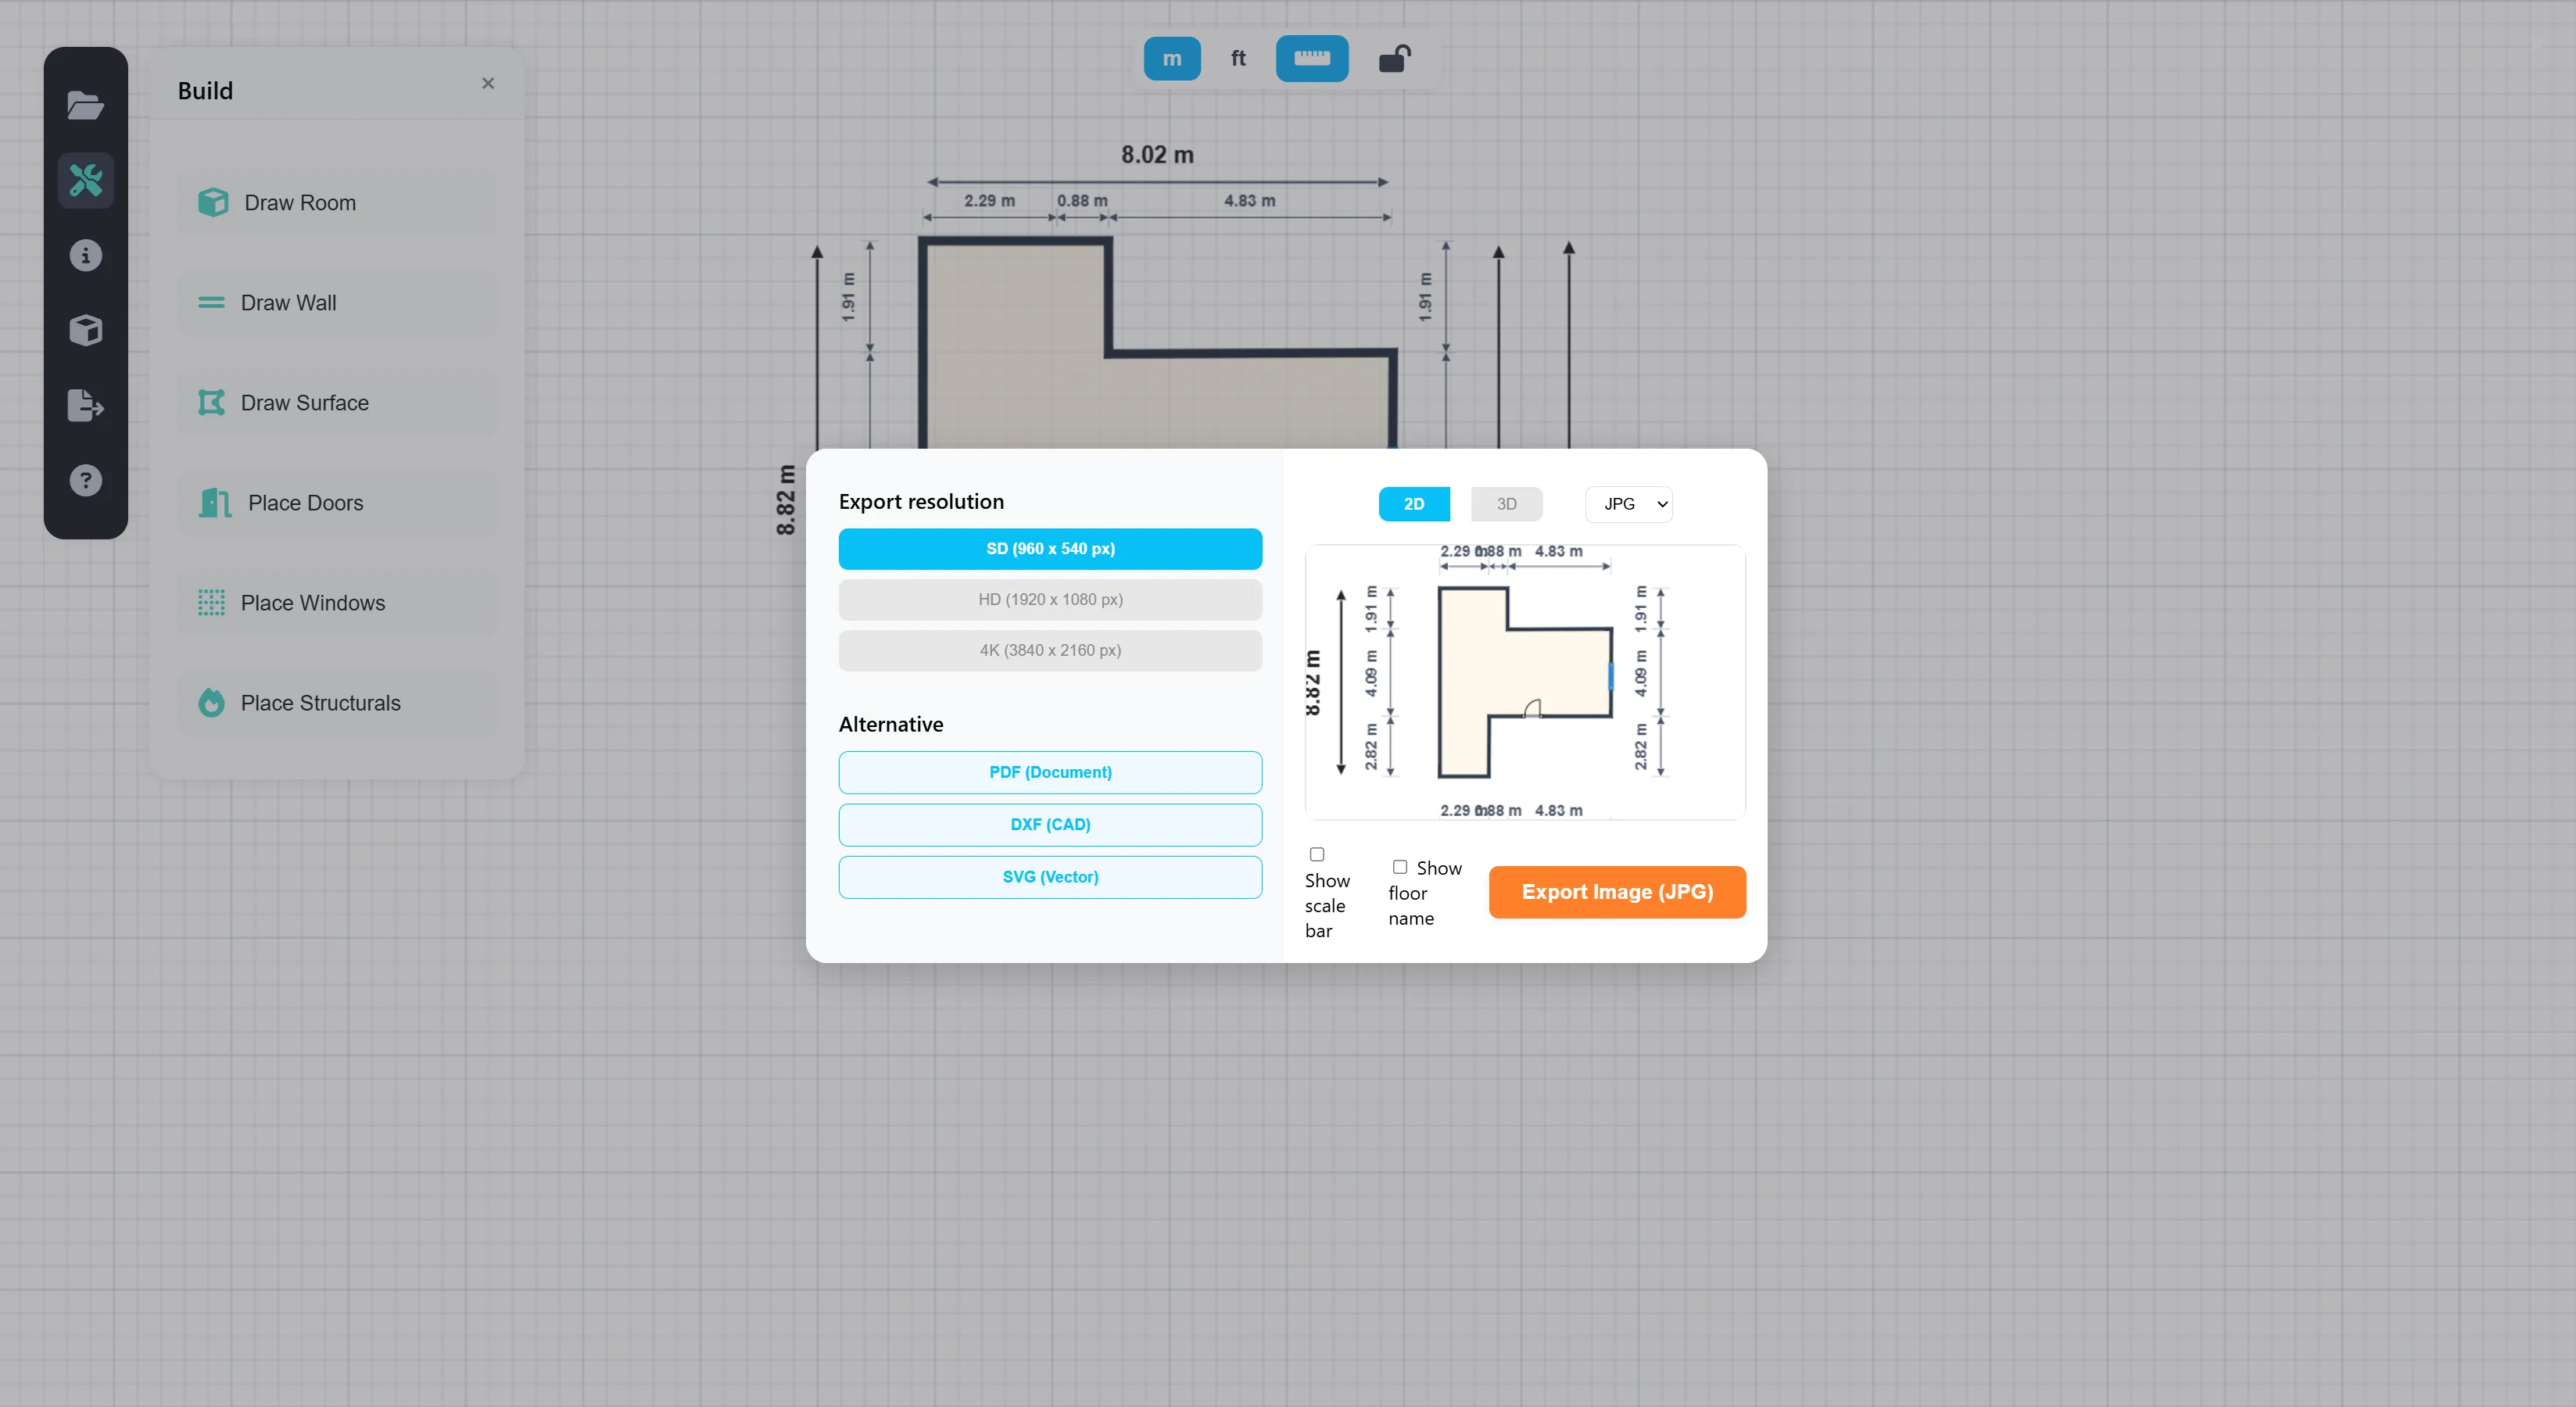
Plan export options in multiple formats.
- Traditional Image Formats: Allows downloading the plan as a physical image (.JPG or .PNG) by selecting the desired resolution based on the necessary level of detail:
- SD: (960 x 540 px)
- HD: (1920 x 1080 px)
- 4K: (3840 x 2160 px)
- Professional and Engineering Formats (Alternative):
- PDF (Document): Ideal for attaching directly as official documentation or project reports.
- DXF (CAD): (Upcoming optimization improvement) Exports the plan in vector format compatible with AutoCAD, Revit, and other native architecture programs.
- SVG (Vector): Downloads the drawing in clean vector scale for graphic design or web manuals.
- Rendering and Printing Modes: The wizard allows toggling between two-dimensional (2D) views and the modeling skeleton (3D), and includes checkboxes to decide whether to print the scale bar (Show scale bar) or room names (Show floor name).
9. Module: Task Center (Checklist)
The Task Center module (identified in the side menu as Checklist) works as the platform's global operational core. Unlike individual task lists found within each site's view, this module unifies and centralizes the activity status of all the organization's projects on a single screen, allowing administrators and operational directors to oversee general staff performance and immediately detect bottlenecks.
The interface is structured under the following components:
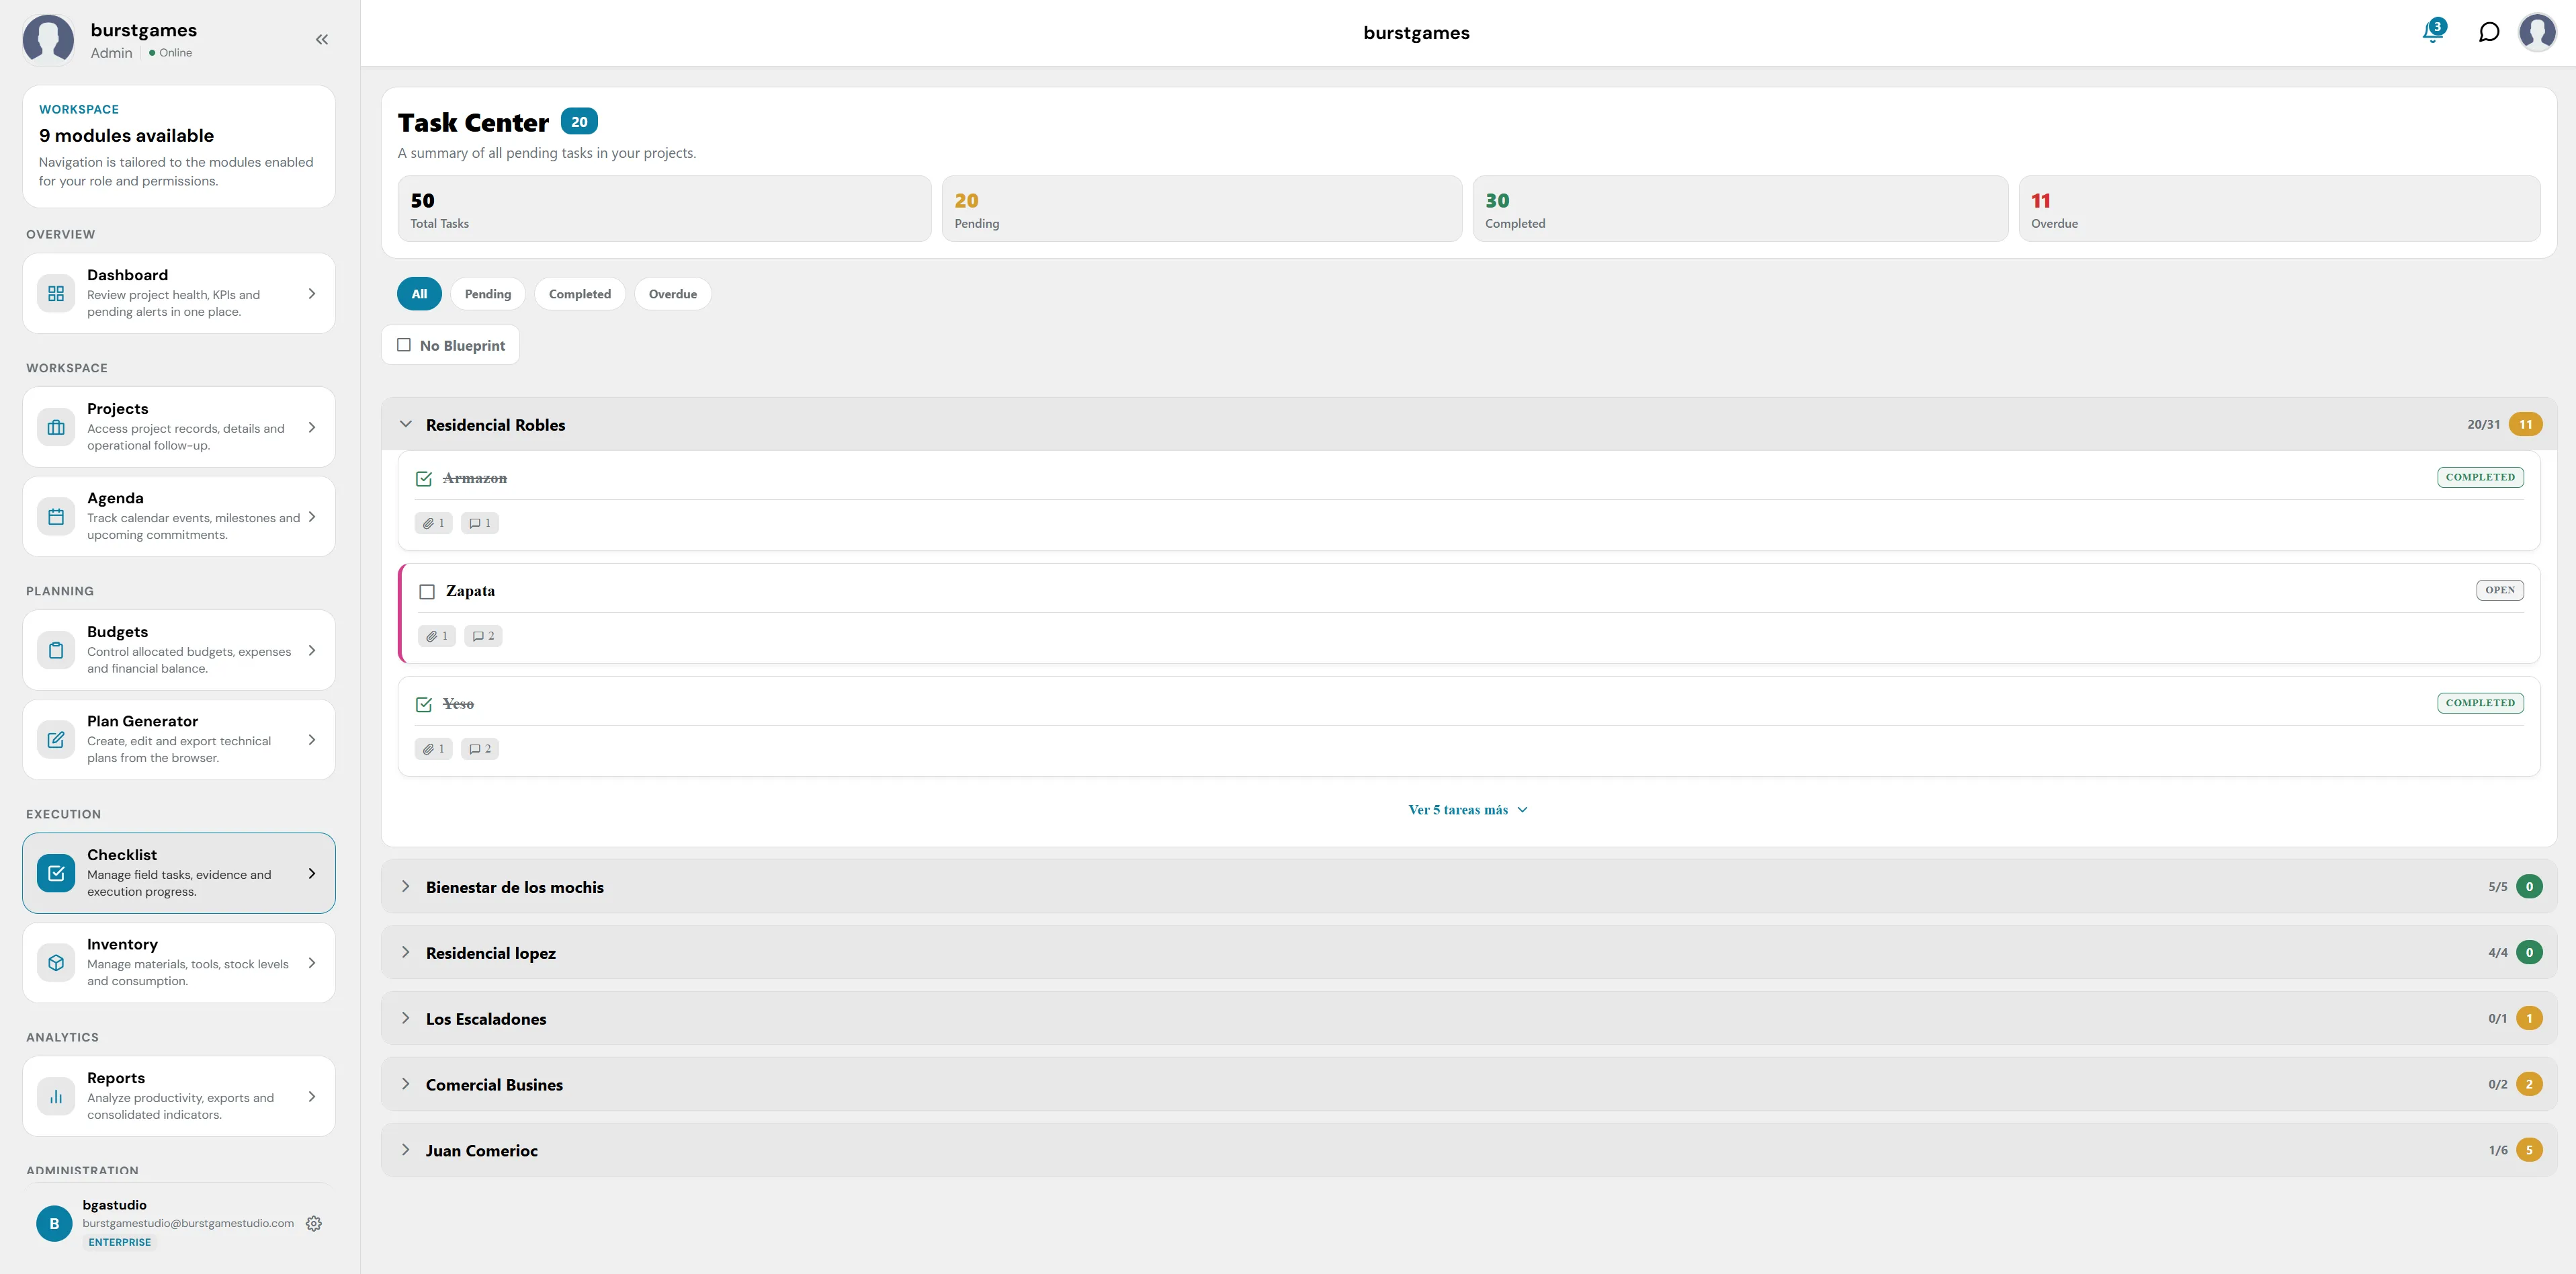
General view of the global Task Center.
1. Task Control Metrics Panel (Global KPIs)
Located at the top of the module, it provides a numerical and cumulative summary of the company-wide workload:
- Task Center (Main Counter): Next to the title is a blue indicator with the total volume of alerts or tasks that require priority attention (e.g. 20).
- Total Tasks: Historical and cumulative amount of tasks registered on the platform (e.g. 50).
- Pending: The total number of activities currently open or in the execution process by the field team (e.g. 20).
- Completed: Quantifies how many tasks have been successfully finished and validated across all work fronts (e.g. 30).
- Overdue: A critical counter in red that highlights tasks whose deadline has already passed and remain incomplete (e.g. 11).
2. Advanced Filtering Bar
Just below the metrics cards are quick segmentation tools:
- Status Filters: Interactive buttons to narrow down the visual list according to audit needs: All (active by default), Pending, Completed, and Overdue.
- Blueprint Filter (No Blueprint): A checkbox that, when activated, isolates and shows only the general tasks of the project, hiding those that are geolocated or anchored to a technical sheet in the interactive plans sub-module.
3. Task Portfolio by Project (Accordion Structure)
The central body of the screen organizes activities by grouping them by their respective site using expandable containers:
- Project Header: Each row represents an active site. On the far right of each tab, the numerical progress ratio is shown along with a colored circle with the count of specific issues or delays for that front.
- Internal Activities Breakdown: Clicking to expand a project reveals the list of its tasks with their individual properties:
- Verification Status: Each task has a selection box on the left. If completed, it shows a green checkmark (☑) and the title crossed out; if still active, the box is empty.
- Status Badge: On the far right of the task row, its status is ratified in uppercase (COMPLETED in green or OPEN in gray).
- Support Counters: Icons below the title indicating the volume of attached files (clip icon) and the amount of comments registered in the assignment's log (message icon).
- Internal Expansion Control (See more): At the base of the deployed project, this button allows you to cleanly load the rest of the site's secondary tasks without saturating the browser's visual performance.
10. Module: Inventory
The Inventory module provides the essential operational tools to supervise, audit, and control the physical flow of the organization's resources. Its unified architecture allows managing both the available stock in the warehouse and the requests for construction materials supply linked to field tasks.
The interface is segmented into four main control tabs that structure the material lifecycle:
1. Main Warehouse
This tab functions as the real-time active stock ledger. It displays an automated table with the breakdown of available stock and its accumulated financial value:
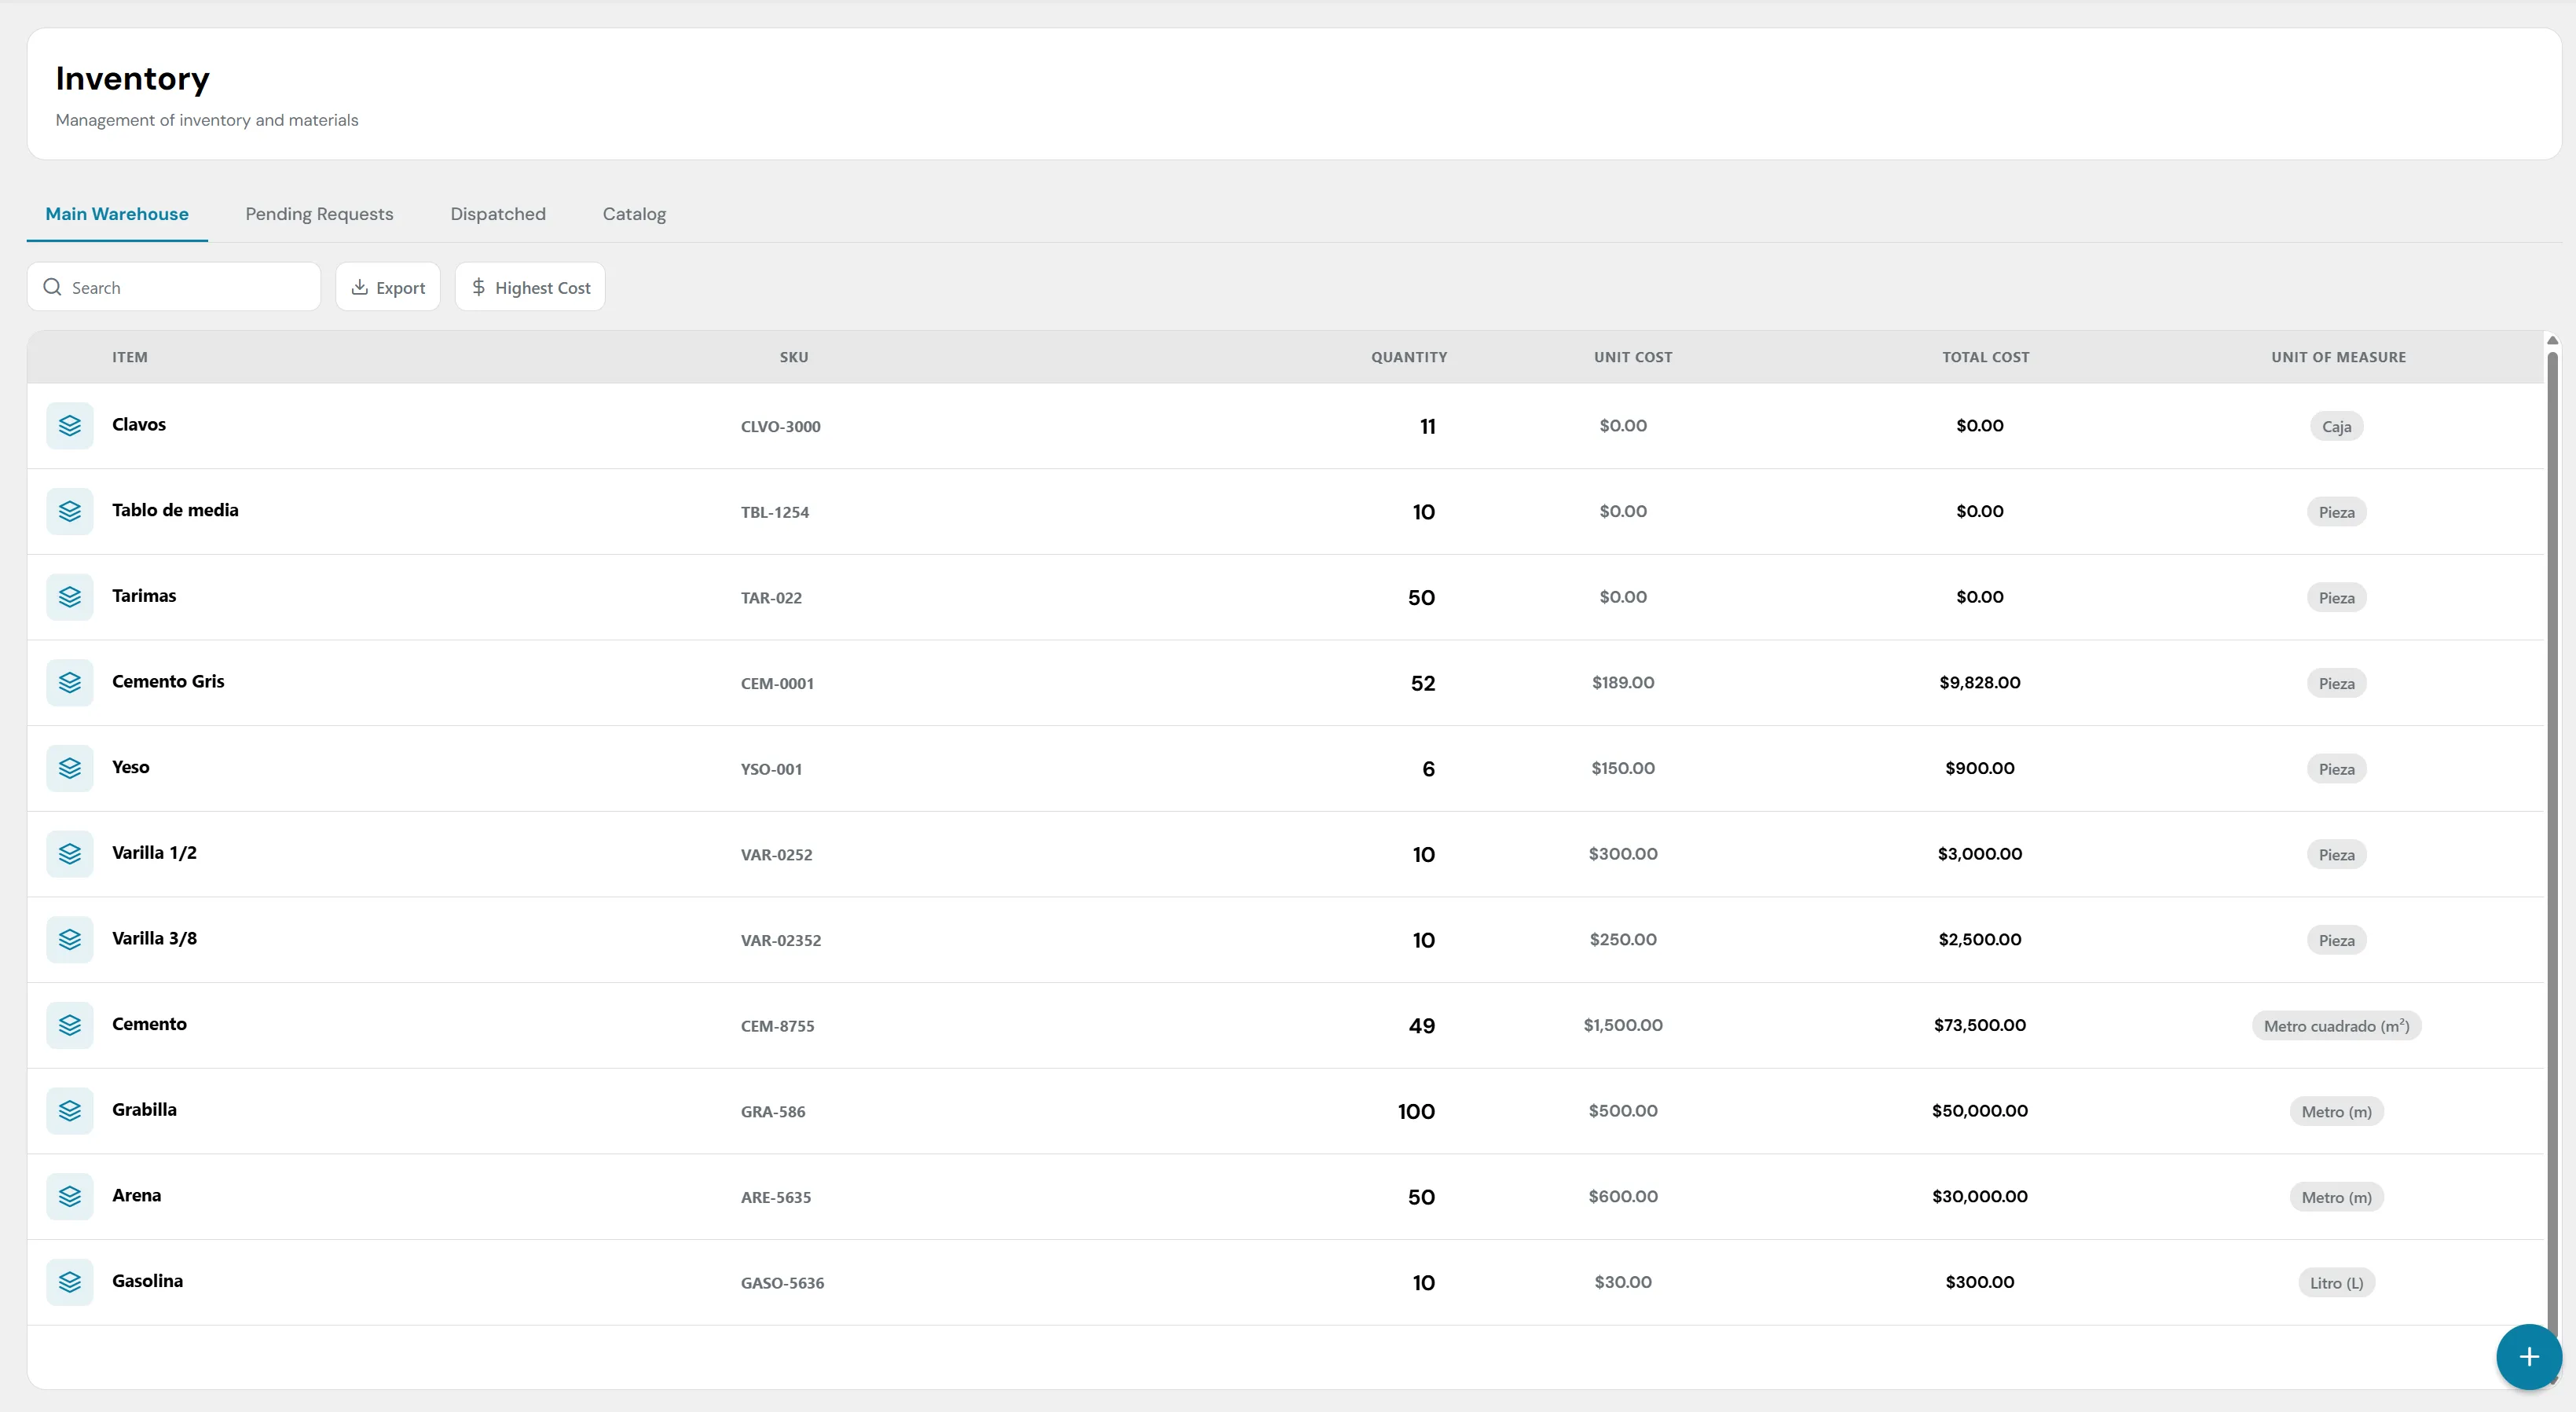
View of the Main Warehouse and stock control.
- Search and Tools: It has a quick text search bar, a data export button (Export), and a cost sorting filter (Highest Cost).
- Stock Control Columns:
- Item / SKU: Identifies the supply's name and its unique catalog code (e.g. Nails CLVO-3000, Gray Cement CEM-0001).
- Quantity: Quantifies the actual physical units stored in the warehouse (e.g. 52 units of Gray Cement).
- Unit Cost: The base unit acquisition price of the material (e.g. $189.00).
- Total Cost: The total financial value of the stock for that supply in the warehouse, calculated mathematically by applying the volume to its unit cost (Quantity x Unit Cost, e.g. $9,828.00 for the cement).
- Unit of Measure: The standardized dispatch metric unit (e.g. Box, Piece, Square meter (m²), Liter (L)).
2. Pending Requests
This is the logistics area where the warehouse manager receives and processes the out tickets generated by the site supervisors:
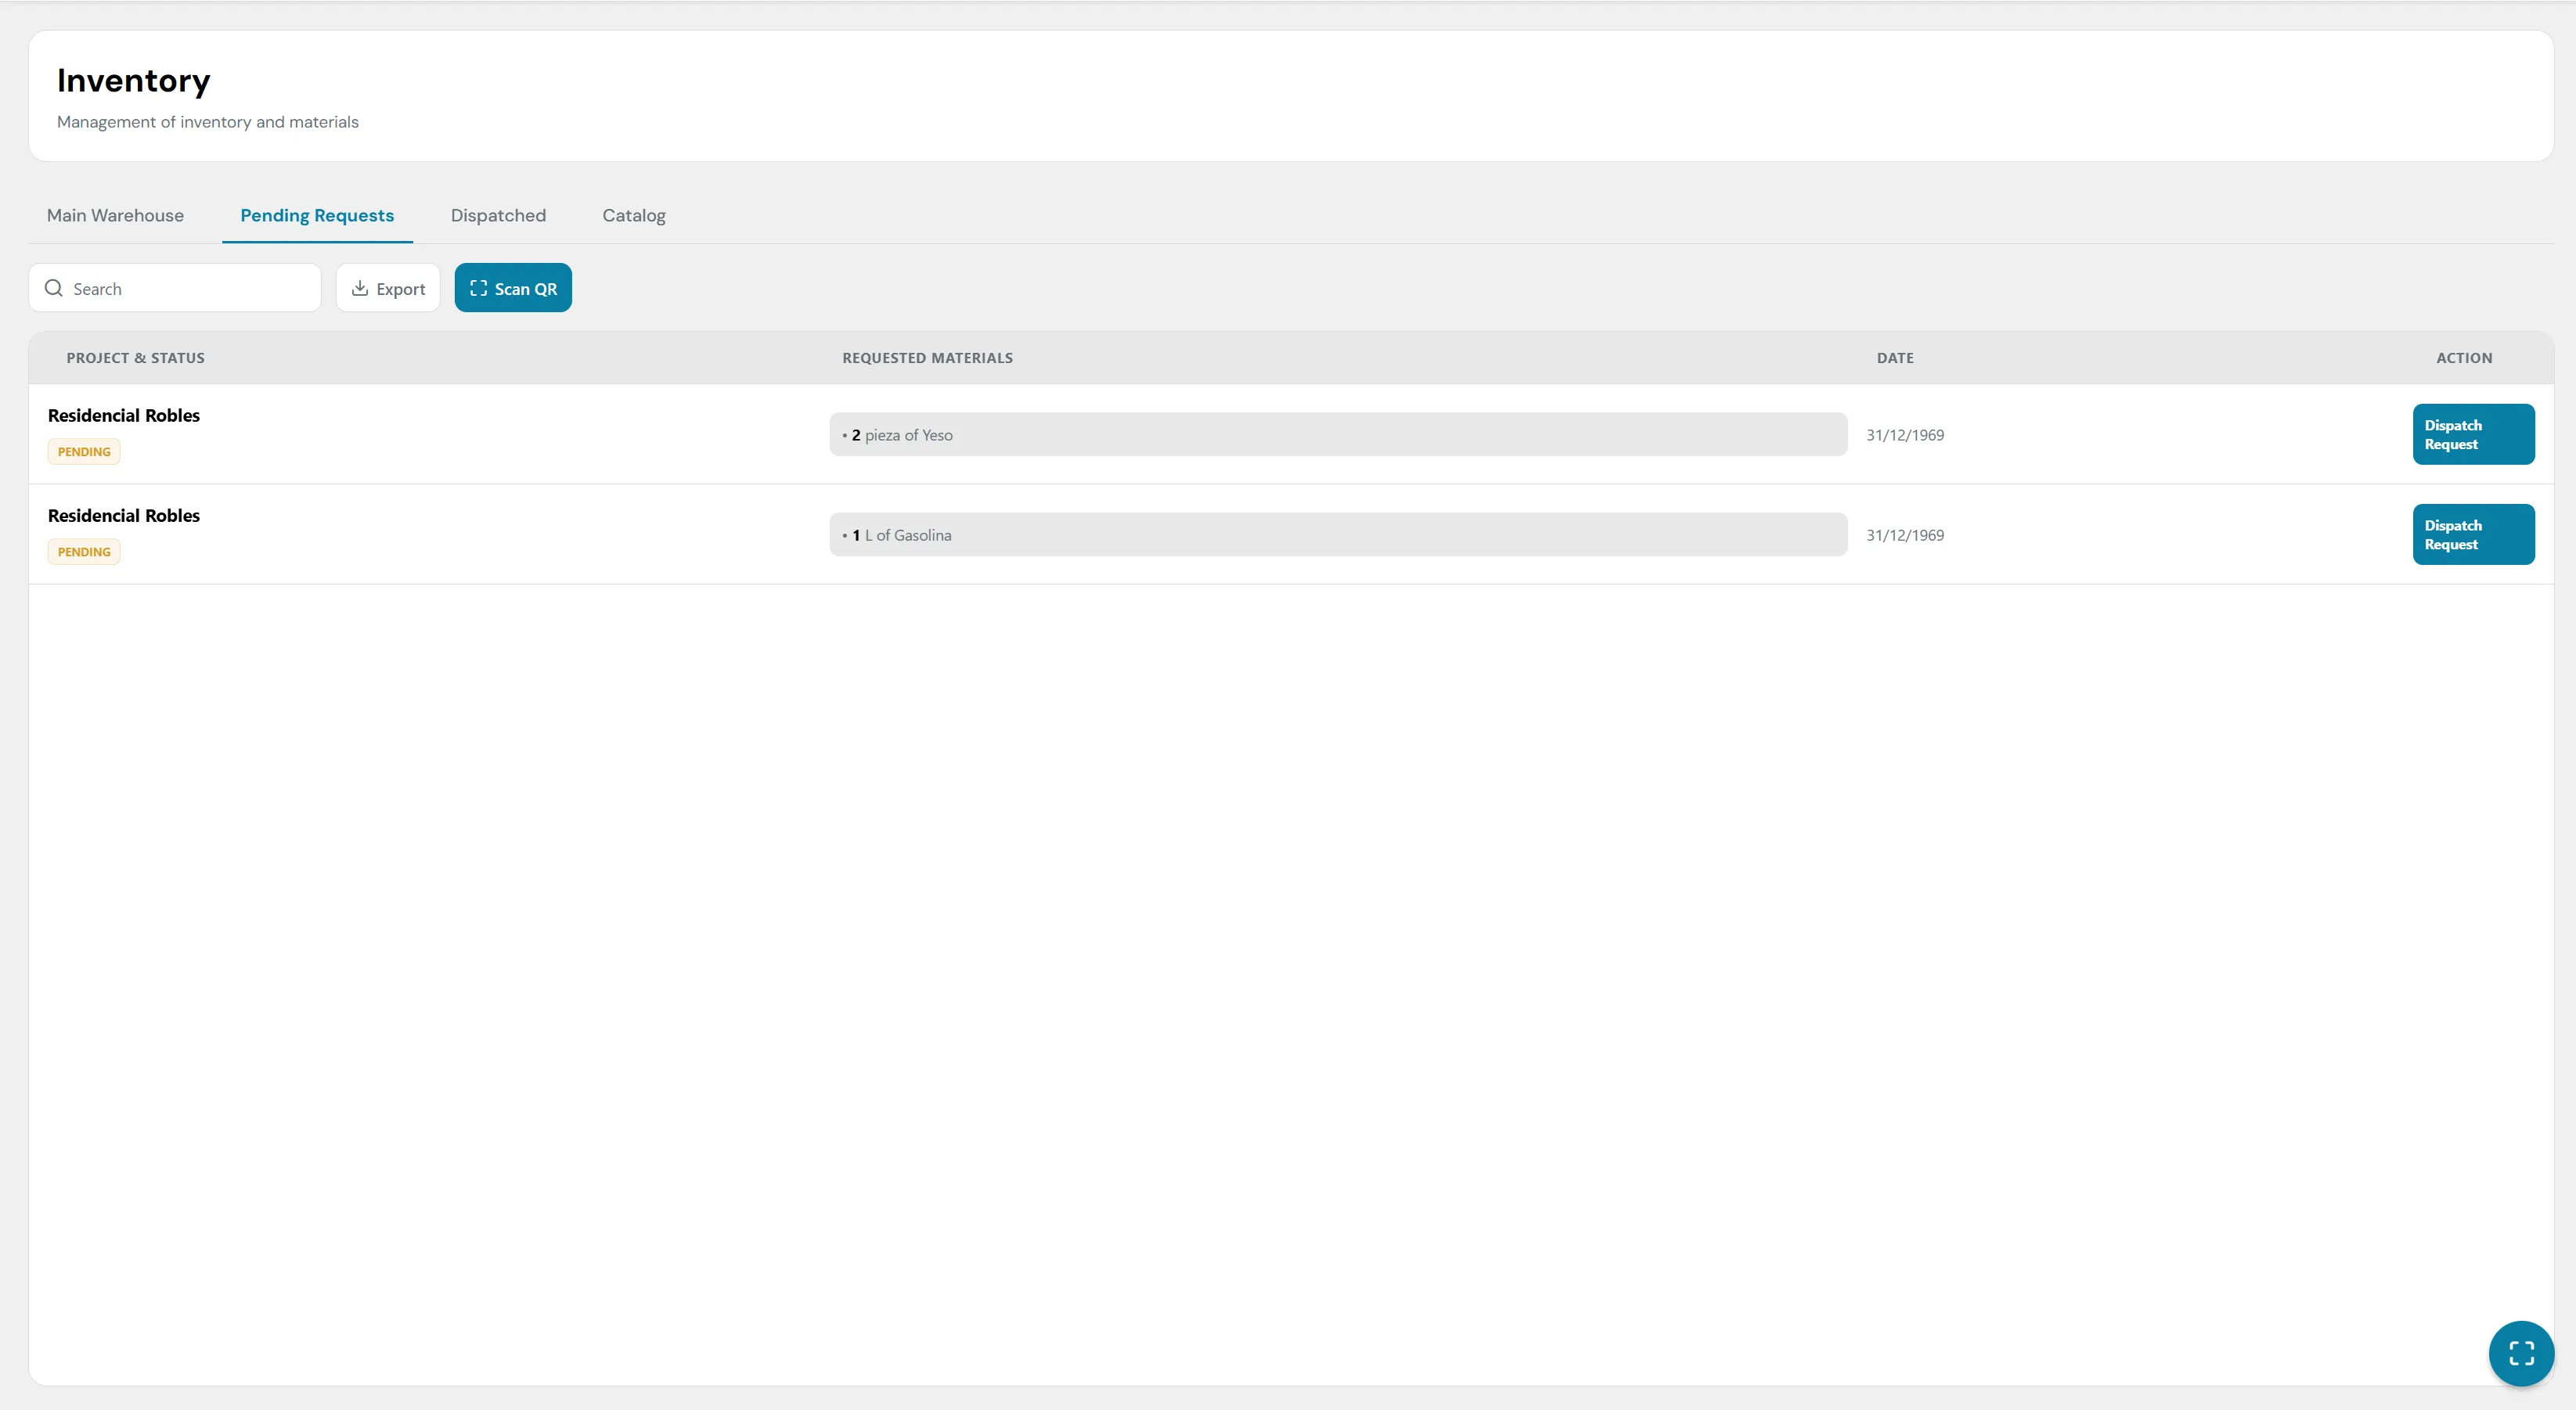
Management of Pending Requests via QR scanning.
- QR Code Scanner (Scan QR): A prominent button that activates the device's camera to directly scan the workers' out tickets, instantly locating the request in the list.
- Order Dispatch Structure:
- Project & Status: Details to which site the supplies will be assigned and shows the yellow PENDING status badge.
- Requested Materials: Specifies the exact volume and type of supply requested (e.g. • 2 piece of Plaster or • 1 L of Gasoline).
- Date: Records the date of the request.
- Action (Dispatch Request): Main action button. When clicked, the storekeeper confirms the physical delivery, which automatically deducts the units from the global inventory in the Main Warehouse tab and moves the record to the history.
3. Dispatched History
A linear and blind audit trail record that stores all historically approved material exit movements of the organization:
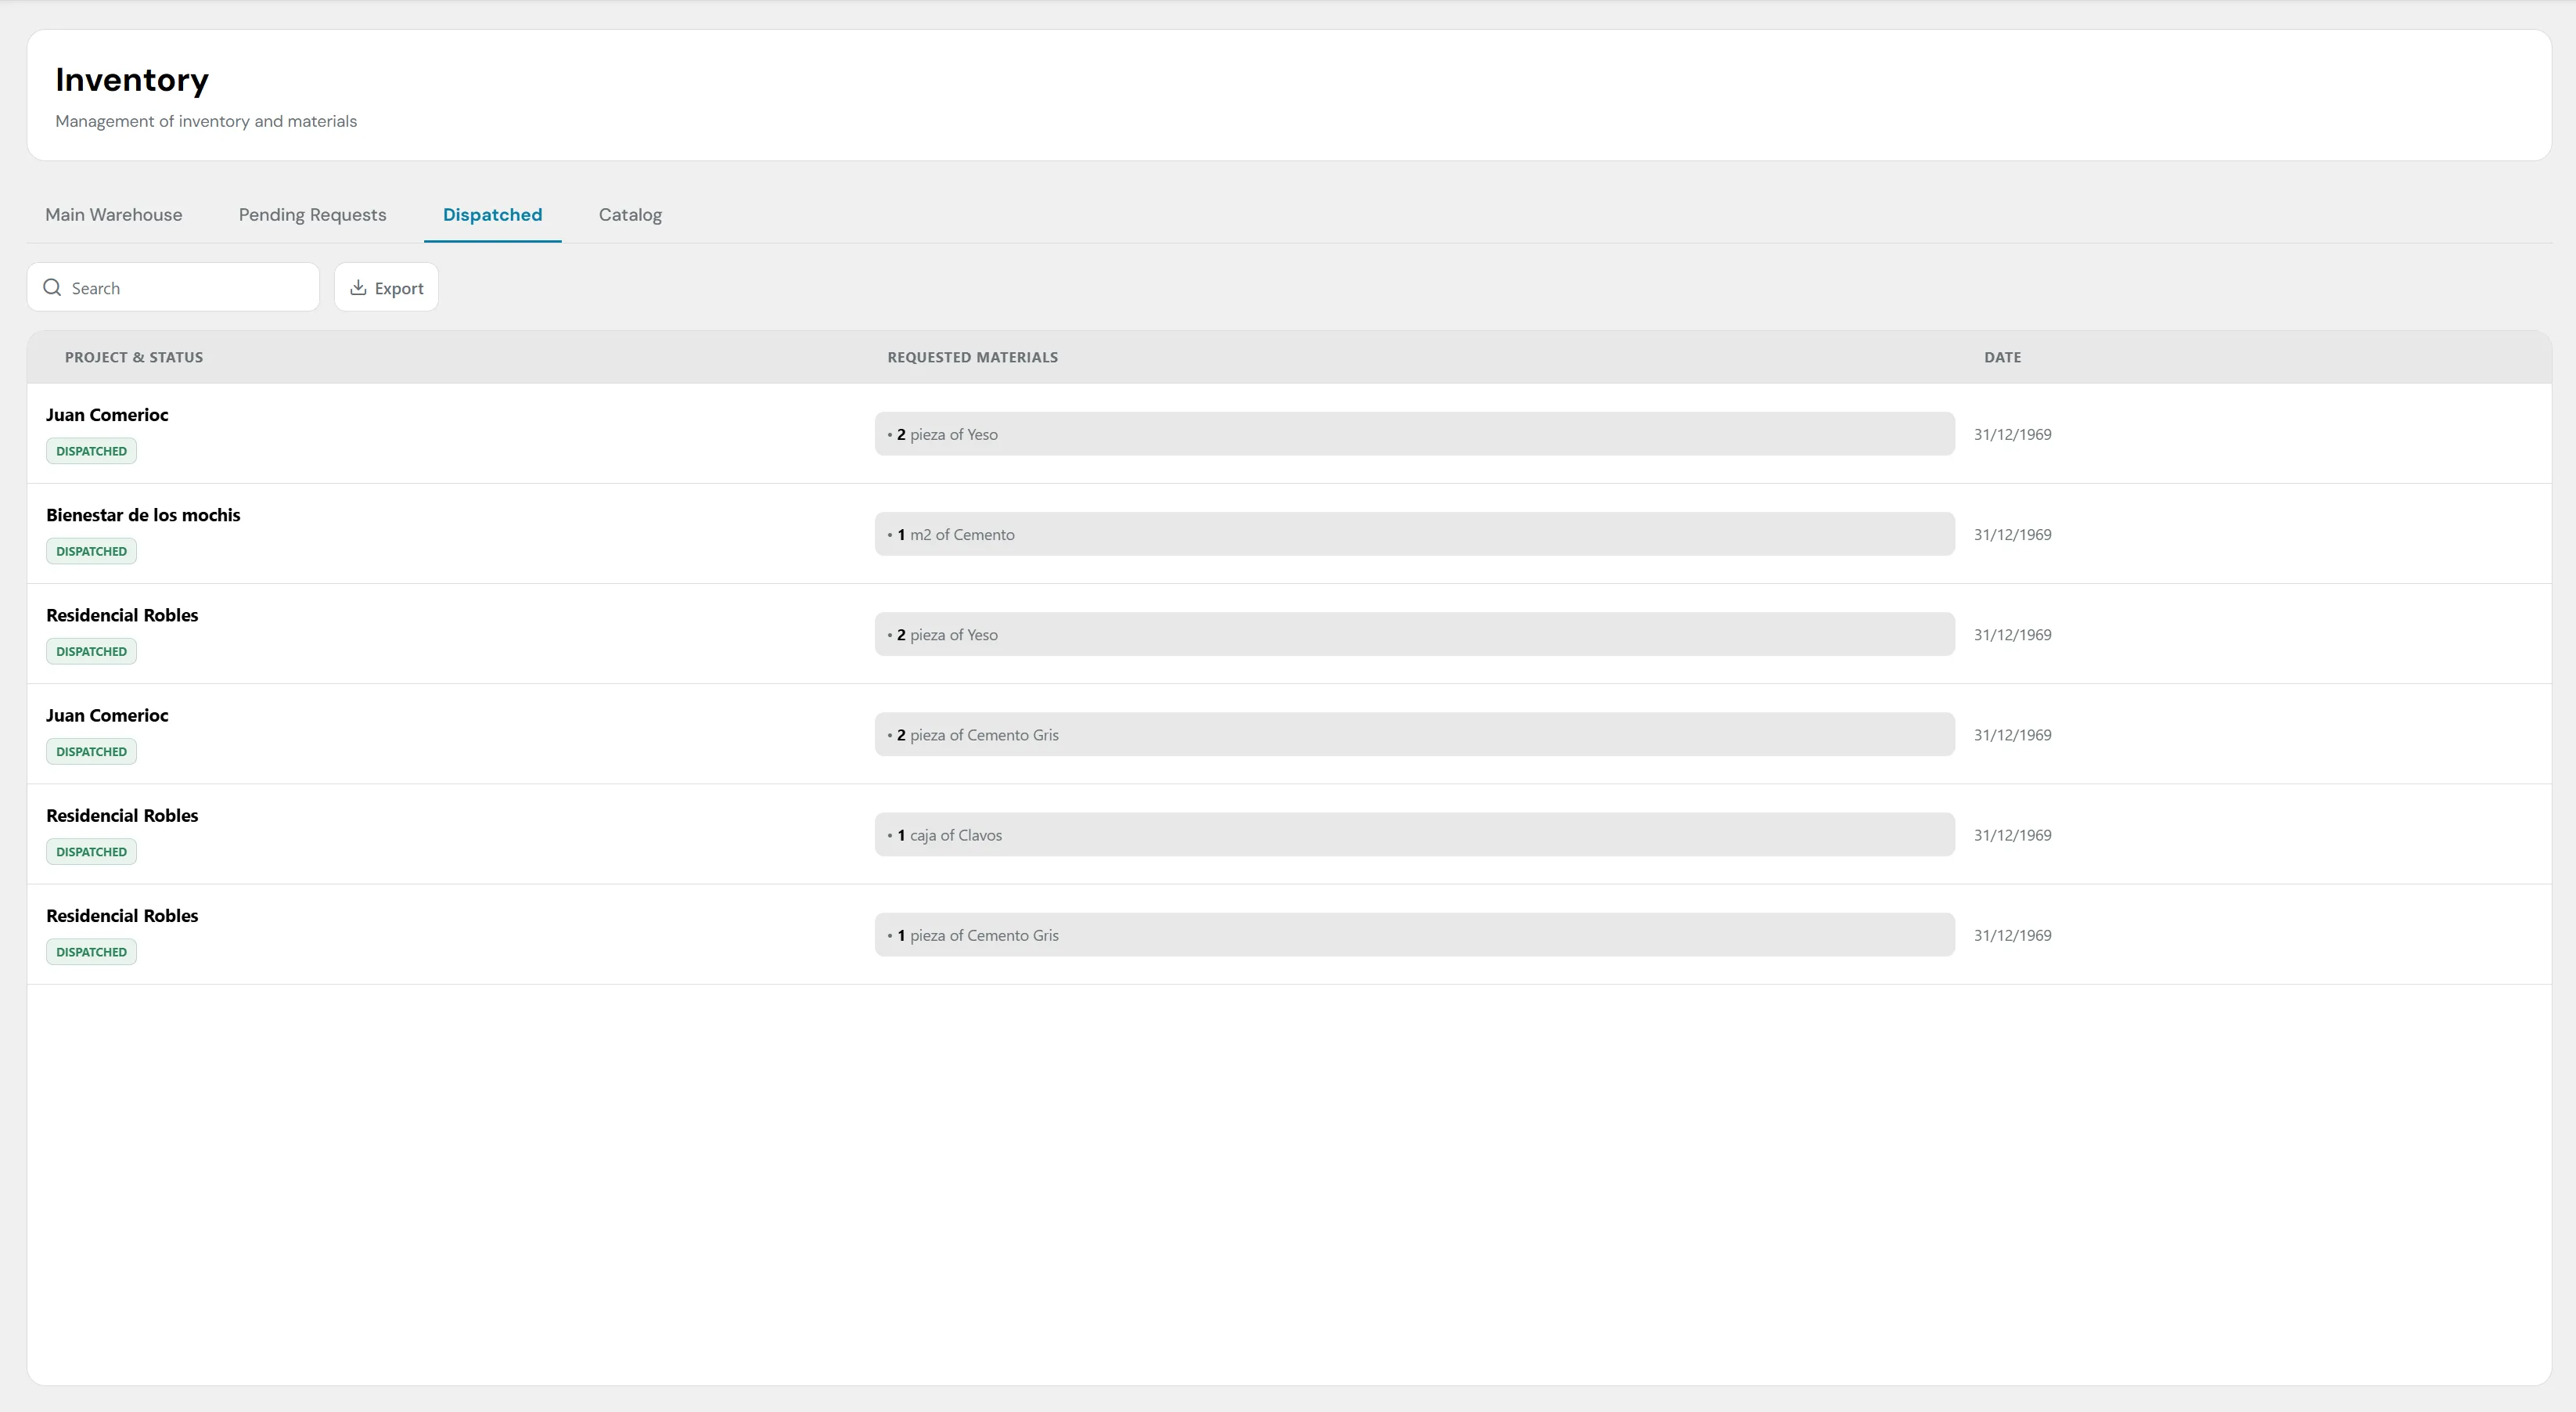
History of materials dispatched to projects.
- Consumption Traceability: Transparently shows which project consumed the supplies (e.g. Juan Comercio, Bienestar de los mochis, Residencial Robles), what specific materials left the warehouse, the exact date of release, and the green final confirmation badge with the DISPATCHED status.
4. Material Master Catalog (Catalog)
This tab represents the reference database that feeds the entire system. Here, the fixed properties of the supplies are configured before physically entering the warehouse:

Material and supply Master Catalog.
- Item: Name of the product accompanied by its technical description (e.g. 1/2 Rebar - Half-meter rebar).
- Supplier: Allows linking and informatively recording the direct supplier or material house associated with the purchase of that supply (e.g. Madereria Chihuahua, Construrama).
- Actions (Maintenance Controls): At the far right of each row, individual tools are integrated:
- Pencil Icon: Opens the editor to correct names, SKU codes, units of measure, or update base unit costs.
- Trash Icon: Permanently removes the item from the master catalog.
- Global Registration Button (+): The floating blue button in the lower right corner opens the wizard to register a completely new product in the system.
11. Module: Reports
The Reports module is the analytical and informational core of the platform. Its main function is to unify operational performance, task progress, and portfolio status into consolidated metrics, offering an interactive wizard to export executive summaries and financial audits in formats compatible with external tools (PDF and Excel).
The interface and its structured download flows are broken down below:
1. Analytical Panel and Projects Preview
Upon entering the section, the system presents a statistical dashboard:

View of the analytical panel and portfolio status.
- Consolidated Top Indicators: Shows quick organizational metrics such as total projects (6), completed sites (2), and the Global Task Completion Rate (61%).
- Portfolio Status Cards: Color blocks that classify projects according to their current condition (Total Projects: 6, Active: 2, Delayed: 1, Completed Tasks: 61%).
- Projects Preview Module: A linear table that exposes the health status of each site at a glance, transparently listing the name of the work front, its status badge (Delayed, Completed, Not Started, In Progress), and its actual progress percentage (from 0% to 100%).
2. Export Flow A: PDF Generation (Executive Summary)
Clicking on the blue "Generate PDF" button displays a step-by-step configuration wizard:
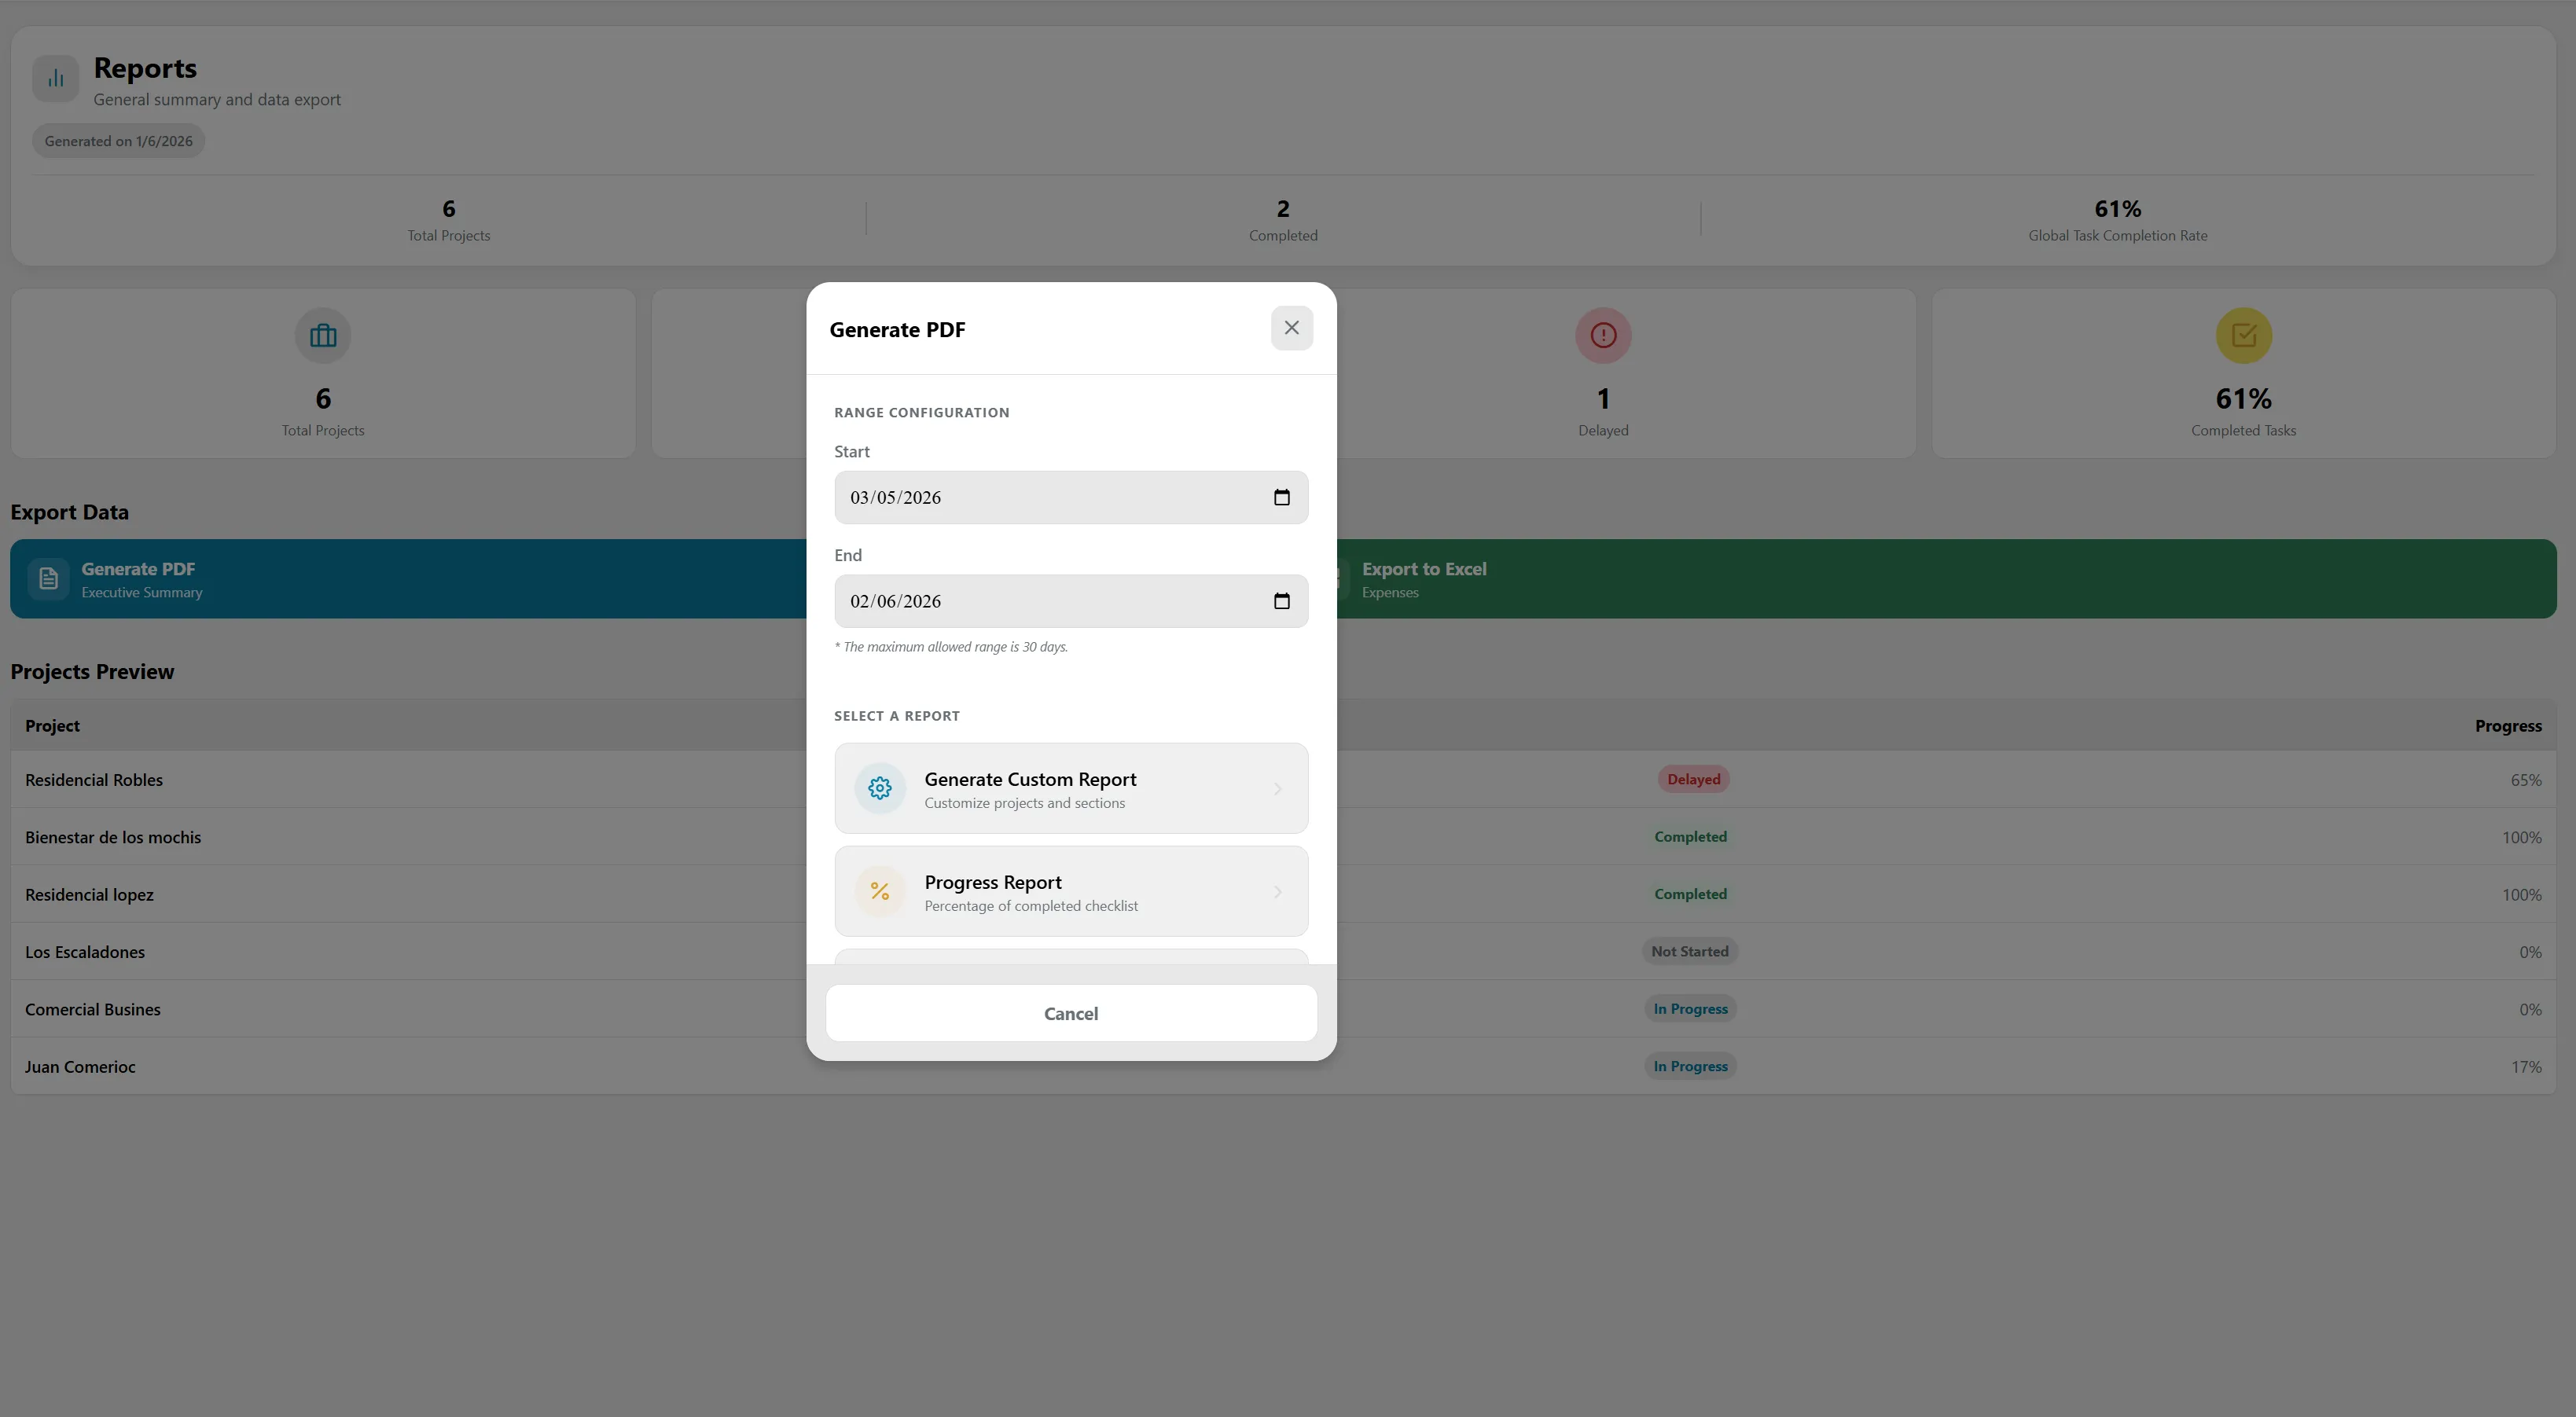
Configuration wizard for PDF report generation.
- Range Configuration: The user must specify a date range with a Start and End day using the calendar selectors. The system includes a clear business rule: the maximum allowed range for the query is 30 days (* The maximum allowed range is 30 days).
- Report Type Selection: Allows choosing the document's base template:
- Generate Custom Report: Opens a second level of advanced customization, where the user marks via checkboxes exactly which projects to include in the document and which operational sections to attach (e.g. Project Summary, Task Status, Budget Overview, Evidence Gallery).
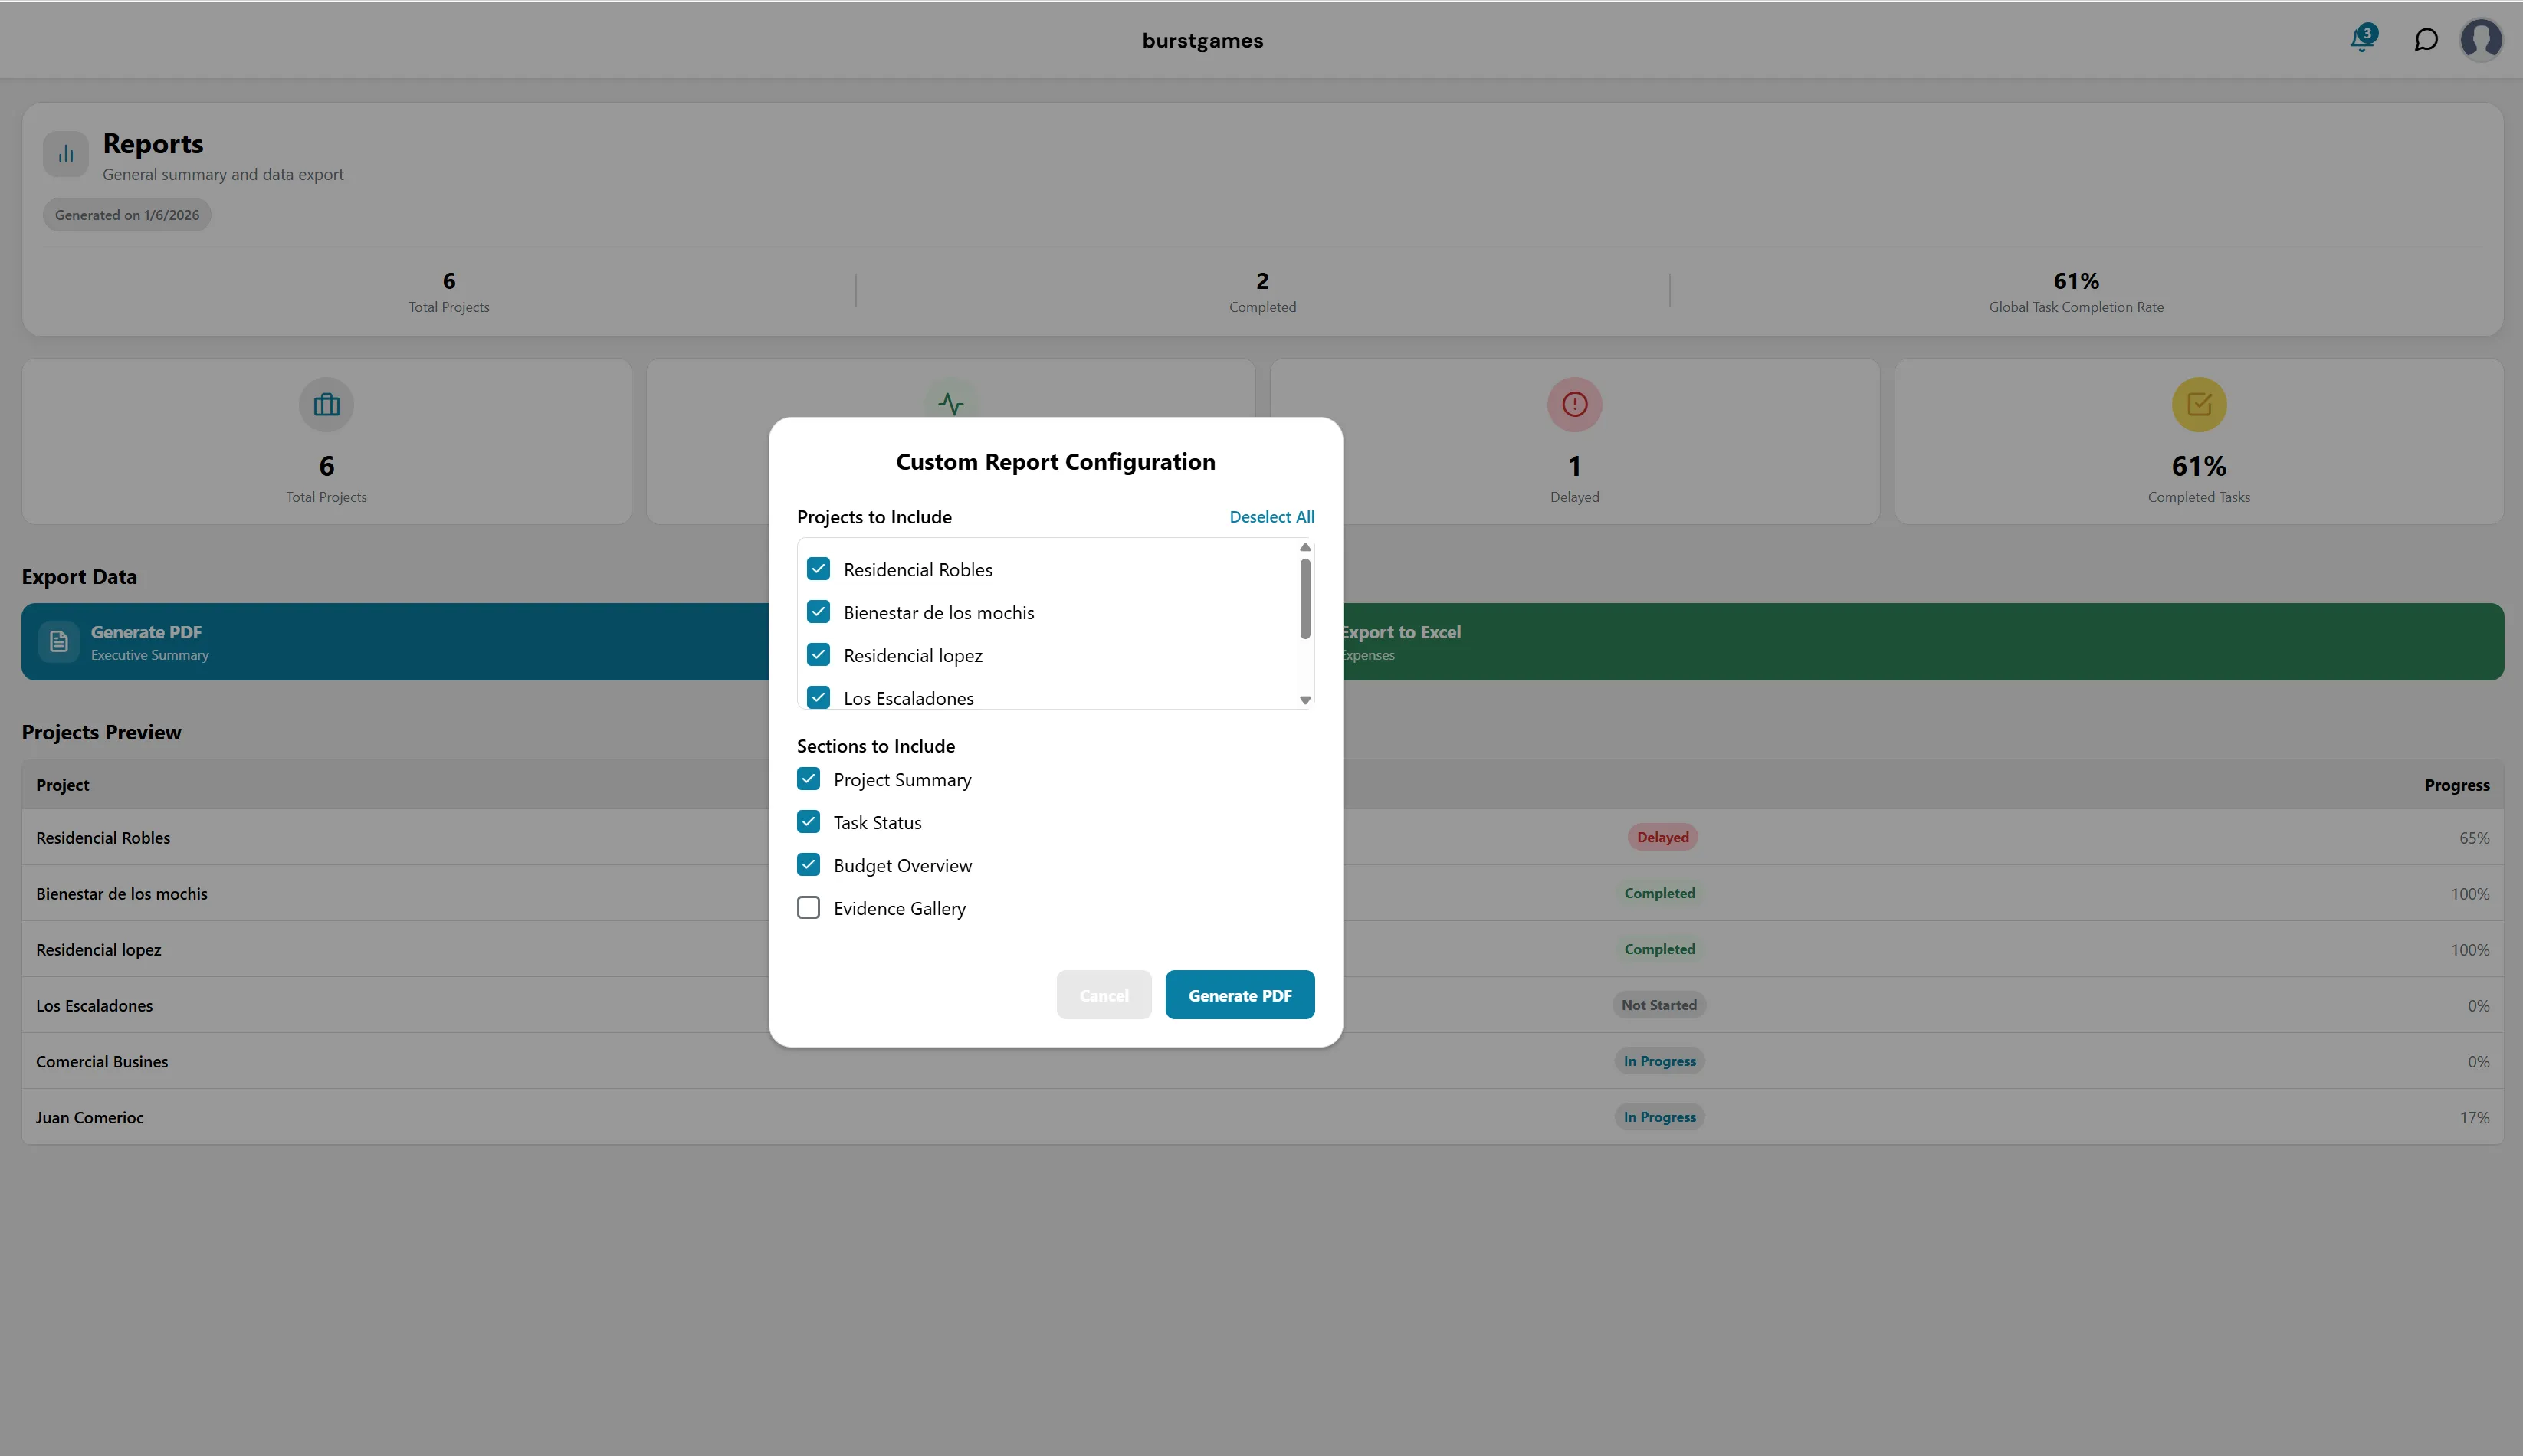
Advanced options to customize the PDF report.
- Progress Report: Generates an automated report focused purely on the completion percentage of checklists.
- Generate Custom Report: Opens a second level of advanced customization, where the user marks via checkboxes exactly which projects to include in the document and which operational sections to attach (e.g. Project Summary, Task Status, Budget Overview, Evidence Gallery).
3. Export Flow B: Excel Download (Expenses)
When the administrator or financial auditor needs to perform advanced data, budget, or accounting cross-referencing, the platform offers the direct download of spreadsheets:
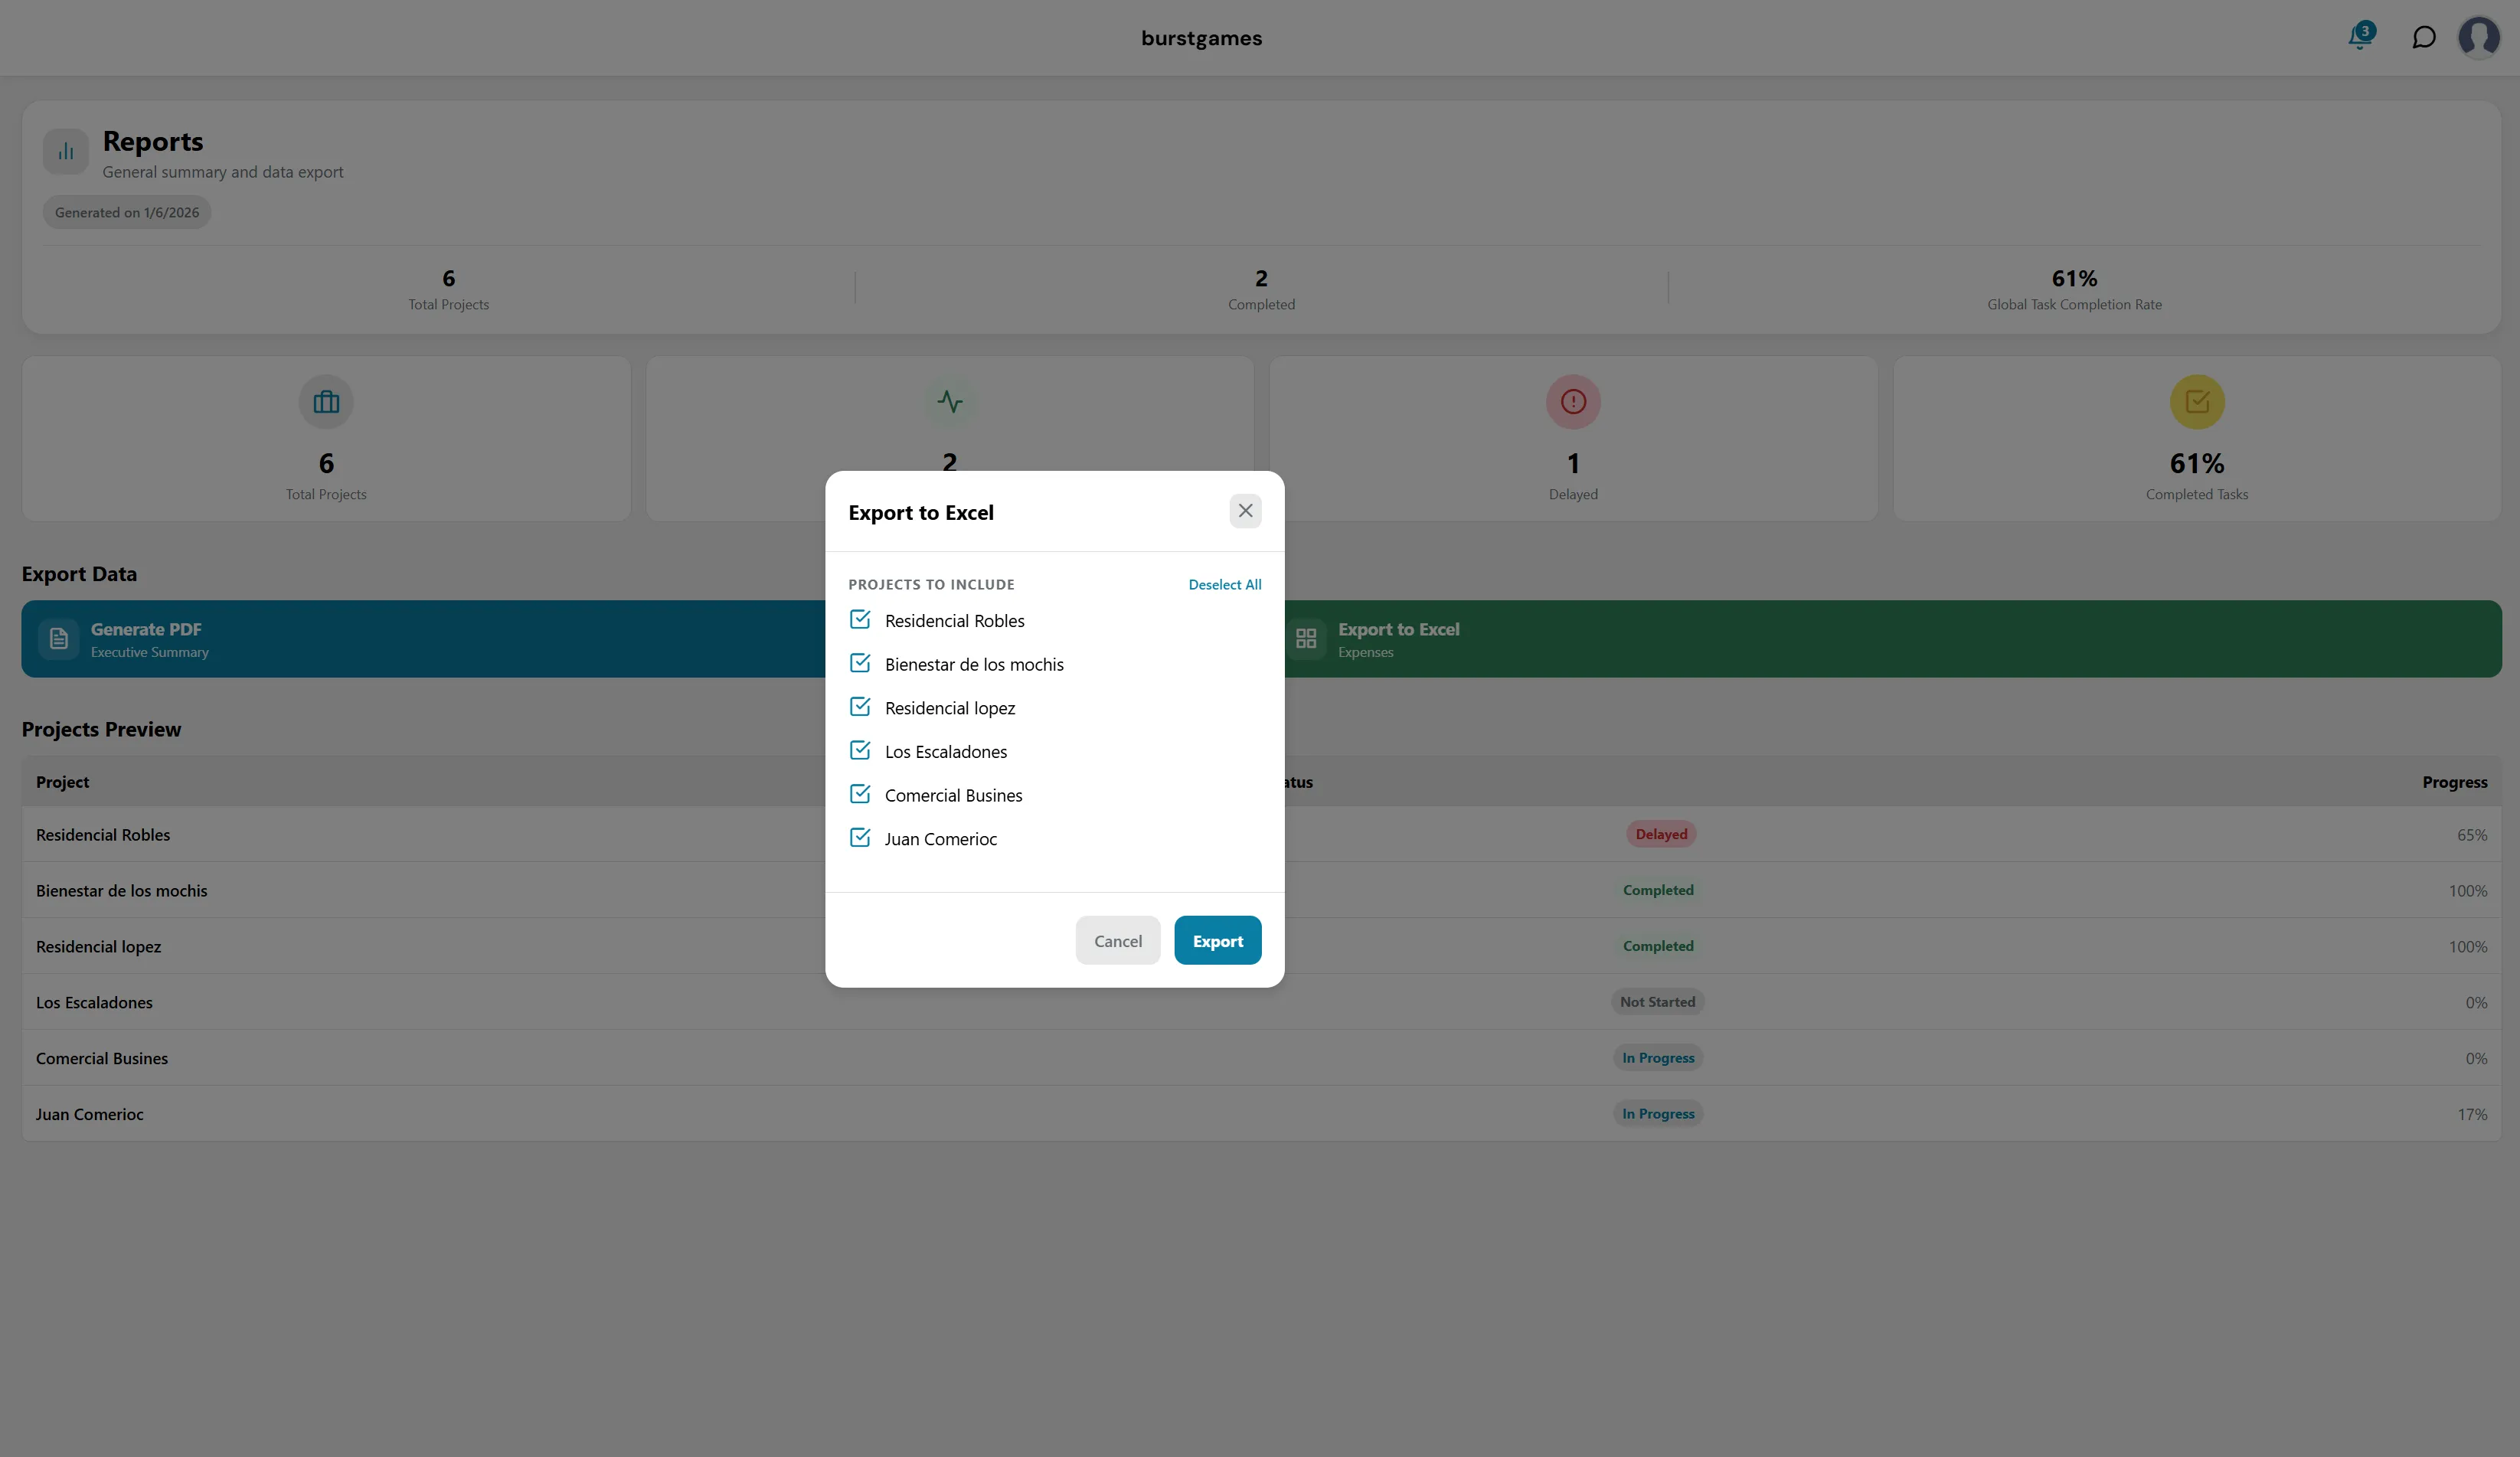
Data segmentation for Excel export.
- Export to Excel Button: Located on the green horizontal bar of the main screen.
- Data Segmentation Window: When triggered, it displays the interactive "Export to Excel" modal. This panel allows the operator to individually check or uncheck which portfolio projects will be indexed in the downloadable database, allowing selective or massive extraction with a single click on the "Export" confirmation button.
12. Module: Notifications
The Notifications center is the component responsible for keeping users informed in real-time about critical events, status changes, and assignments within the platform. This space centralizes system alerts to ensure that the operational and administrative team responds quickly to the needs of each site.
The interface is designed with the following interaction and reading elements:
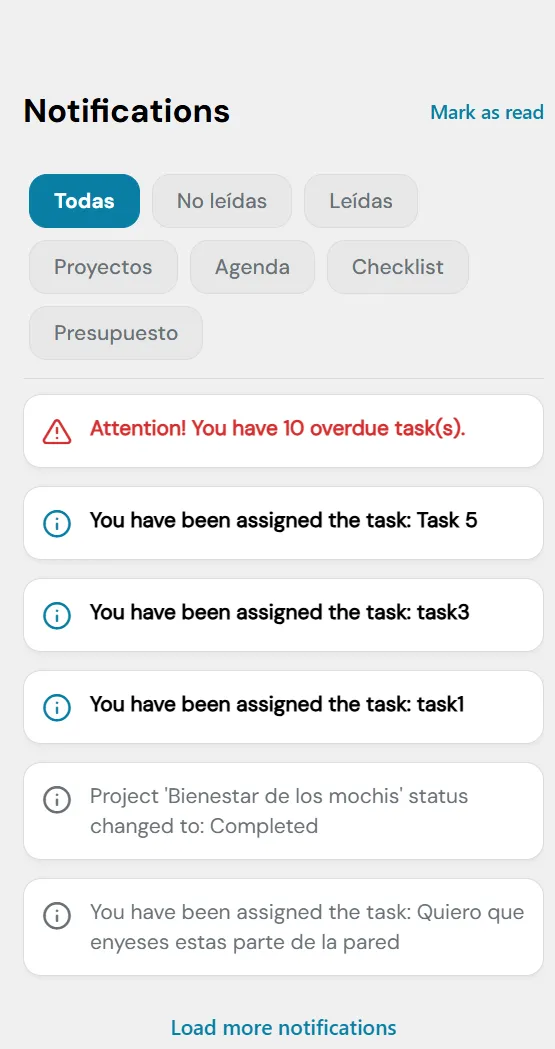
View of the Notifications Center and its alerts.
1. Header and Global Action
- Section Title: Identified in the upper left as "Notifications".
- Mark as read: A quick link in the upper right corner that visually clears the pending alerts indicator, changing the status of all current notifications to "Read" with a single click.
2. Advanced Segmentation Filters
Just below the title, a filter button bar is integrated to isolate alerts by their read status or originating module:
- Read Status Filters:
- All: (Default active filter in blue) Shows the complete alert history.
- Unread: Isolates only the novelties that require the user's primary attention.
- Read: Displays the historical record of already reviewed notifications.
- Category Filters (Modules): Allows filtering messages according to the nature of the event to streamline the workflow:
- Projects: Alerts about additions, removals, or structural changes in the sites.
- Agenda: Reminders of upcoming events, meetings, or expiring milestones.
- Checklist: Notifications strictly linked to assigned tasks, comments, or field logs.
- Budget: Financial notices, readjustment alerts, or high expense records.
3. Integrated Alerts List (Notification Feed)
The main body presents the notices chronologically in independent blocks. Each card uses an icon code to identify the urgency of the message:
- Critical Attention Alerts: (Red Warning Triangle Icon) Designed to notify severe delays or anomalies that impact the schedule (e.g. "Attention! You have 10 overdue task(s).").
- Direct Assignment Alerts: (Blue Info Icon) Automated messages that notify the user when they have been appointed responsible for a new activity in the system (e.g. "You have been assigned the task: Task 5").
- System Informational Alerts: (Gray Info Icon) Institutional notices about the life cycle of work fronts or detailed descriptions of field activities (e.g. "Project 'Bienestar de los mochis' status changed to: Completed").
4. Dynamic Pagination Control
- "Load more notifications" Link: Located at the central base of the screen, this control allows the user to expand the alert feed downwards to audit or review an older history of interactions without needing to completely reload the page.
13. Module: Internal Chat (Messaging System)
The Internal Chat system is the instant communication and interaction tool integrated into the platform. Its objective is to centralize work team conversations directly in the system, allowing the coordination of site activities, resolving checklist doubts, and keeping a log of agreements without needing external messaging apps.
The interface is divided into two main sections:
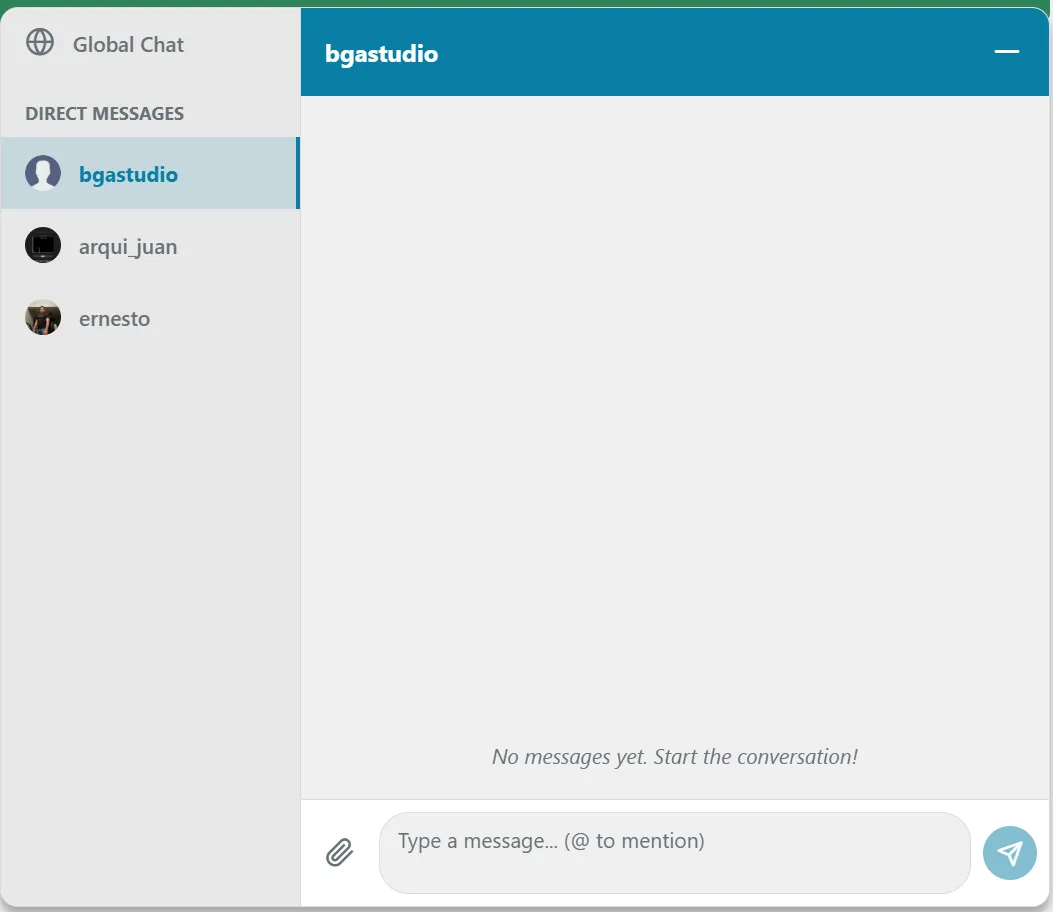
View of the messaging system and internal chat channels.
1. Channels and Contacts Panel (Left Sidebar)
This panel organizes the different communication environments available to the user:
- Global Chat: Located at the top with a globe icon, it functions as the organization's general channel. It is an open space where all team members can send massive notices, global alerts, or institutional announcements.
- DIRECT MESSAGES Section: Vertically lists individual and private chats with different company collaborators. Each contact is shown with their respective profile picture or avatar and account identifier (e.g. the currently selected chat is bgstudio, followed in the list by other team members like arqui_juan and ernesto).
2. Active Conversation Window (Central Chat Area)
It is the dynamic space where the interactions of the selected contact or channel take place:
- Chat Header: A top blue strip that confirms the name of the user or channel being interacted with (e.g. bgstudio) along with a dash button (−) on the far right to minimize or collapse the floating messaging window.
- Message History: The central body of the container renders the conversation chronologically. When a chat is completely new or the history has been cleared, the system shows the informative assistance text: "No messages yet. Start the conversation!".
- Text Entry and Tools Bar (Chat Footer): Located at the base, it contains the controls to write and enrich messages:
- Clip Icon: Dedicated button to directly attach files, evidence images, text documents, or technical blueprints to the conversation.
- Interactive Text Box (Type a message...): Free entry field where the message is drafted. It features native support for integrated mentions; typing the @ symbol followed by a user's name deploys a quick menu to tag a team member directly and send them a priority alert.
- Send Button (Paper Plane Icon): Circular blue control located in the lower right corner that processes and instantly transmits the drafted message to the recipient.
14. Module: Profile Settings
The Profile Settings panel is the space where users can manage their security credentials, adjust the application's visual preferences, review their account level status, and modify their digital identity information within the platform.
The interface is organized vertically into the following operational blocks:
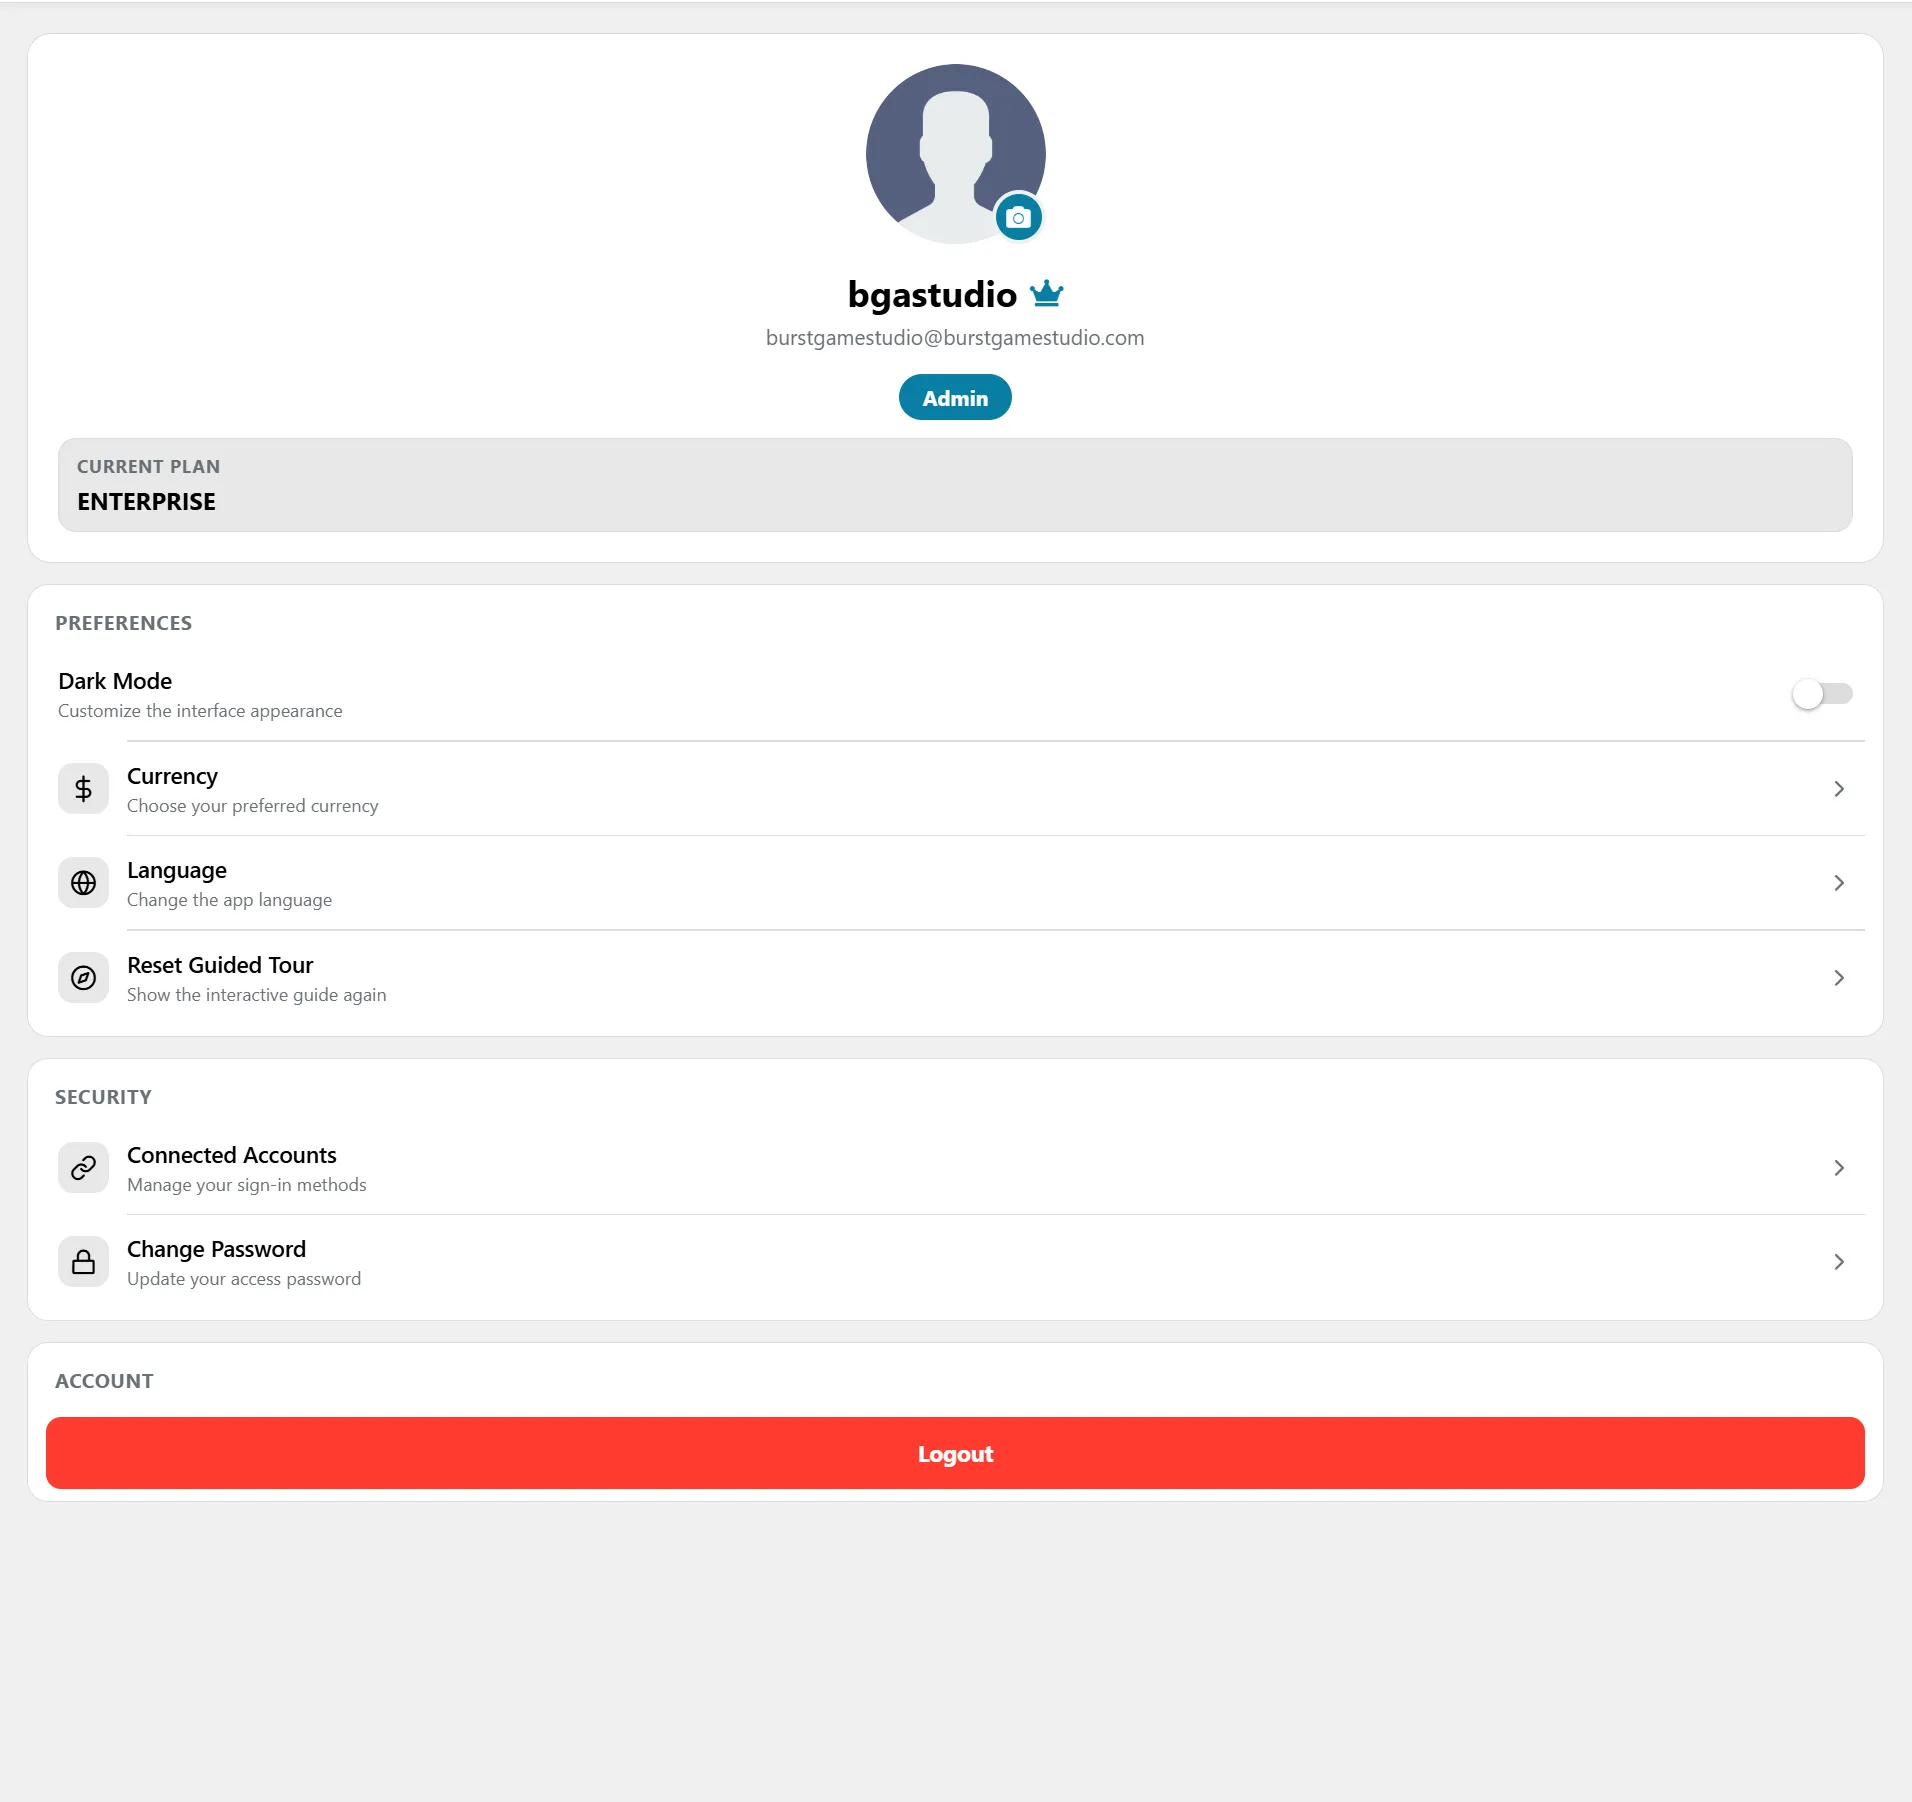
View of the user settings panel.
1. Identity Card and User Plan (Header)
Located at the top, it centralizes the general data of the active profile:
- Avatar and Profile Picture: A circular container with an overlapping camera icon that allows the user to click to upload or update their corporate photo.
- Username and Identifier: Shows the account name (bgstudio) accompanied by a blue crown icon that visually highlights the account type, followed by the official contact email (burstgamesstudio@burstgamesstudio.com).
- Role Tag: A solid blue button that ratifies the global permissions assigned to the current user (e.g. Admin).
- Subscription Status (Current Plan): A prominent container indicating the level of the active license held by the organization (e.g. ENTERPRISE).
2. Section: Preferences
Groups the customization options to adapt the visual and linguistic behavior of the workspace:
- Dark Mode: A toggle switch on the right that allows instantly switching the interface appearance between light and dark mode.
- Currency: Opens an interactive submenu to change the preferred currency with which costs and financial statements will be rendered in the Budgets and Inventory modules.
- Language: Gives access to the platform's translation options to change the default language of the application texts.
- Reset Guided Tour: Allows restarting the system's initial interactive tutorial, showing the introductory assistance guides for the work fronts again.
3. Section: Security
Concentrates data protection and account authentication tools:
- Connected Accounts: Interactive module to manage, link, or revoke third-party login methods (e.g. Google, GitHub accounts, or other identity providers).
- Change Password: A direct shortcut to the security wizard to update or reset the user's current access password securely.
4. Section: Account
- Logout Button: A prominent red horizontal bar at the bottom of the panel. It acts as the secure exit action to end the active session on the current device and return the user to the login screen.